The problem to solve was, a control surface with switches and LEDs that outputs just MIDI Note ON messages with a MIDI Note ON 127 when pressed and a MIDI Note ON 0 when released. The idea was to link this to song part selection and drive the LEDs on the control surface so I see when the change has occurred when using the foot switch or next button and to give me a fast way of selecting a song part if I double pressed or accidentally pressed the foot switch. It is also worth adding that, as a matter of course I like to use midi keyboards and control surfaces with factory default settings, it keeps all of the configuration in one place and when something does go wrong, there is only one setting to remember for everything, factory default.
On the surface this looked easy as I already had the MIDI feedback “Sync” working for motorised faders and my MMC controls. When I mapped a Button/LED widget to the input and selected Note On, this would light the LED of the widget but it didn’t go off when the button was released. This was tracked down to; GP converts MIDI Note ON 0 to MIDI Note OFF 0, so the widget only saw the MIDI Note ON message. For playing notes, this is not an issue for control surfaces it is. So I needed to convert the Note OFF to a note On message to drive the widget correctly. I checked that I could get a Note ON 0 out of GP even though the GP MIDI monitors show it as a Note OFF 0.
But, I could not loop this round to an input as the MIDI Note ON 0 would again be changed for a MIDI Note OFF 0. So converting the incoming Note ON and Note OFF messages to CC messages looked like a good solution.
So the plan was to use a scriptlet to convert the MIDI Note ON messages from the control surface to MIDI CC messages (including the modified Note ON 0 message). Use the CC messages to drive the widget and the Sync’d feedback CC messages converted with a scriptlet to MIDI Note ON messages to drive the LEDs. Other solutions are available, but this was fairly straight forward in the end.
I tested and describe this on windows but it does work on the MAC (as you do not need the RTP-MIDI, it is built in). First set up RPT-MIDI with two “virtual devices”. Do not attempt to use loopMIDI in place of RTP-MIDI as it only creates a virtual cable (half of what you need) See the update for loopMIDI / IAC solution.
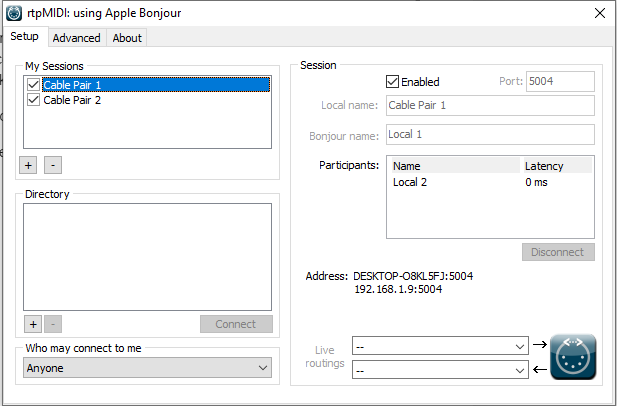
When you have the two set up, if you select either of them in MySessions you will see the second connection in the Directory, select and connect to this directory entry. You now have two full MIDI In/Out interfaces connected together. In GP you will have two MIDI interfaces available named Cable Pair 1 and Cable Pair 2.
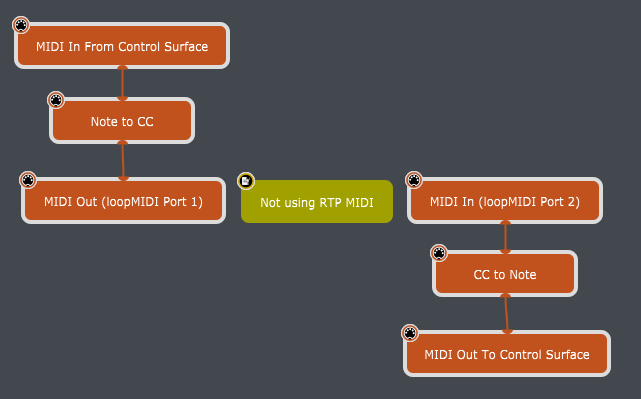
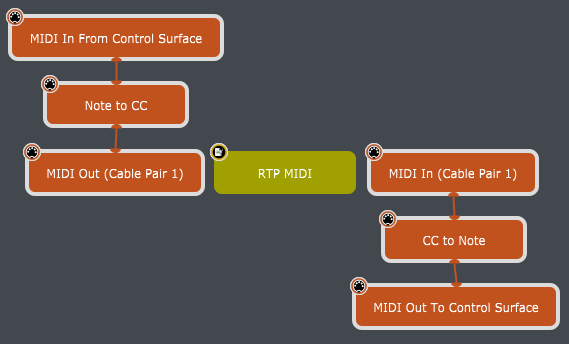
In the global rackspace I created the following wiring with two scriptlets one to convert the Note On/OFF messages to CC messages and a second to convert the CC messages to Note ON messages.
// Convert Notes to CC messages

On NoteOnEvent(m : NoteMessage)
    SendNow(MakeControlChangeMessage(GetNoteNumber(m), 127))
End

On NoteOffEvent(m : NoteMessage)
    SendNow(MakeControlChangeMessage(GetNoteNumber(m), 0))
End
// Convert CC Messages to Note ON
var c : integer // Channel Number

//Called when a CC message is received
On ControlChangeEvent(m : ControlChangeMessage)
    c = GetChannel(m)-1
    SendNow(MakeMidiMessage3(0x90+c, GetCCNumber(m), GetCCValue(m)))
End
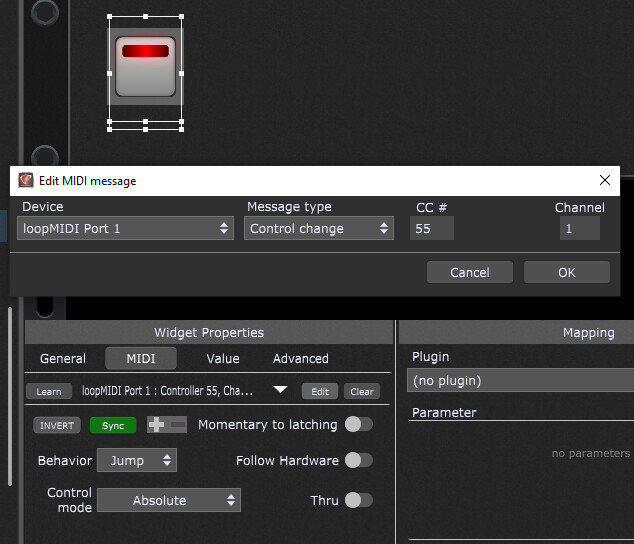
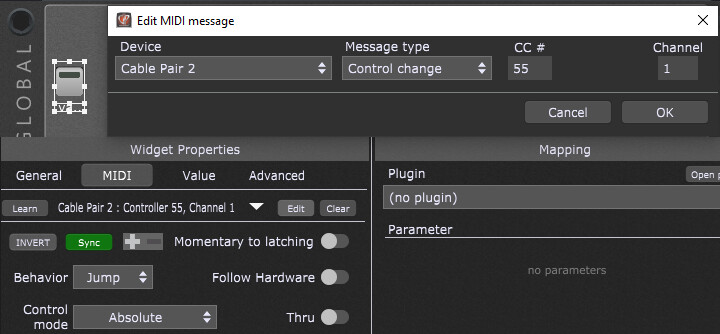
The last part of the puzzle was to include the widget with feedback, this was very straight forward. I have shown this in raw port and CC numbers, but you can now use Rig Manager to map the controls to sensible names.
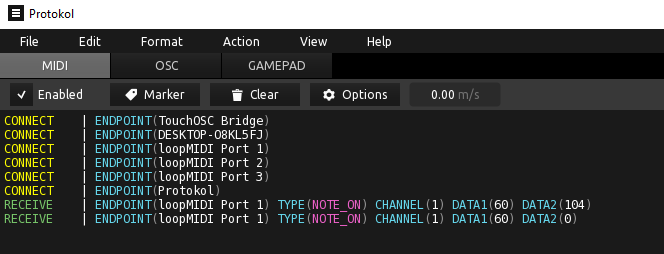
The final test is to look at the messages going back to the control surface.

I’m sure there are many other ways of cutting this cake, but the simplicity of the scriptlets and implicit MIDI port connections won out over managing this task within a larger script file.