Recently, I have experimented with connecting TouchOSC with GigPerformer. All of the example setups that I have seen here are using some kind of managed network (e.g. a WiFi router) for this. Since in my current rig, I have the iPad connected directly to the Mac via USB anyways, I figured that using this cable would be a great solution.
How I got it to work
Connect Mac and iPad via USB 2.
Open TouchOSC on the iPad.
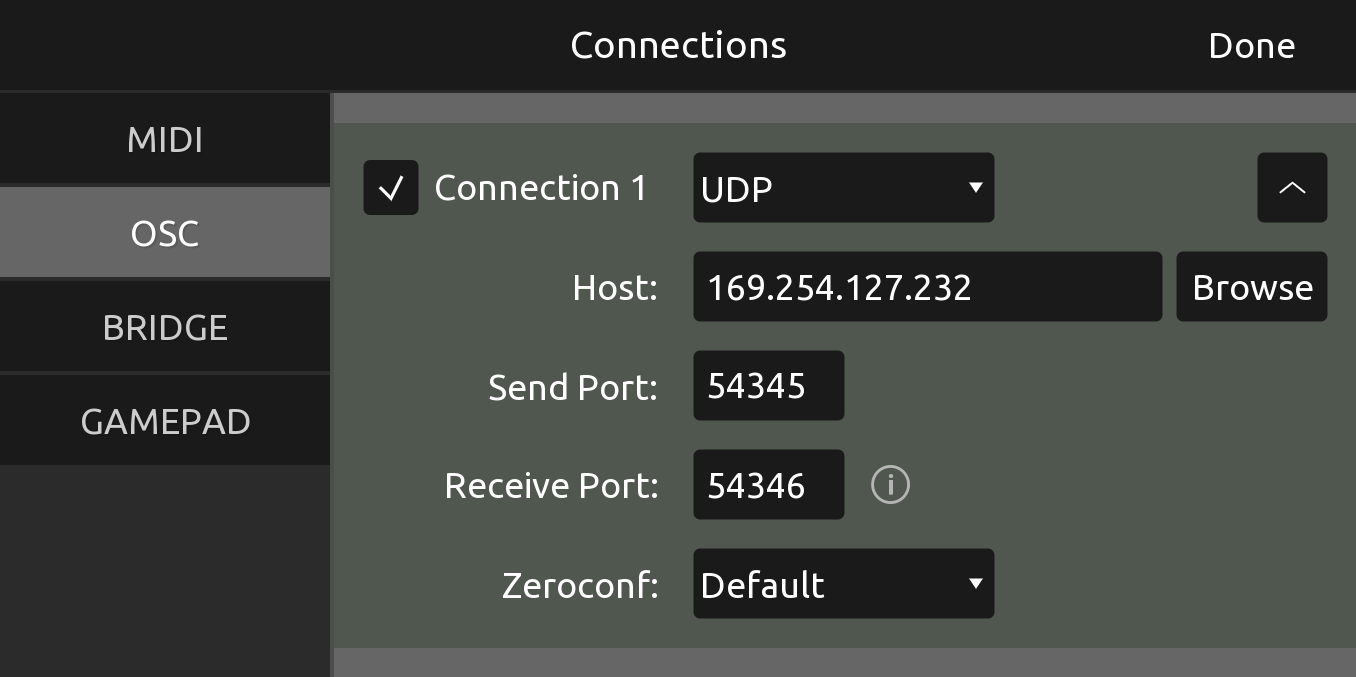
In the OSC section of the connections panel:
Choose UDP as connection type
Click on the Browse button on the Host line which finds my Mac and choose an appropriate IPv4 address.
Set the send port to Gig Performer’s listening port
Set the receive port to Gig Performer’s remote client port
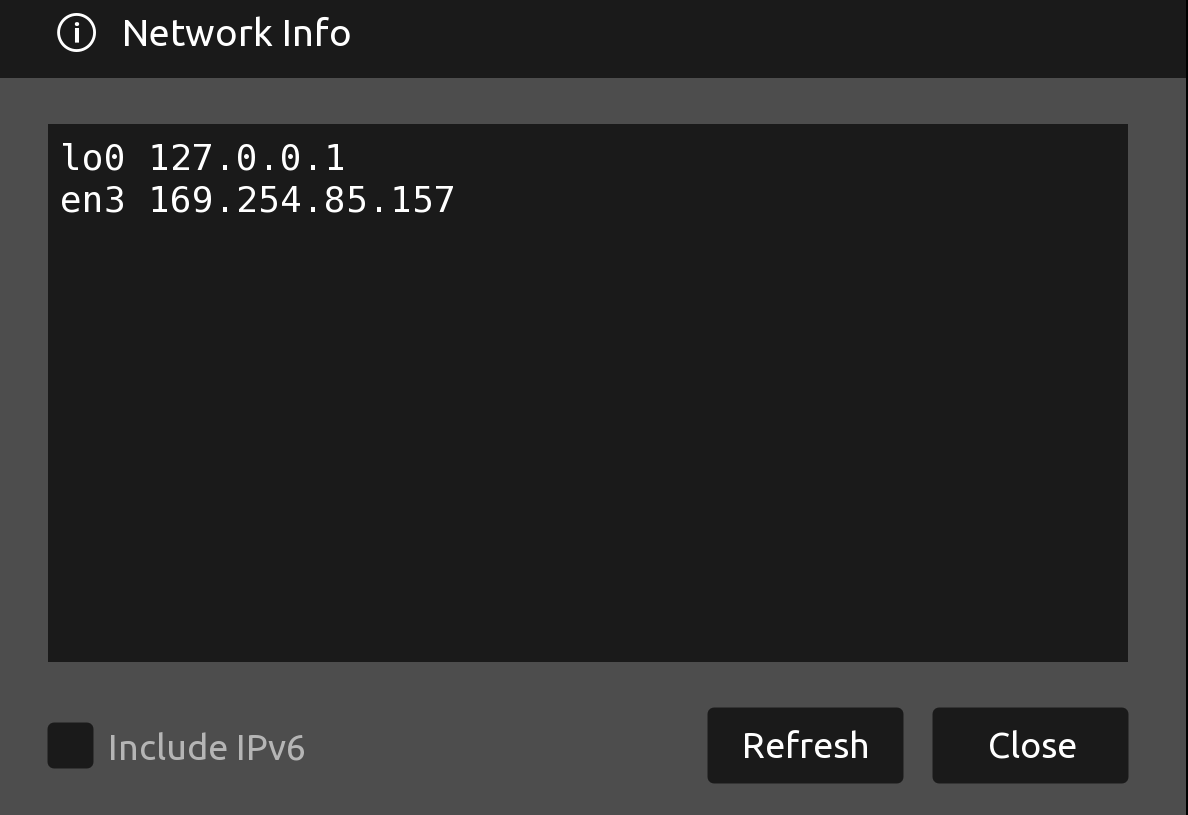
Click the little info symbol next to the receive port which opens the Network Info box, showing exactly two IPv4 addresses:
127.0.0.1 is localhost. I cannot use that to talk to any other device.
169.254.85.157 is a link-local address which works for reaching the Mac (since it is on the same subnet as the IP of the Mac that I selected on the Host line)
It is difficult to set up initially (I figure I would have failed at this or at least needed a lot more time if I did not have a working knowledge of IP networks).
The link-local addresses change every time I reconnect the two devices, so I have to find and enter the IP addresses both on the TouchOSC and Gig Performer side every time I reconnect the devices
Do you have any ideas?
The first problem can be addressed by writing a tutorial, maybe I’ll do that when I am satisfied with the process. (Or is there already some guide for this which I did not find - maybe @npudar knows something here?)
The second problem comes down to the need for IP addresses that do not change. I can see multiple approaches here:
Define static IPv4 addresses for both Mac and iPad (specifically the network adapters corresponding to this specific USB connection). But how would that work? I don’t know and don’t find any guides about this.
Use IPv6 link-local addresses: These are great because you always get a link-local address which corresponds to your network adapter’s MAC address (e.g. fe80::f200:0aff:febb:28fc%en3) and since the network adapters (including there addresses and names) are stable on both the iPad and the Mac side, I could use those. TouchOSC in fact already supports that, but Gig Performer does not
Just use a “regular” network connection, such as a home router with an integrated DHCP server. I would like to avoid that since that’s more hardware to carry and maintain.
Do you have any other ideas and thoughts on this topic?
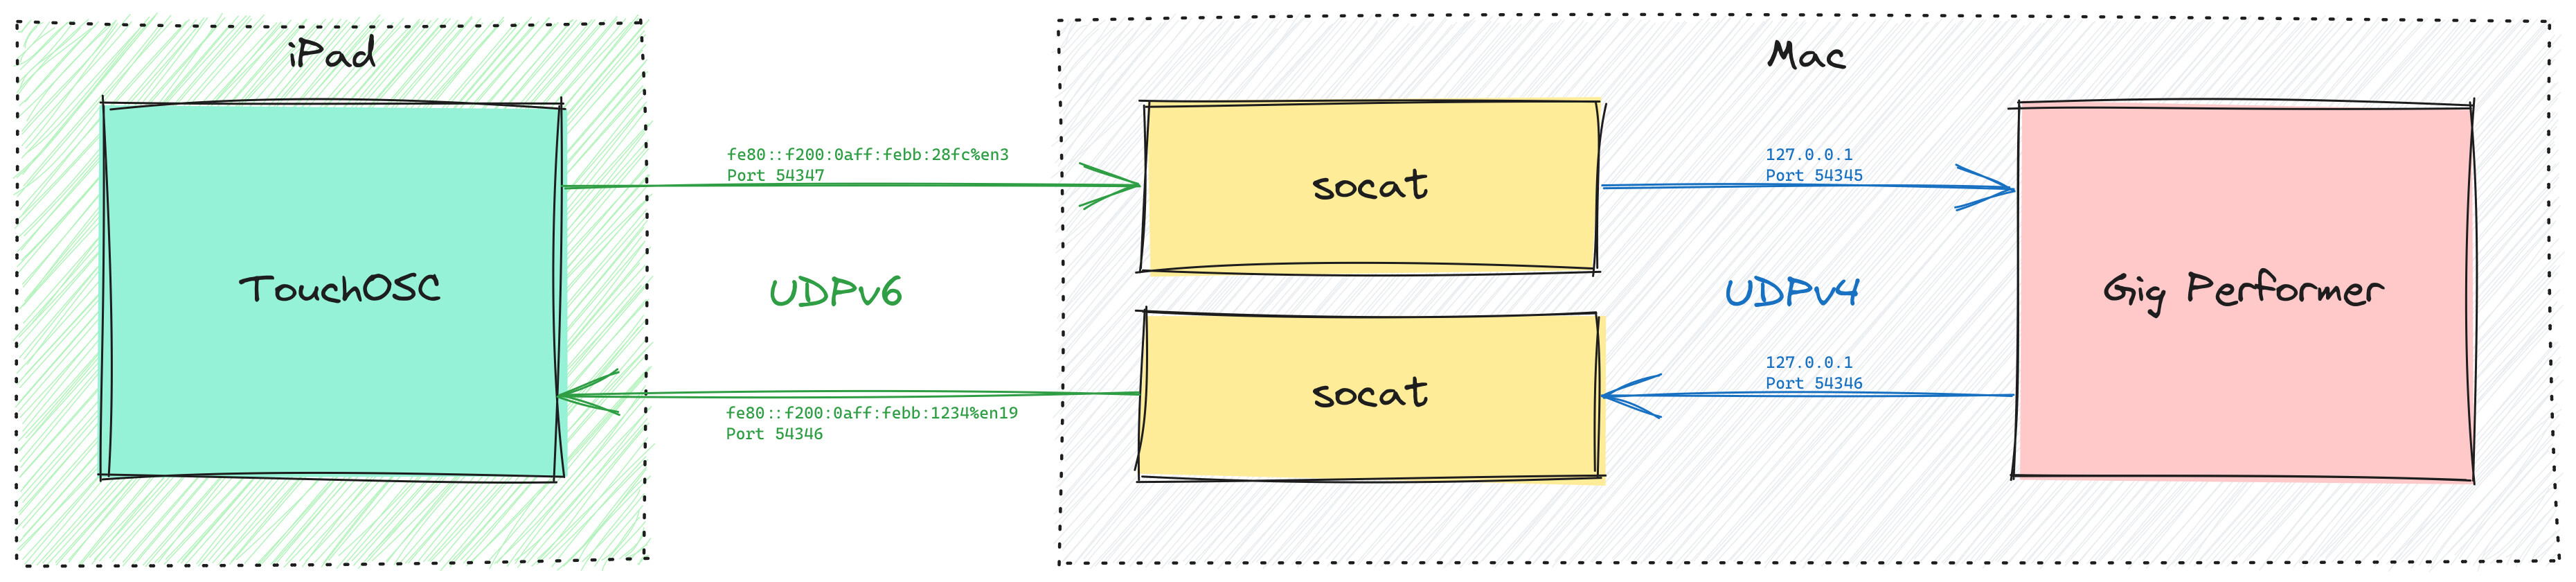
I came up with a way for using IPv6 link-local addresses between: I am setting bidirectional forwarding of UDP packets via socat on the Mac: Packets arriving on a given UDP6 port (i.e. the ones from TouchOSC on the iPad) are forwarded to a UDP4 port on localhost (where Gig Performer can receive them) and Packets arriving on another UDP4 port on localhost (i.e. the ones from Gig Performer) are forwarded to the link-local address of the iPad via UDP6 (so that TouchOSC can receive them):
iPad: fe80::f200:0aff:febb:1234, connected to the network adapter en19 on the Mac
Mac: fe80::f200:0aff:febb:28fc, connected to the network adapter en3 on the iPad
I would…
… in TouchOSC:
connect to host fe80::f200:0aff:febb:28fc%en3
set send port 54347
set receive port 54346
forward via socat:
[::1]:54347 to 127.0.0.1:54345 (TouchOSC → Gig Performer)
127.0.0.1:54346 to [fe80::f200:0aff:febb:1234%en19]:54346 (Gig Performer → TouchOSC)
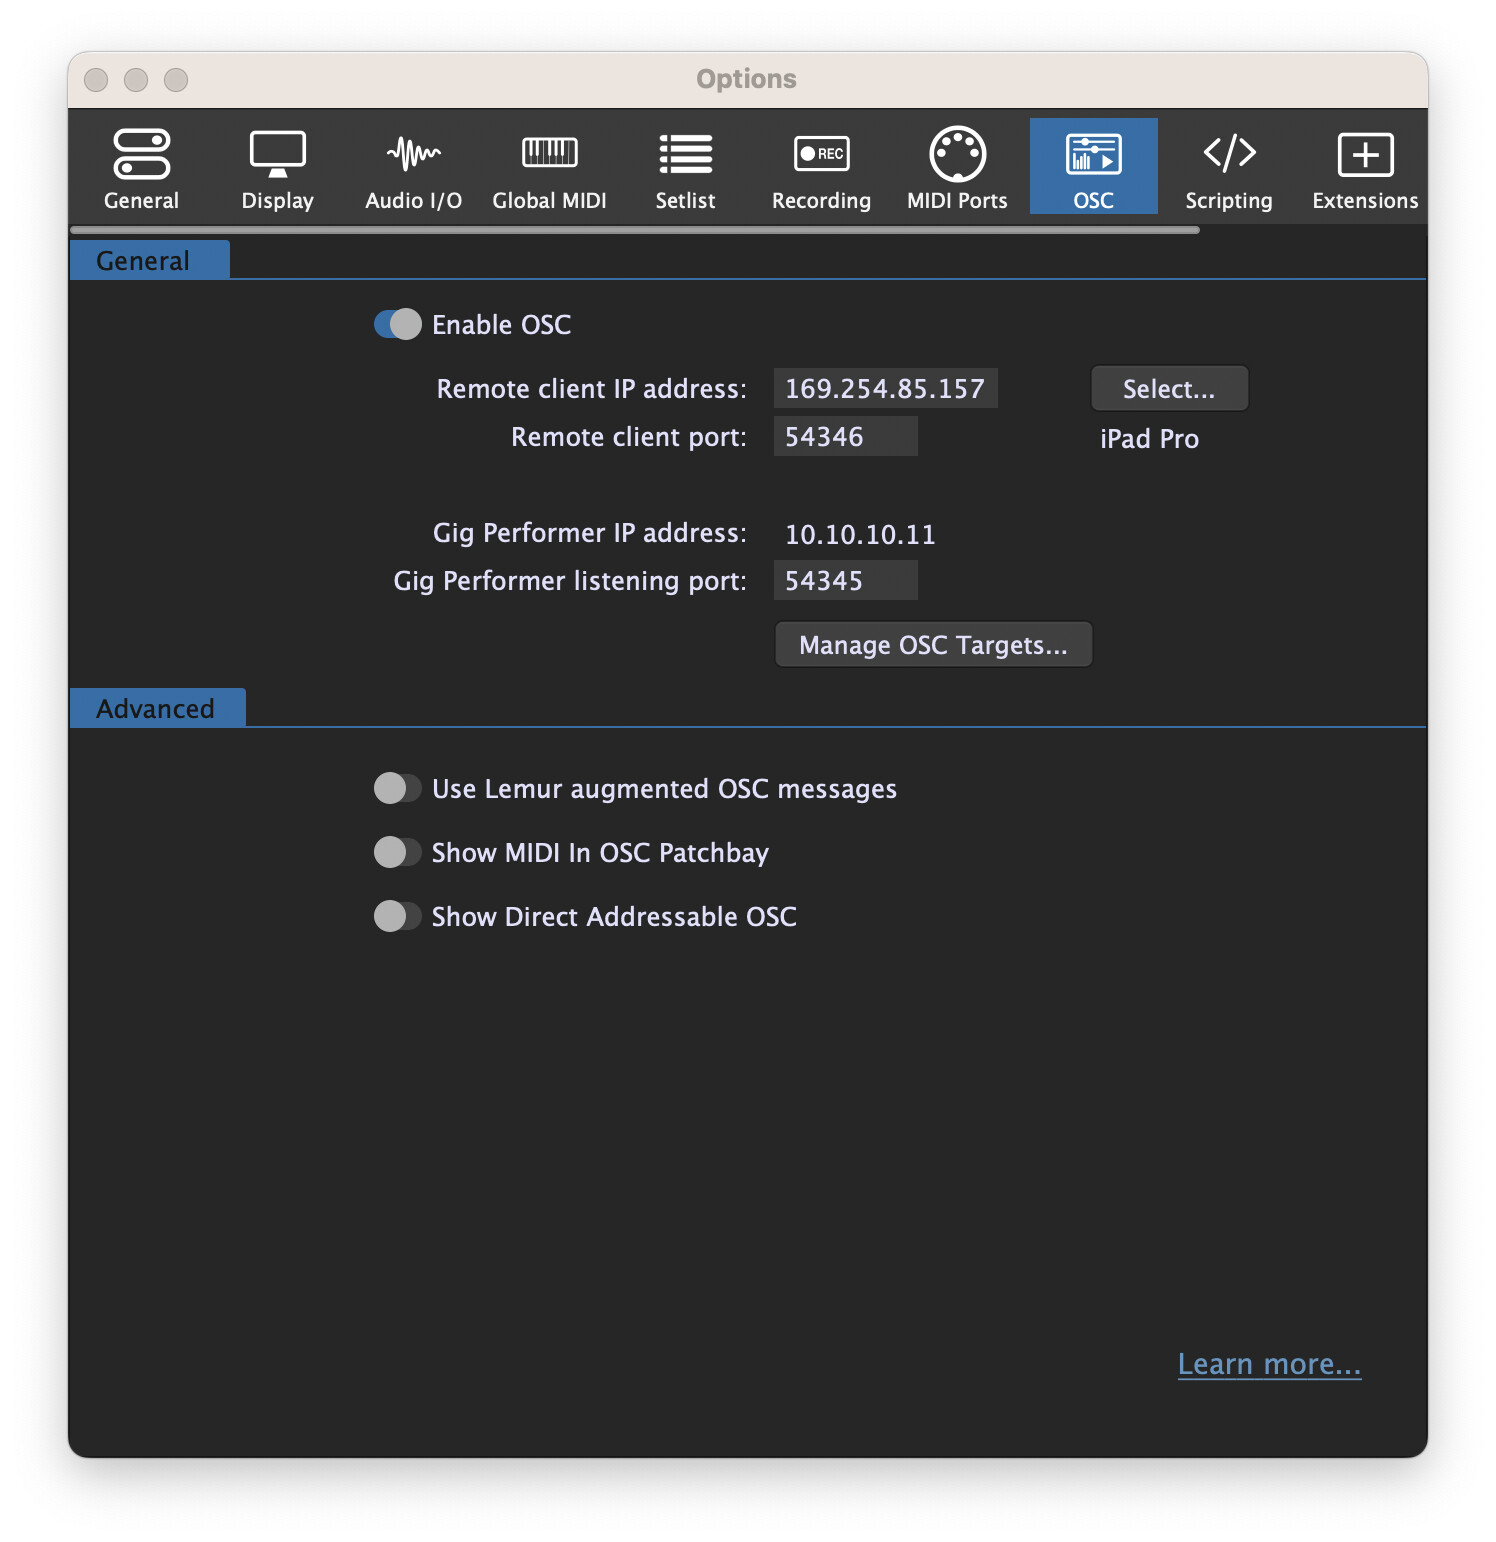
… in Gig Performer:
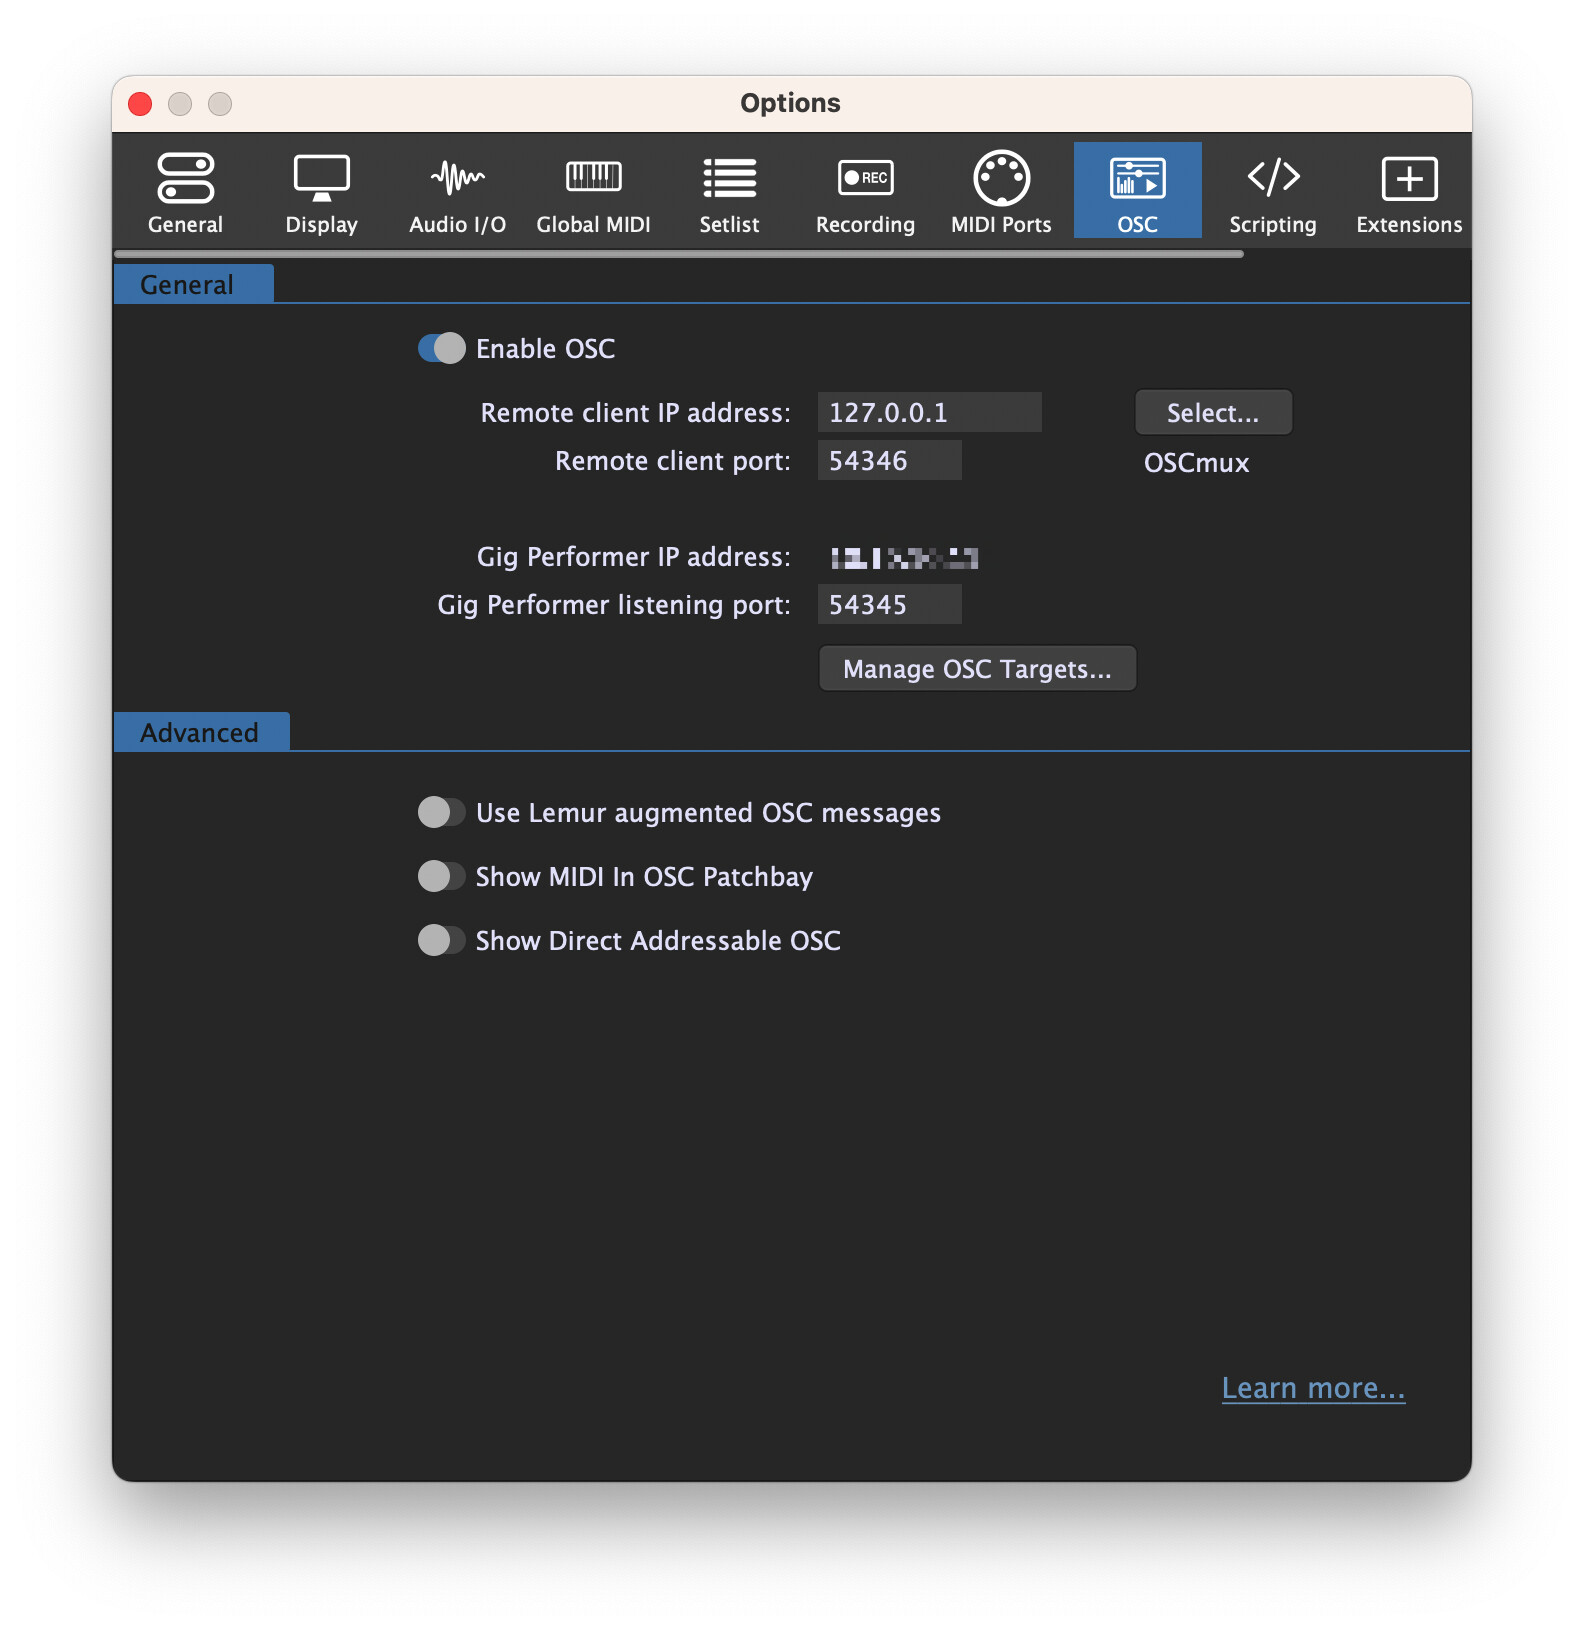
connect to remote client 127.0.0.1
with remote client port 54346
listening on 54345
For convenience, I made a small shell script to start socat:
#!/bin/sh

# Set up a UDP proxy between a local IPv4-only application and an IPv6-only remote.

set -eu

LOCAL_PORT_RX=54345
LOCAL_PORT_TX=54346

PARTNER_IP="fe80::f200:0aff:febb:28fc%en3"  # IP address of the iPad
PARTNER_PORT_RX=$LOCAL_PORT_TX
PARTNER_PORT_TX=54347 # We bind to this port. If this is the same as LOCAL_PORT_RX, there might be conflicts.

echo "127.0.0.1:$LOCAL_PORT_TX -> [$PARTNER_IP]:$PARTNER_PORT_RX"
socat UDP4-RECV:$LOCAL_PORT_TX,reuseaddr "UDP-SENDTO:[$PARTNER_IP]:$PARTNER_PORT_RX" &

echo "[::1]:$PARTNER_PORT_TX -> 127.0.0.1:$LOCAL_PORT_RX"
socat UDP6-RECV:$PARTNER_PORT_TX,reuseaddr "UDP-SENDTO:127.0.0.1:$LOCAL_PORT_RX" &

wait
It’s still not perfect (but better than the previous approach)
Now, we can safely detach and reattach the USB cable - OSC communication will resume automatically after reattaching the cable
Sometimes after rebooting the devices, they will pick a new MAC address and thus a new link-local IPv6 address, so after doing that you will need to tell both TouchOSC and the socat proxy the respective new addresses
In general, this setup is rather involved but for my use case (taking into account my rig, my taste and openness for network nerdery) it seems to be the best approach I can think of right now.
IMO, most people are likely better off using a router for this kind of stuff. It will require significantly less network nerdery
Playing around with this today, I found that only the address on the TouchOSC side needed to be changed. The remote client IP for the iPad that I set up in Gig Performer didn’t change.
But I often had struggles with TouchOSC ‘searching’ and finding the MacBook Pro. It seemed that opening the TouchOSC app or Protokol app on my Mac allowed the iPad TouchOSC to instantly ‘find’ my MacBook Pro. I assume this is the ‘Zeroconf’ feature that is advertising the ip/port from the MacBook.
Because the address entered in GP was stable, it meant that GP could always send data to the iPad (updating TouchOSC). It was only the other direction (TouchOSC to GP) that didn’t work and required me to update the host address within TouchOSC.
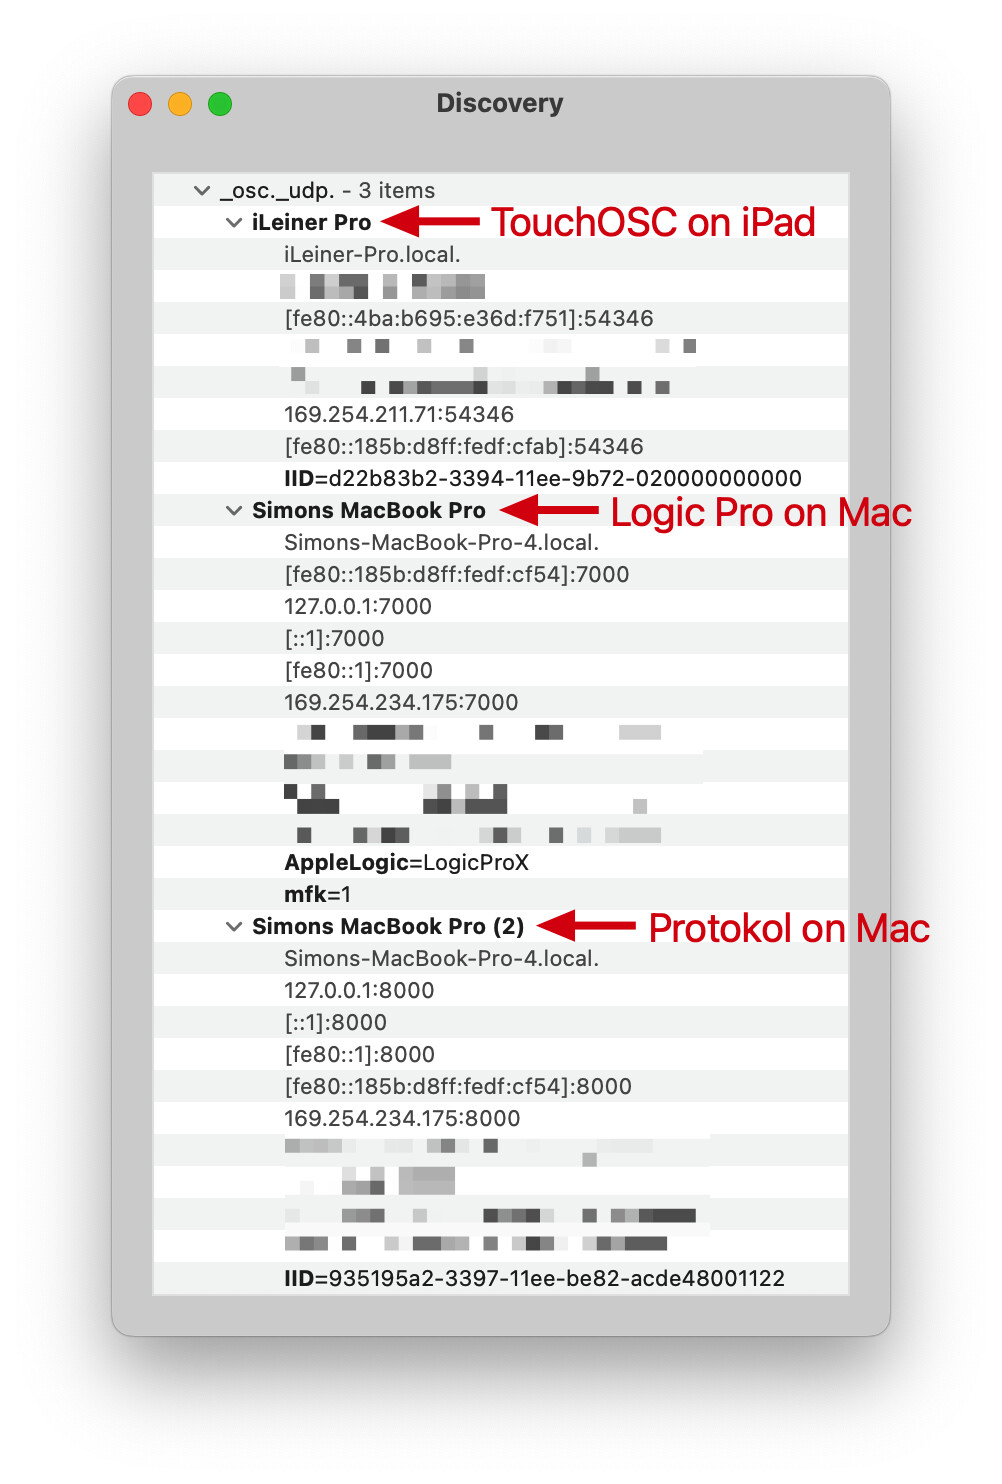
This gave me an idea: Instead of juggling IP addresses, the devices get assigned names via Bonjour. You can check this either on the command line via dns-sd or using a nice GUI like Discovery.app:
Critically, you can see domain names here: My iPad is iLeiner-Pro.local and my Mac is Simons-MacBook-Pro-4.local. So we can use these domain names instead of hardcoding IP addresses. I have modified my script to do so.
The modified script (a.k.a. OSCmux)
#!/bin/bash

# oscmux: Set up a UDP packet proxy between a local IPv4-only application and a
# partner on the network.
# (c) 2023 Simon Leiner, licensed under the MIT license

set -eu

PARTNER_HOST="iLeiner-Pro.local"
PARTNER_PORT_RX=54346
PARTNER_PORT_TX=54347 # We bind to this port. If this is the same as
#                       LOCAL_PORT_RX, there might be conflicts.

LOCAL_PORT_RX=54345
LOCAL_PORT_TX=$PARTNER_PORT_RX

################################################################################
# Helper functions

function log_prefix() {
    name=$1

    expr=$(printf 's/^/%-6s |> /' "$name")
    sed -u -e "$expr"
}

function resolve_partner_ip() {
    name=$1

    cache_results=$(dscacheutil -q host -a name "$name")
    ip_address_line=$(echo "$cache_results" | grep -e "ipv6_address:" -e "ip_address:" | head -n 1)
    ip_address=$(echo "$ip_address_line" | awk -F ': ' '{print $2}')

    if echo "$ip_address_line" | grep -e "^ipv6" >/dev/null; then
        ip_version=6
        ip_address_wrapped="[$ip_address]"
    else
        ip_version=4
        ip_address_wrapped="$ip_address"
    fi

    echo "$ip_address;$ip_address_wrapped;$ip_version"
}

function ping_ip() {
    ip_version=$1
    shift

    if [ "$ip_version" -eq 6 ]; then
        ping6 "$@"
    else
        ping "$@"
    fi
}

################################################################################
# Proxy setup

# Ensure that all child processes are terminated when the script terminates
trap "echo && echo && echo '🛑 Shutting down...' && trap - SIGTERM && kill -- -$$" SIGINT SIGTERM EXIT

# Resolve hostname
IFS=";" read PARTNER_IP PARTNER_IP_WRAPPED PARTNER_IP_VERSION < <(resolve_partner_ip $PARTNER_HOST)
echo "✅ Found partner $PARTNER_HOST on IPv$PARTNER_IP_VERSION address $PARTNER_IP"

# Check connection initially
if ping_ip "$PARTNER_IP_VERSION" "$PARTNER_IP" -c 1 >/dev/null; then
    echo "✅ Confirmed a connection to $PARTNER_IP via ping"
else
    echo "❌ Failed to ping $PARTNER_IP" >/dev/stderr
    exit 1
fi

echo ""

echo "➡️  Forwarding 127.0.0.1:$LOCAL_PORT_TX -> $PARTNER_IP_WRAPPED:$PARTNER_PORT_RX..."
socat -d -s UDP-RECV:$LOCAL_PORT_TX,reuseaddr "UDP-SENDTO:$PARTNER_IP_WRAPPED:$PARTNER_PORT_RX" &

echo "➡️  Forwarding *:$PARTNER_PORT_TX -> 127.0.0.1:$LOCAL_PORT_RX..."
socat -d -s UDP-RECV:$PARTNER_PORT_TX,reuseaddr "UDP-SENDTO:127.0.0.1:$LOCAL_PORT_RX" &

echo "➡️  Advertising OSCmux via Bonjour"
dns-sd -R OSCmux _osc._udp . $PARTNER_PORT_TX | log_prefix "dns-sd" &

################################################################################
# Regular operation

sleep 1 # not strictly needed, but it improves log layout since after the delay,
#         dns-sd should have written all its output
echo "➡️  Continuously pinging partner to show connection status..."
ping_ip "$PARTNER_IP_VERSION" "$PARTNER_IP" | awk '(NR>1); fflush()' | log_prefix "ping"
Summary of the setup
The principle has not changed very much: It’s just no hardcoded IP addresses anymore (except for 127.0.0.1, fine) and the UDP communication between socat/OSCmux and iPad may use either IPv4 or IPv6.
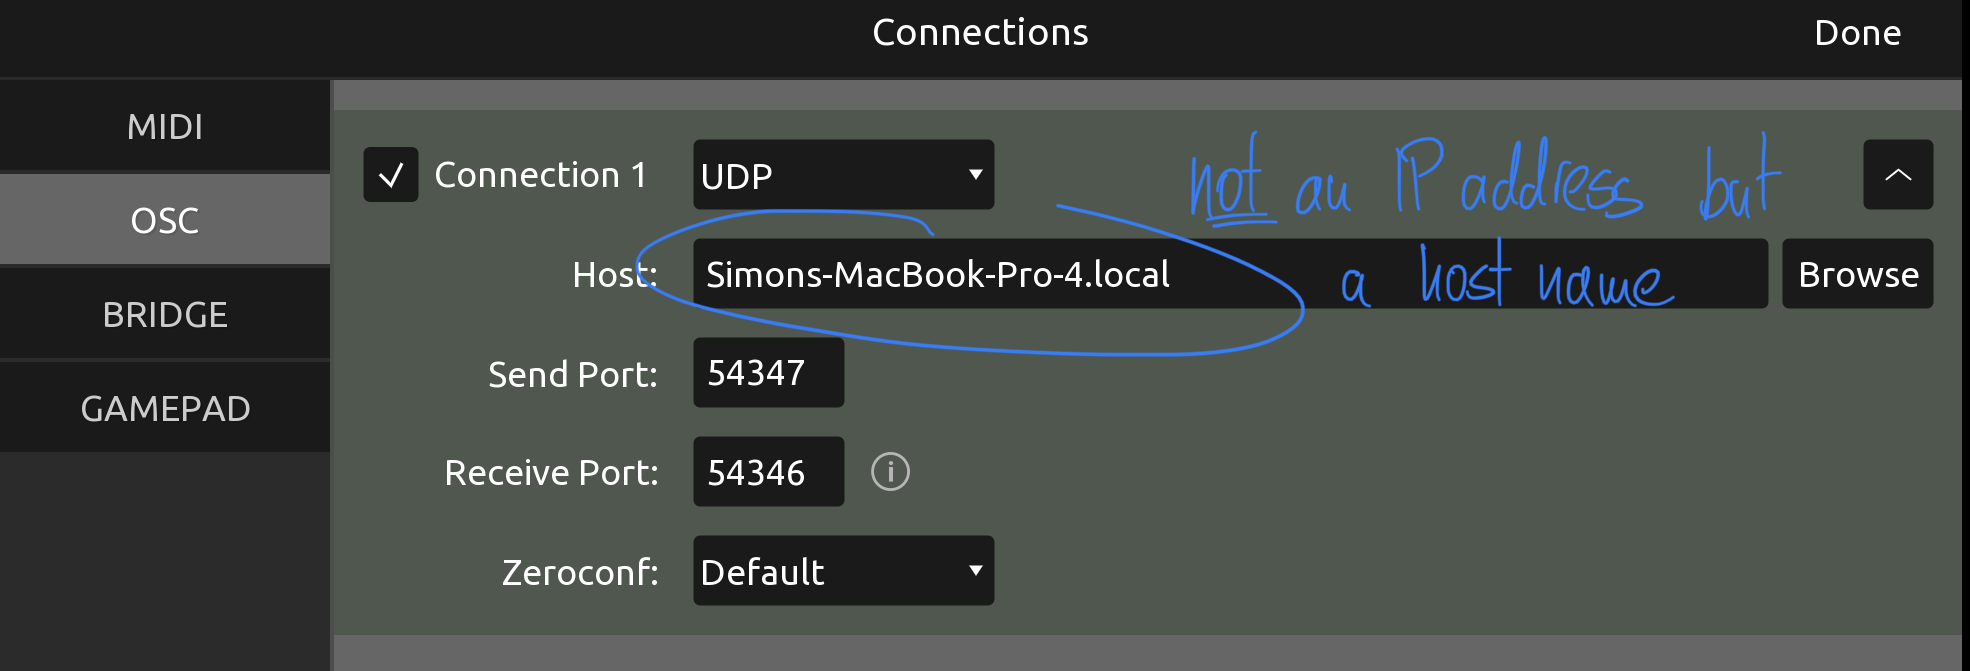
Note that the Host value is not an IP address, but a host name. You will not get this through the Browse button, so you will need to enter this manually through the keyboard.
Notably, this will work over any connection (be it your home WiFi, another stage WiFi, a direct USB connection). Any network connection works (so long as it does not suppress Bonjour).
You do not need to modify these settings after reboots any more (but you do if you rename your devices).
In my testing so far, it was really stable.
It’s still not perfect though
Both iPad (i.e. TouchOSC) and Mac (i.e. OSCmux) look up the other side’s IP address on application start. If it changes (e.g. because you disconnect your Home WiFi and connect via USB instead - or even getting a different DHCP lease for some reason), you need to restart both. Apple’s framework are actually able to give an application “push updates” about the IPs under which a device is available, but TouchOSC does not use it, so OSCmux doesn’t either (that would also be the point where I would strongly consider using a “real” programming language instead of shell scripting).