The article How to set up live streaming using OBS, Gig Performer and Jack router describes how to use Jack to bypass the limitations of single-client ASIO drivers.
This guide explains how to use Jack like a Virtual Audio Cable, especially with multiple instances of Gig Performer.
The issue
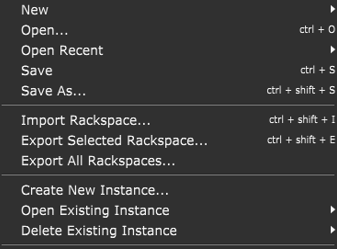
Gig Performer can launch multiple instances with each their own settings. Creating a new instance can be done from a ‘main’ instance by choosing Create New Instance….
After filling out the name of the new instance, it can be started using Open Existing Instance, or from the command-line by passing -in=<Instance name>, for example:
GigPerformer4.exe -in=test1
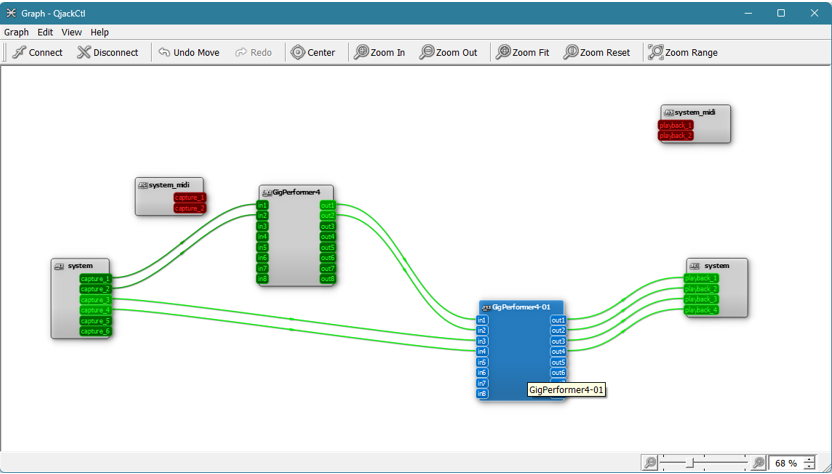
Refer to this blog article for more information. This way multiple instances can work in parallel. With Jack it is possible to make routes between the instances of Gig Performer:
However, there are some issues:
- Jack crashes when a MIDI message arrives.
- By default, the number of inputs and outputs of a Jack-ASIO client is 4 of each.
- By default, when a Jack-ASIO client starts all inputs and outputs are connected to the system-capture_x and system-playback_x ports.
- A way of persisting the routing setup is needed.
- When the routing setup is persisted, Jack has no way to tell the multiple instances of Gig Performer apart.
The good news is that all these issues can be addressed.
Jack crashes when a MIDI message arrives (issue #1)
I ran into this issue in my configuration. I mitigated it by removing the MIDI support from the Jack configuration, because I want Gig Performer to handle all MIDI anyway.
- In QjackCtl click Setup…
- On the Settings tab, select the right preset you want to adjust.
- On the Settings tab, click Advanced.
- Remove the argument -X winmme from the Server Prefix field.
- Click Save to update the preset.
- Click Apply
This is how it looks like with my configuration:
The number of inputs and outputs of a Jack-ASIO client is 4 of each (issue 2)
This one is the easiest to change.
- Start Notepad with Run as administrator.
- Open JackRouter.ini. By default, it is stored in the folder C:\Program Files\JACK2\jack-router\win64
- In the section [IO], change input= and/or output=. to i.e. input=8 and/or output=8
- Optional: In the section [AUTO_CONNECT] you can change input=1 to input=0 and likewise output=1 to output=0. This will take care of the first issue: all inputs and/or outputs of a new client will start disconnected, but with some loss of flexibility: it is applied to all Jack presets. Another way to have the clients start disconnected is described in the next part of this guide.
- Save the file.
Next time you start QjackCtl, when a Jack-ASIO client starts, it will have the specified numbers of inputs and outputs, and, if you chose to do that, it will start up with no inputs and/or outputs connected.
When a Jack-ASIO client starts all inputs and outputs are connected (issue 3)
Out of the box, every client registering with Jack, i.e., by using the Jack ASIO driver, it has all inputs and outputs connected to the hardware outputs and inputs. The drawback of this is that all ways of recalling setups as offered by QjackCtl are merged with the currently existing connections. When making an advanced setup, this might be not desirable. This can be mitigated by editing the JackRouter.ini as described in the previous part, but that means that auto connect can never occur, also when multiple presets are created using QjackCtl. You might deliberately want to have a preset for mitigating the single ASIO client driver problem, where you do want to have all Jack-ASIO clients auto-connect to all available inputs and outputs. Luckily, there is also an option per preset in the setup dialog, so you can have preset with auto-connect and without:
- In QjackCtl click Setup…
- On the Settings tab, select the right preset you want to adjust.
- On the Settings tab, click Advanced.
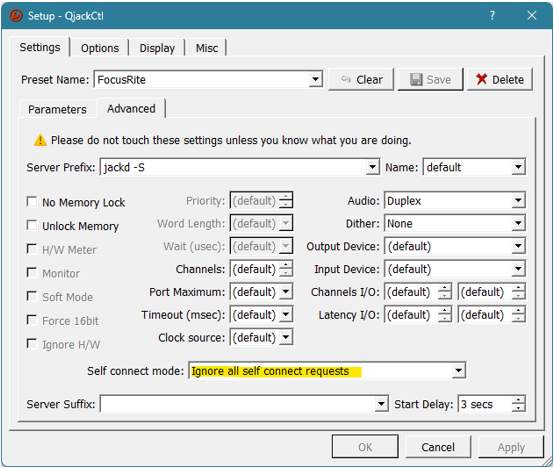
- If you don’t want any auto-connects, change Self connect mode to Ignore all self connect requests.
- Click Save to update the preset.
- Click Apply
This is how it looks like with my configuration:
This setting can be made per preset, so you can also add a preset with the default (Don’t restrict self connect requests (default)), that will auto connect all Jack-ASIO clients.
Persisting the routing setup (issue 4)
QjackCtl has to ways to accomplish this: Using Patchbay or using Session. Each of these has its advantages and disadvantages:
Using Patchbay
Pros:
- Configurations can be automatically applied.
Cons:
- No automatic creation of a configuration that reflects the setup shown in the Graph. That is, it tries to, but it makes mistakes when the setup is not very basic.
- Lots of clicking to create a configuration yourself.
Using Session
Pros:
- Copies the configuration show in the Graph exactly.
Cons:
- Cannot be automatically applied at startup.
- Cannot be edited.
Persistence using Patchbay
The main problem with Patchbay is that it tries to copy the existing setup by grouping the connections per Jack-ASIO client. The best, but most elaborate way is to create one-to-one mappings. To demonstrate the issue with Patchbay, consider the next example. You need to have more than two system-captures and system-playbacks for this demonstration:
Now perform the following steps:
- In QjackCtl, click Patchbay.
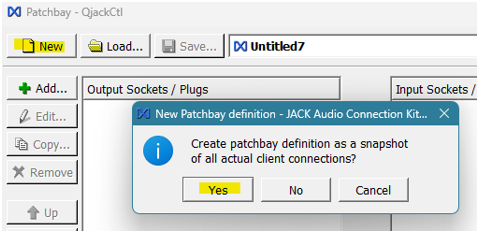
- In the Patchbay, click New.
- When the question Create patchbay definition as a snapshot… pops up, click Yes. That seems to be the easiest way to copy the current graph:
- Now click Save… choose a location and a filename and save the setup.
- Click Activate:

And see how the graph is messed up:
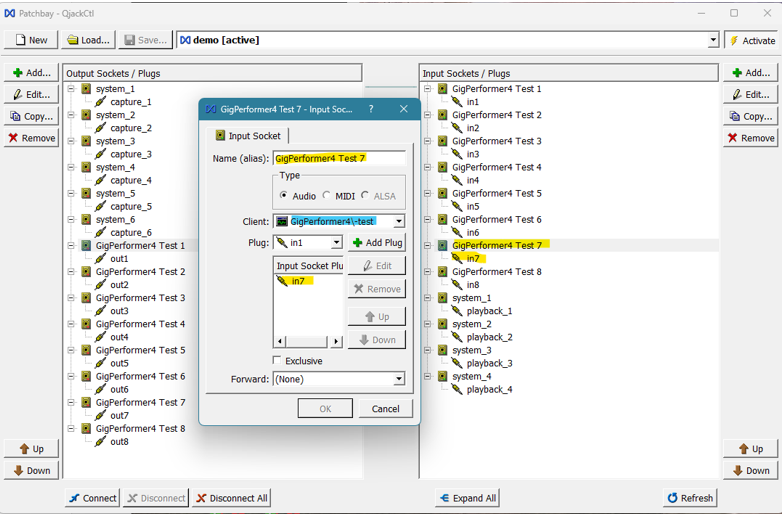
The most concise way to deal with this problem is to create your own setup and define each port apart. After some work, it looks like this:
The yellow fields of the Patchbay and the edit box correspond. The alias (yellow highlight) can be changed to your liking. The blue highlighted client should not be changed, because this is the ‘anchor point’ for Jack to recognize the right Jack-ASIO client to apply the setup to. (More about this a little further in this guide.)
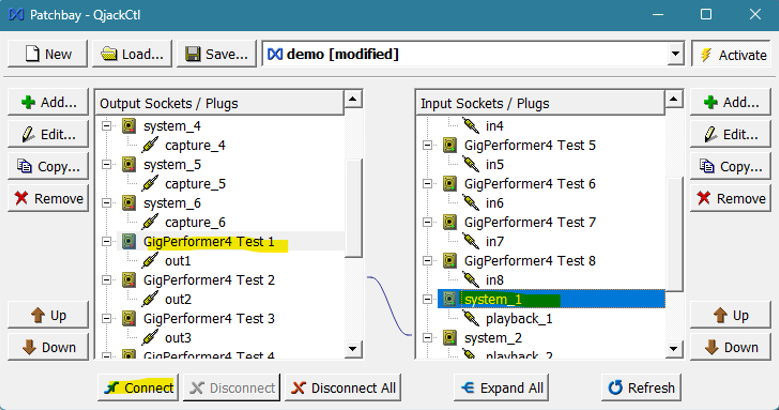
After creating all ports, they can be connected by choosing and output and input port and clicking Connect:
When all connections are made, save the setup, and activate it. Now it works as you would expect.
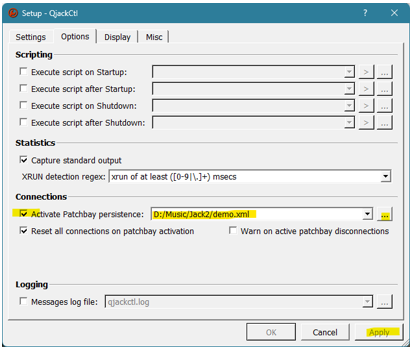
You can automatically apply this configuration:
- Click Setup…
- Select the Options tab.
- Select Activate Patchbay persistence:
- Select the setup you created and click Apply.
Main drawback is that this setup involves a lot of work.
Persistence using Session
This method is simple:
- Create your setup using the Graph button in QjackCtl.
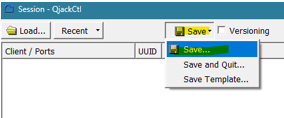
- In QjackCtl click Session.
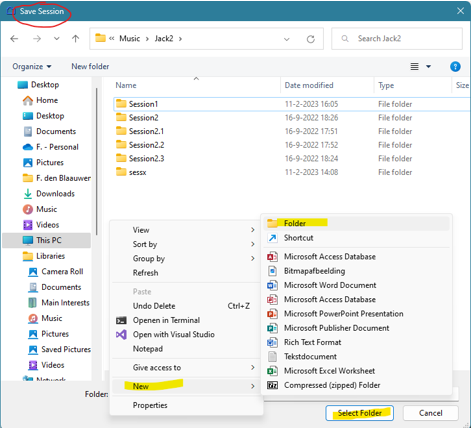
- In the Session window click Save and then Save…
- Navigate to the location where you want to save the session and create a new folder. Sessions are contained in a folder. The file itself is always called session.xml.
- Select the newly created folder and click Select Folder:
That’s all. Main drawback is that the only way to apply this configuration is by clicking the Load… button or select a current setup using the Recent button in the Session window.
Make sure to not automatically apply a Patchbay configuration.
Jack has no way to tell the multiple instances of Gig Performer apart (issue 5)
The problem
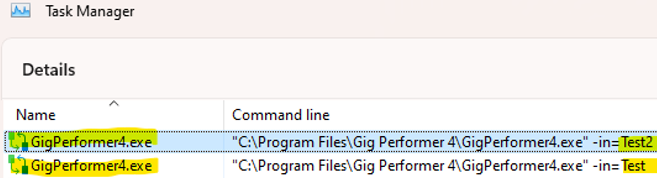
When creating advanced configurations, there probably is a fixed way how you want to connect the instances of Gig Performer. The problem with this is how Jack recognizes the Jack-ASIO clients. It simply uses the name of the program-executable that uses the Jack-ASIO driver. For Gig Performer 4.5.8 the name is GigPerformer4.exe. So, when you launch multiple instances of Gig Performer, they have all the same name, as can be easily checked using the Task Manager:
Note that this are to separate instances (Test and Test2), but the name of both is GigPerformer4.exe, so which one is which in the setup of Jack is a bit of a gamble.
A solution: Use Jack-1119-router
To bypass this problem, I have created a fork of the original Jack-router. You can find this fork at Jack-1119-router. It contains a folder binaries/win64. In that folder you will find the binary JackRtr1119.dll and the accompanying JackRtr1119.ini.
Installing:
- Download both files to a folder of your choice, i.e., c:\program files\JACK2\JackRtr1119.
- Of course, you should verify the files by using a decent and up to date malware scanner.
- Open a command box (cmd.exe)
- Execute following command:
regsvr32 "<path to JackRtr1119.dll>"
For example:
regsvr32 "c:\program files\JACK2\JackRtr1119\JackRtr1119.dll"
Optional: Modify JackRtr1119.ini. This file serves the same purpose as JackRouter.ini.
FYI: Uninstalling:
- Open a command box (cmd.exe)
- Execute following command:
regsvr32 /u "<path to JackRtr1119.dll>"
For example:
regsvr32 /u "c:\program files\JACK2\JackRtr1119\JackRtr1119.dll"
Delete both JackRtr1119.dll and JackRtr1119.ini
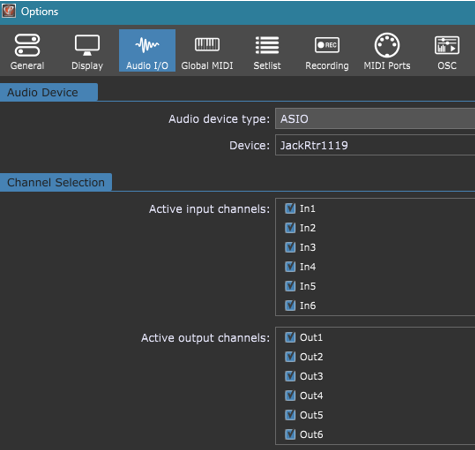
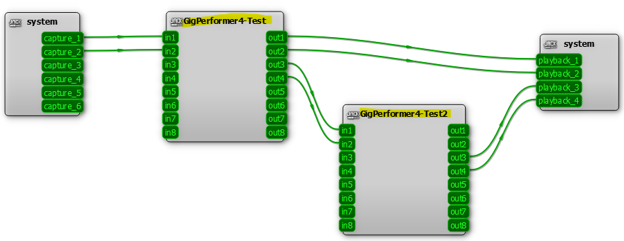
After installing, the JackRtr1119 ASIO driver it will show up in Options → Audio Setup…:
The modified ASIO driver will append the text following the -in= argument (which Gig Performer uses for starting multiple instances) to the client name, separated by a dash. This is how things will look in the Graph windows in QjackCtl:
Automating some things
The main drawback of the Session method is that it is not automatically applied. However, it is possible to automate this using python. To do this, I’ve prepared a few scripts for persisting the configuration to a file and to apply a configuration from a file, created with one of these scripts. First you need to get your environment setup:
- Locate the library libjack64.dll. It should be in c:\Windows. The python library downloaded and installed in the previous step is just not smart enough to find it on its own, so I’ve made a workaround in the scripts for that, but the workaround only works if the library libjack64.dll is in the right place.
- Copy the scripts apply_session.py and save_session.py to disk.
Syntax scripts
save_session.py
Saves the current configuration to an XML file.
Syntax:
python save_session.py -out <filename> [-session <sessionname>]
- filename: Name of an XML file to save the configuration to.
- sessionname: When specified, it is saved in the session-tag in the XML.
apply_session.py
This script applies sessions. The format is the same as session.xml files saved using the Session method.
Syntax:
python apply_session.py -in <filename> [-wait] [-nodisconnect]
- filename: Name of an XML file with the configuration to apply. See save_session.py for creating these files.
- -wait: When specified, the script waits until all connections are made.
- -nodisconnect: When specified, the connections are merged. Existing connections are not removed, even when they do not exist in XML filename.
Conclusion
Jack and Gig Performer do live well together. Points of attention:
- Change JackRouter.ini (or JackRtr1119.ini) to have the desired number of inputs and outputs.
- Switch off the auto connect feature in Setup… → Settings → Advanced.
- You can use Patchbay configurations and combine it with Activate Patchbay persistence (Setup… → Options) OR use Graph together with Session to persist the configuration.
- When using multiple Gig Performer instances, you might use JackRtr1119.
- The python scripts may be used to automate the application of sessions.