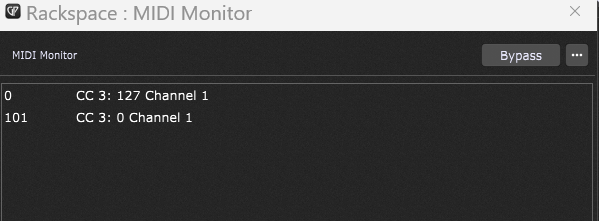
Post the output of the MIDI Monitor.
It is also good practice in GP to not control VST’s directly. you should ideally map the VST CC’s to Widgets. This will help decouple problems later down the line.
You can go back to your original account. We have upgraded it to member
2 Likes
THANKS! you can delete this one if you want
I just got through the next wall! I had to set the midi channel of the individual instrument in sampletank to channel 1 in order for it to see the CC message. SampleTank now flashes the mute button when I hit my floor control. and now NEXT WALL REVEALED… when the button is pressed and released it sends two cc messages. I need it to latch the mute button in sampletank off or on, but it just turns it on and off real fast. Can the script be made to ignore the second message?
I think I figured out how to modify the code. Thanks very much for your help tonight everyone, especially Spav!
Signing off, will check back in tomorrow. You all may make a regular Gig Performer user of me yet.
1 Like
There are no walls in GP, just replace the script with this one.
var last_cc : Integer Array = [0,0,0,0,0,0,0,0,0]

On ProgramChangeEvent(m : ProgramChangeMessage)
    var pg_num : Integer = GetProgramChangeNumber(m)
        cc_num : ControlChangeMessage

    If pg_num >= Size(last_cc) Then
        Print("PC message out of range")
    Else
        If last_cc[pg_num] == 0 Then
            last_cc[pg_num] = 127
        Else
            last_cc[pg_num] = 0
        End

        cc_num = MakeControlChangeMessage(pg_num, last_cc[pg_num])
        SendNow(cc_num)
    End
End
If I get chance I will send you a gig file with widgets mapped to the PC/CC messages, you should then map the output of the widgets to what ever you want to control in SampleTank.
Also see … SampleTank 4 Macro Learn
Dang! You are the wall basher!! I went back to try again and kept running into that wall, but you gave me wrecking ball ![]()
As you can see GP Script can solve most problems, but where possible you should use the mechanisms that already exist within the GP application. As mentioned earlier ideally you should not use the hardware directly to control parameters within Plugins, it is always better to control things via a widget.
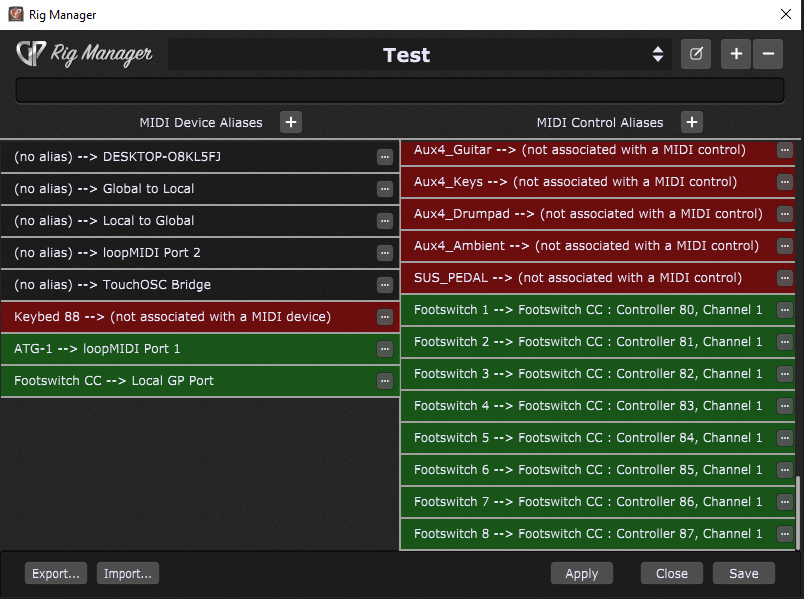
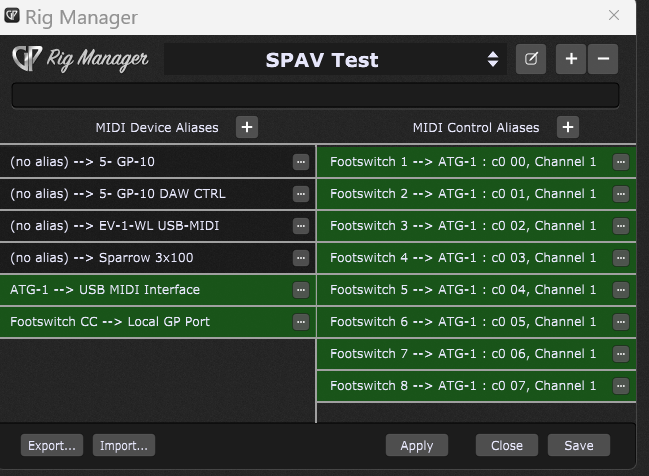
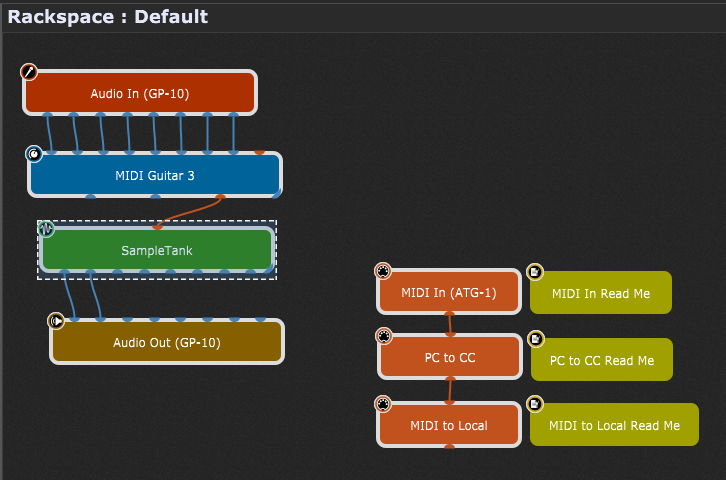
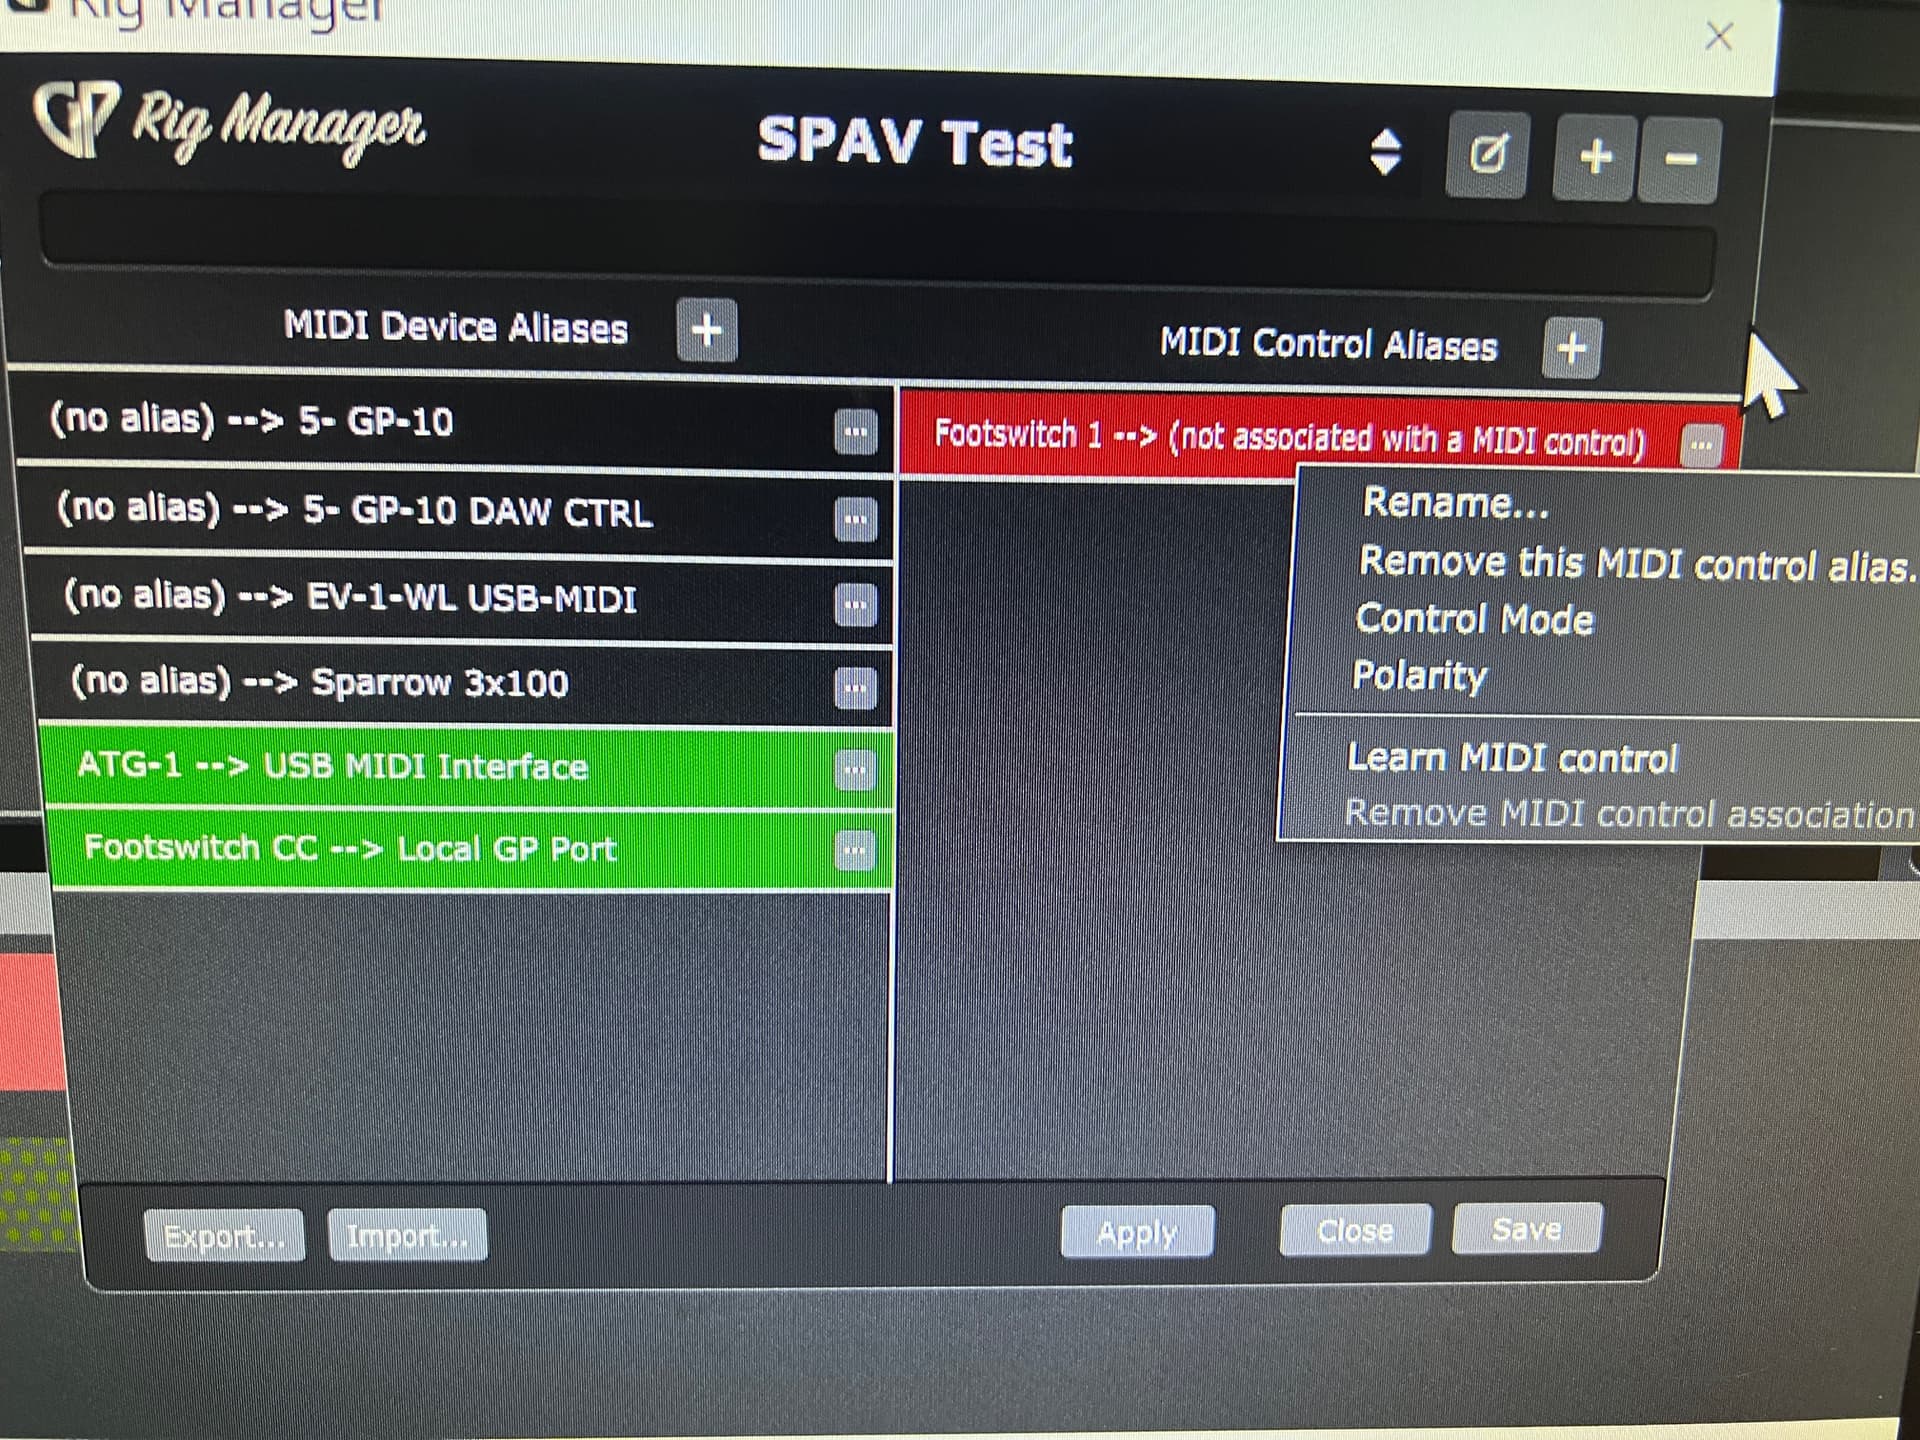
I have put this gig file together to show the basics of what you need to do. First define an Alias in Rig Manager to get the PC# messages from the hardware (which I think you have already done). The PC to CC script (the one that outputs a CC# ON followed by a CC#OFF) is used to emulate a foot switch press and release. The MIDI to local script outputs the CC# messages to the Local GP Port.

The next step is to define the modified messages as control aliases in the Rig Manager. This is how I defined them while testing. Note the device alias Footswitch CC assigned to Local GP Port and the eight Control Aliases Footswitch #
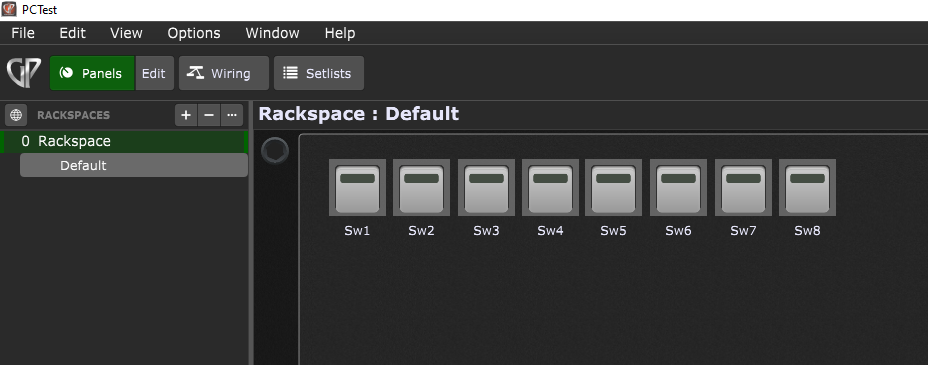
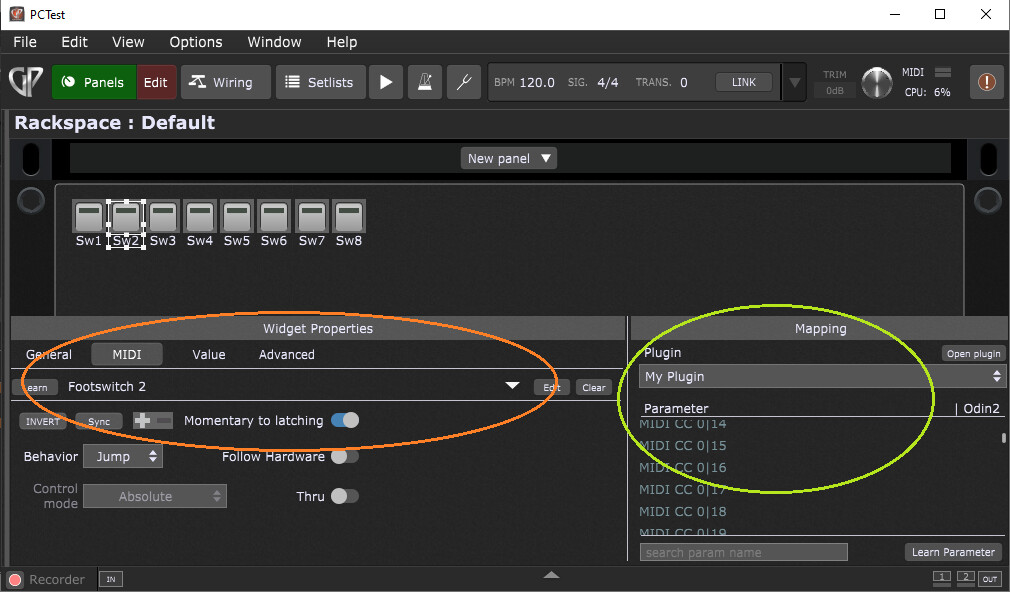
Once these are defined the control aliases can be used to map to the widgets. Here I have created eight buttons in a rackspace. Each button can then learn the incoming CC# messages via their alias name.
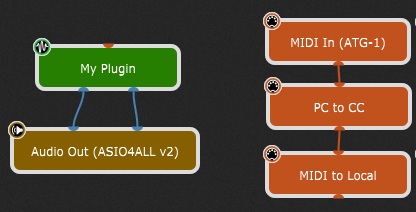
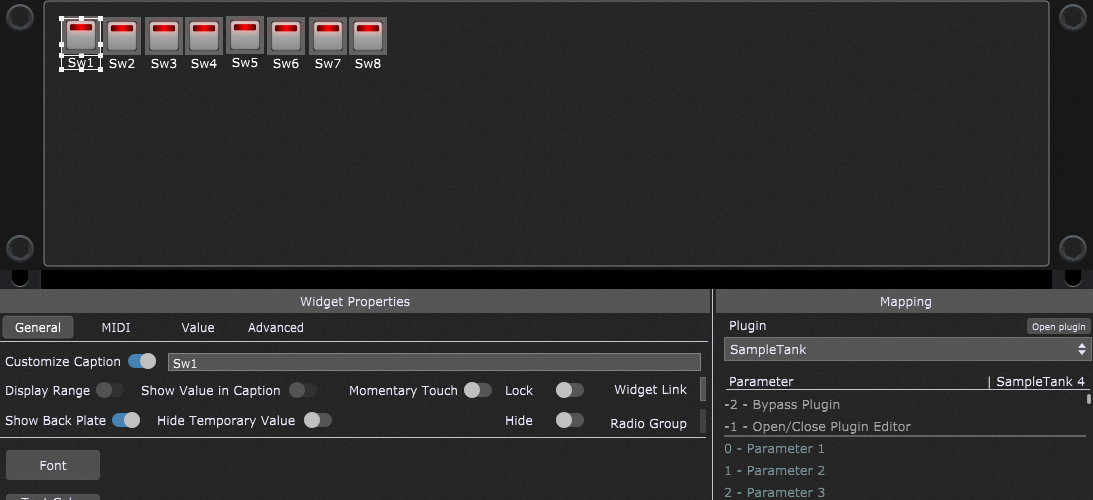
Then you drop your Plugin onto the wiring, note there is no connection between the earlier scripts and the plugin as the connections are made via the widgets.
Each button is assigned an alias control and the latching function is also applied at this point (rather than doing this within a script), indicated by the orange highlight. The green highlighted area is used to assign the widget to the required control within your plugin (I have assumed that what you want to control in SampleTank is available).
Enjoy
PCTest.gig (135.8 KB)
2 Likes
Wow Spav! My head is spinning. I got a second wind last night and using your script I thought I was headed in the right direction (no widgets). I had to create 8 rechannelizers after your script because each SampleTank instrument is on it’s own midi channel and I needed the CC to send to the mute button of that midi channel. So I tried to use Sampletank’s midi learn. It would work a couple times (didn’t matter which two channels) after the learn function just did nothing. Maybe too many incoming wire connections?
This morning I read through your last big post and started to rework my whole approach based on your PCTEST file. This is what I’ve got so far. 7 of the 8 footswitch widgets toggle off and on with my ATG-1 pedalboard. Switch number one learned the midi, but after learning stopped working. Could it have to do with it being CC#0? I notice that in your example you are starting at 80 but mine does not start there even though the script shows +80 ?
Next issue. I don’t know what to assign in the “mapping” section for the individual midi mute buttons within SampleTank. I tried opening SampleTank and using it’s midi learn, but doesn’t seem to be getting anything even when I set the instrument to channel 1.
First issue you have assigned the control aliases to the ATG1 and not the Footswitch CC device alias (check the names in my Rig view against yours). You are bypassing the scripts and sending the PC# messages to the widgets and not the CC# messages. The second nugget, is the momentary to latching switch for each widget, but it sounds like you have that one covered.
Take one step at a time. For now remove the Sampletank plugin until you are happy with the control input. When working the widgets should toggle in response to the switch inputs.
Once the front end is running correctly you can then deal with Sampletank. Btw I suggest you use the defaults in Sampletank and do not rely on Sampletank learning anything.
1 Like
Thanks again, I’ll get on it!
I deleted the SampleTank, but I see no way to re-associate the Footswitch aliases in the Rig Manager? I only see midi learn (which when I click the ATG-1 pedals that is what shows). I tried deleting all the Footswitch alias and recreating (plus button then type Footswitch x) but still the same, only option I see to associate is midi learn, no Footswitch CC
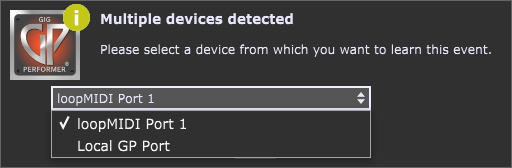
The gig file I sent works without sample tank. You only need to build the connections correctly in Rig Manager to get my gig file running with your foot switches. When you learn foot switches you should get the option to select which interface, as the PC# will arrive on ATG1 and the CC# will arrive on Footswitch CC, you need to select the Footswitch CC (or it’s alias, in this case it is Local GP Port).
I’m missing something. Here’s exactly what I’m doing. https://youtu.be/Y7kBoP-r9aI?si=-h24XMnXECm9DVw0

mine match your photo
no they don’t yours is on ch 16
mine is on ch 1
should i change it