Recently I was lucky enough to be invited onto the Backstage livestream with Brett to talk a bit about my rig and Gig Performer setup. You can find that here:

I go pretty in depth about my setup in the video. Here, I thought I’d talk a bit more about HOW I came into Gig Performer. Im sure many of you have a very similar story. And if not, hopefully the thought processes of everything can give you some examples of problem solving when it comes to your creative process. And if you’re just interested in my current rig’s specs, just skip to the bottom ![]()
I’ve been playing guitar for close to 20 years now. Over the years I built up your typical guitar rig. Heavily based on Adam Jones of Tool. It was a great sounding tube halfstack and a big ass pedalboard. All you need to feel like a rock star.

That was all great at the time. I was mostly playing along to my favorite songs, occasionally playing with some friends, and rarely playing live. During all this time though, I was starting to record more. I had started making electronic music in FL Studio and was slowly learning how to record and manipulate audio.
I eventually started getting the hang of recording. I had a mic and would record random riffs and covers. But then I discovered the Mesa Boogie CabClone. I don’t have a picture of my rig at this time, but basically what this allowed me to do was record my amp head directly into the computer, silently. This was a game changer. I fell in love with putting on my headphones and being surrounded by guitar. I was also now able to record at any time I wanted.
I started to discover the world of guitar plugins. Again, I tried many. Ended up settling on Bias, probably the best available digital amp at the time. I was impressed. At first, I thought it was just a fun toy. Eventually though, I found myself liking Bias more than my CabClone and amp combo. I sold the amp and actually bought Bias.
At this point, I was getting comfortable recording things. I had tried out many DAWs and plugins. I started also getting into adding synths and digital drums. I realized I now have the ability to write and record complete songs by myself. This was my setup around that time, approx. 2017.
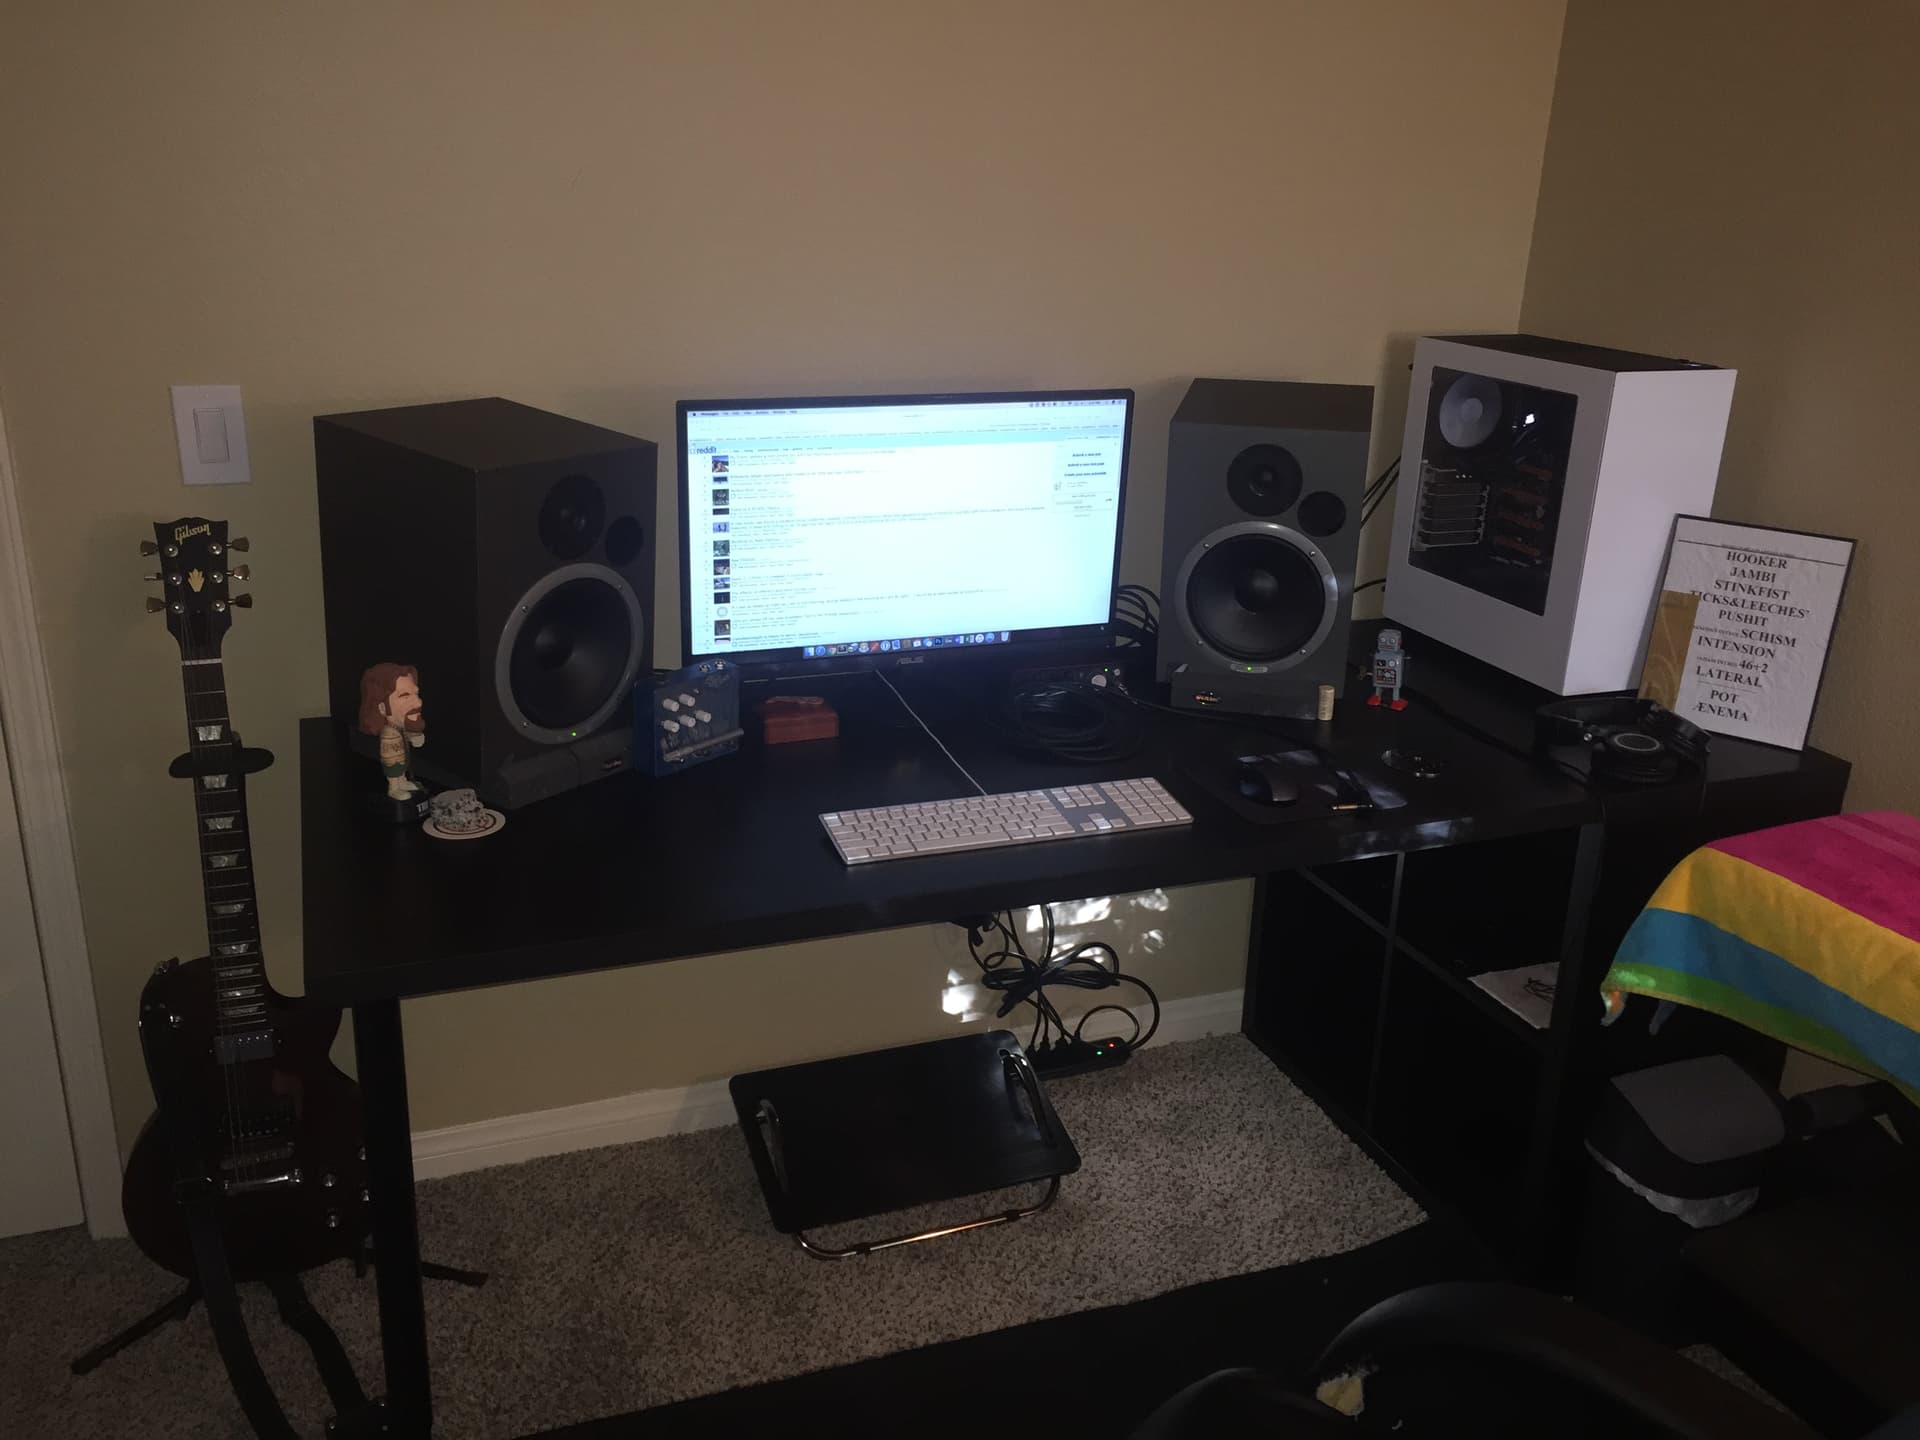
I feel like this is a lot of people’s current setup. Really just a standard office setup with an interface. I was recording my dry guitar signal directly into whatever my DAW of choice was at the time. I then added Bias as an effect on each guitar track (a serious CPU burner). I also had my synths, programmed in MIDI in the DAW.
This was the low point. My rig consisted entirely of a Focusrite interface. I had multiple projects, all with different settings, all rendering everything in real time. If I got a great sound in one project, it was a tedious process to get that sound into another project. This resistance was a creativity KILLER. I didn’t produce anything for years. There was no more creative process. It felt more like programming. I knew something had to change.
Once I settled into Logic, I discovered how to record the output of a bus. Another gamechanger. I could now just apply ONE instance of Bias to a bus, and then record that. It was like recording with the CabClone, but all digitally. No more projects with 12 instances of Bias. My CPU was thankful. I was happy with this for awhile. But there was still the issue of keeping my sound consistent between projects because around this time I also picked up a MIDI pedalboard. I could now turn on and off effects in real time via MIDI. This is great, but it just leads to the same problem. I have to assign the MIDI messages in EACH PROJECT. I tried making a template that included all these settings, and using that template for all future projects, but then if I wanted to change a MIDI setting, it ruined it for ALL my other projects!
Something had to change. Around this time, I was experimenting with sampling audio. I was using the app Loopback to route audio from a movie or Youtube, into Logic, to record it. The lighbulb eventually went off. What if I did that with my guitar? I could build my rig in another program, and then record THAT audio into Logic? Then my rig was completely CONSOLIDATED. What a dream. I first tried using Mainstage.
Mainstage was great. This was my setup for awhile. But it was so limiting. I was stuck with this fixed screen size, essentially limiting how many controls I could add. So I had to really think about what was important to control. Mainstage also functioned a lot like Logic. Your normal channel strips and busses. This would later become an issue.
I may have never found the light of Gig Performer if Mainstage didnt crash like every 5 damn minutes. Again, a creativity killer. I felt more like I was in IT than making music. After a simple Google search “Mainstage alternative” (and probably “Mainstage alternative reddit”), I found it: Gig Performer
NOW WE ARE TALKING.
This is October 2021. The world might as well be ending. But there I was, curled up inside with Gig Performer, just experimenting. As you can see in the photo, I was initially just trying to recreate my Mainstage rig, which was very skeuomorphic. Meaning, I was trying to make the interface reassemble actual guitar gear. I eventually moved towards a more compact Panels page, which I’ll show later.
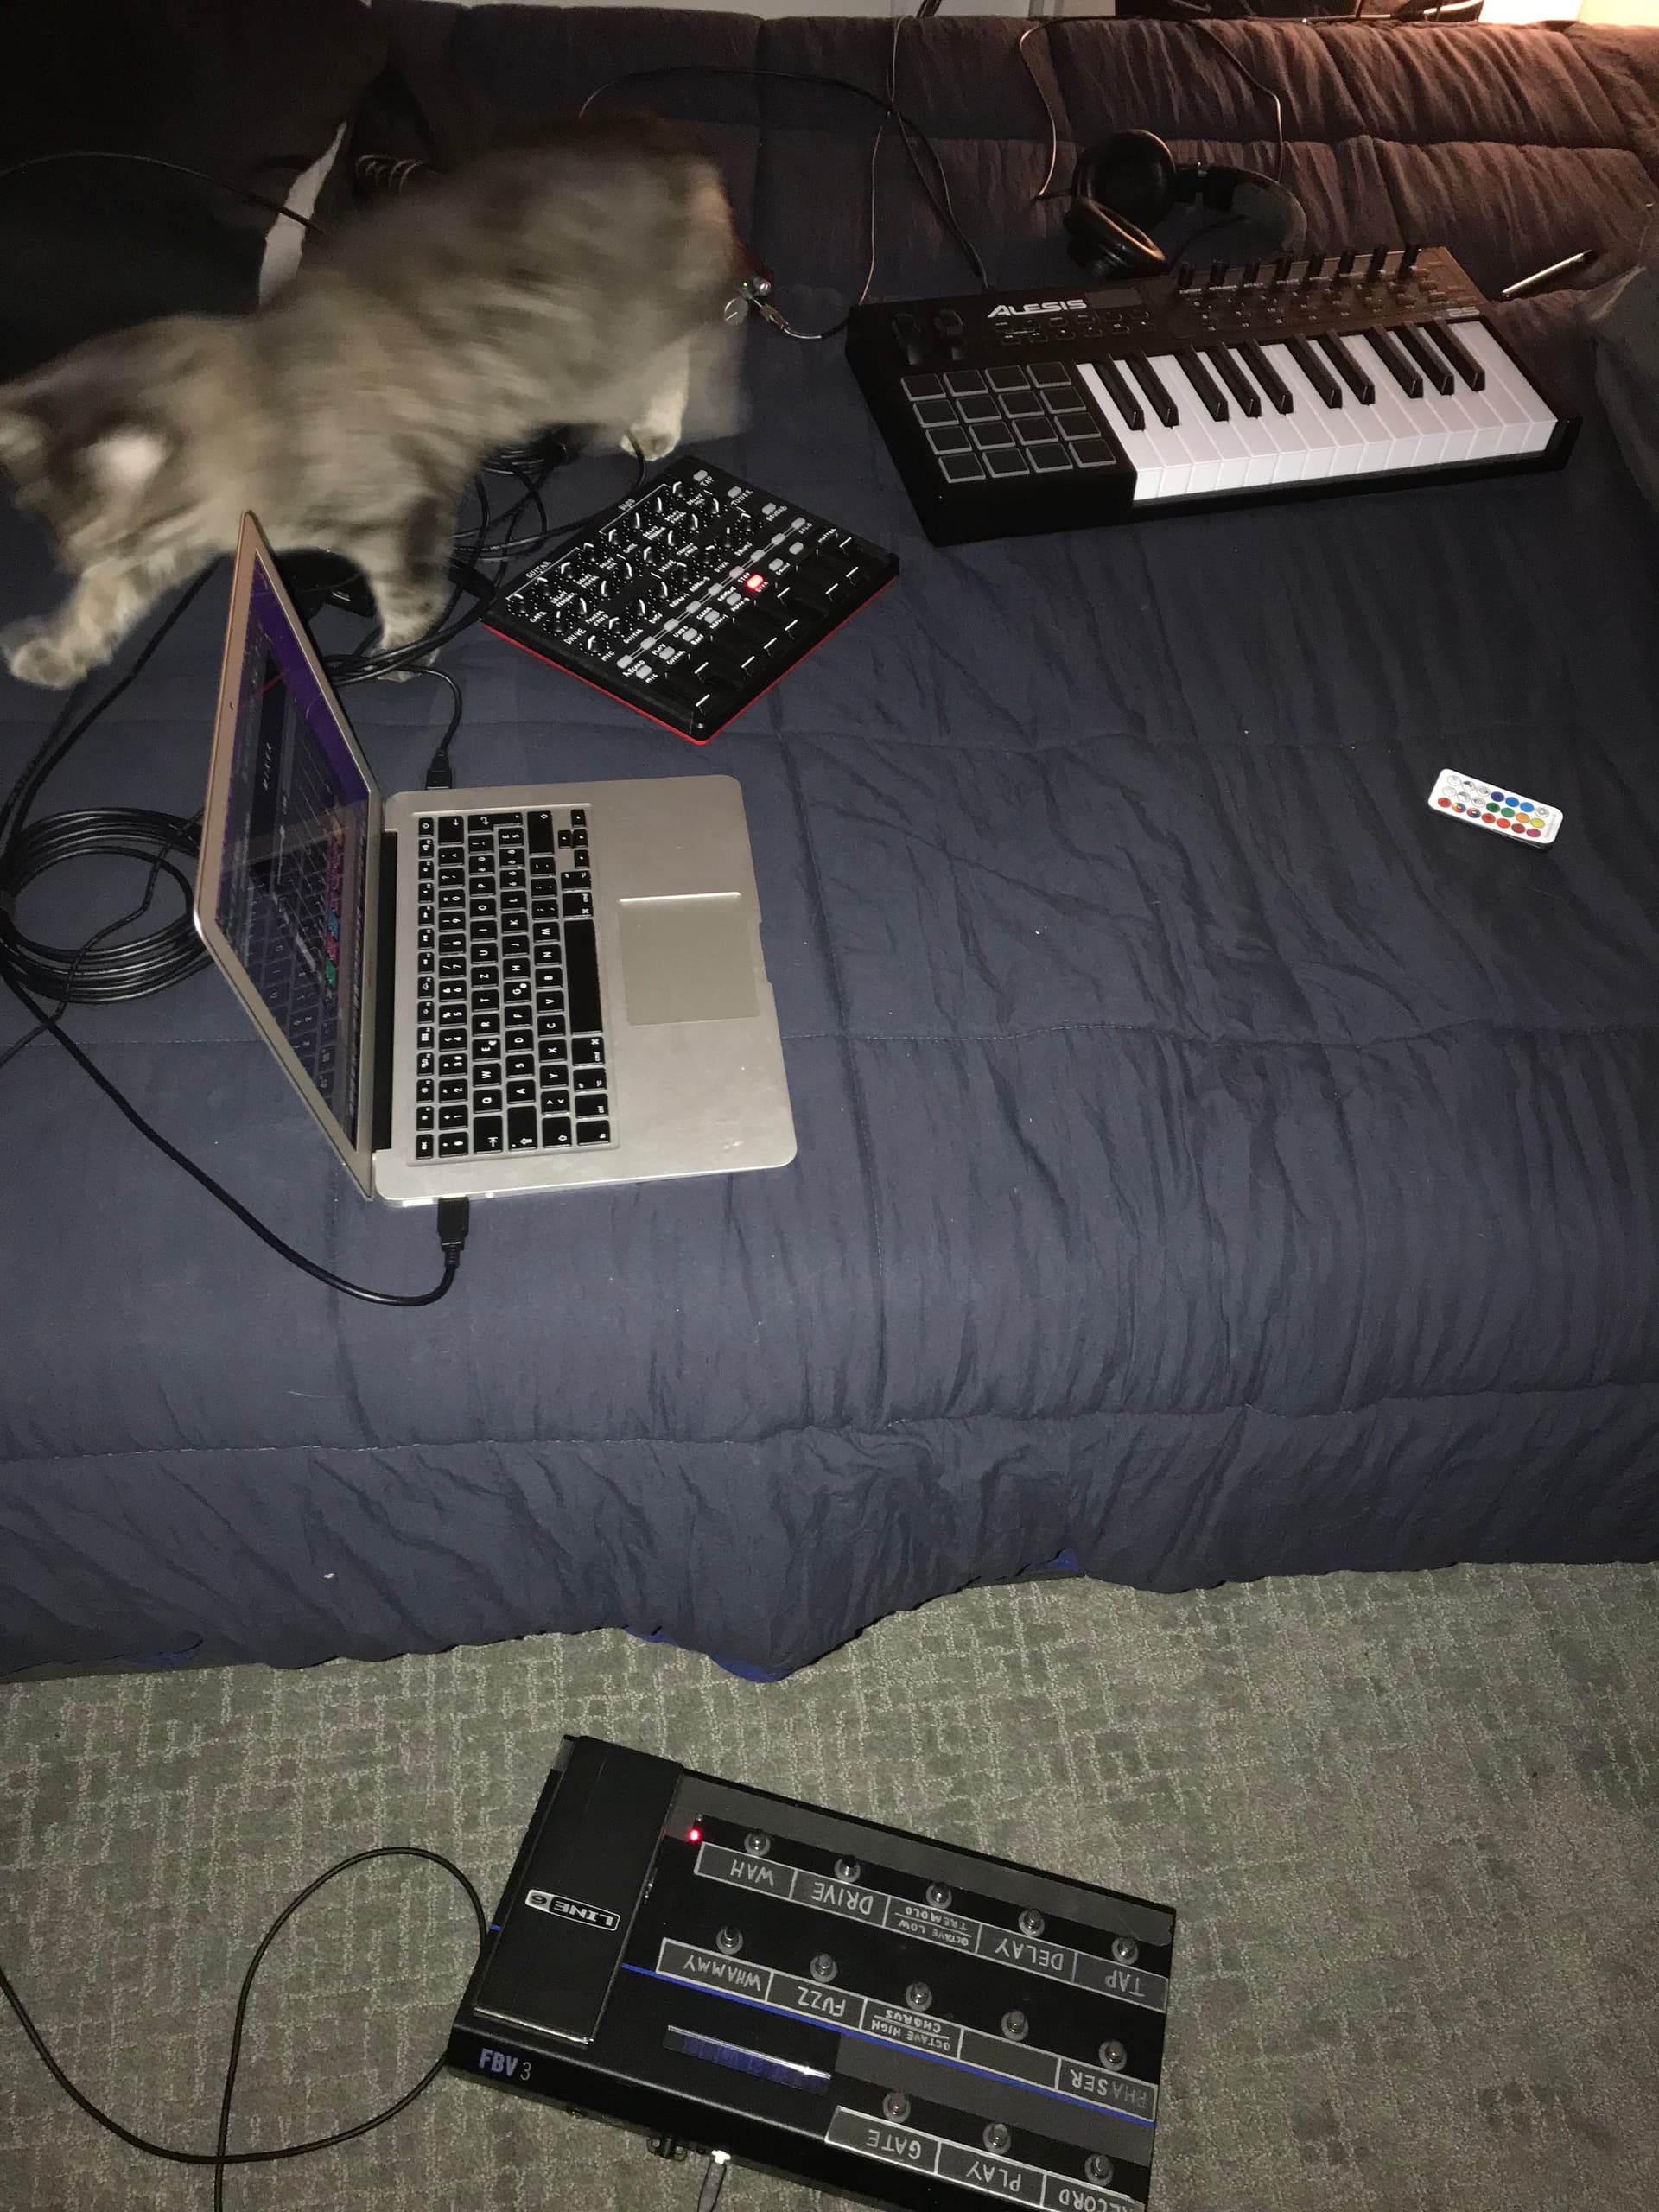
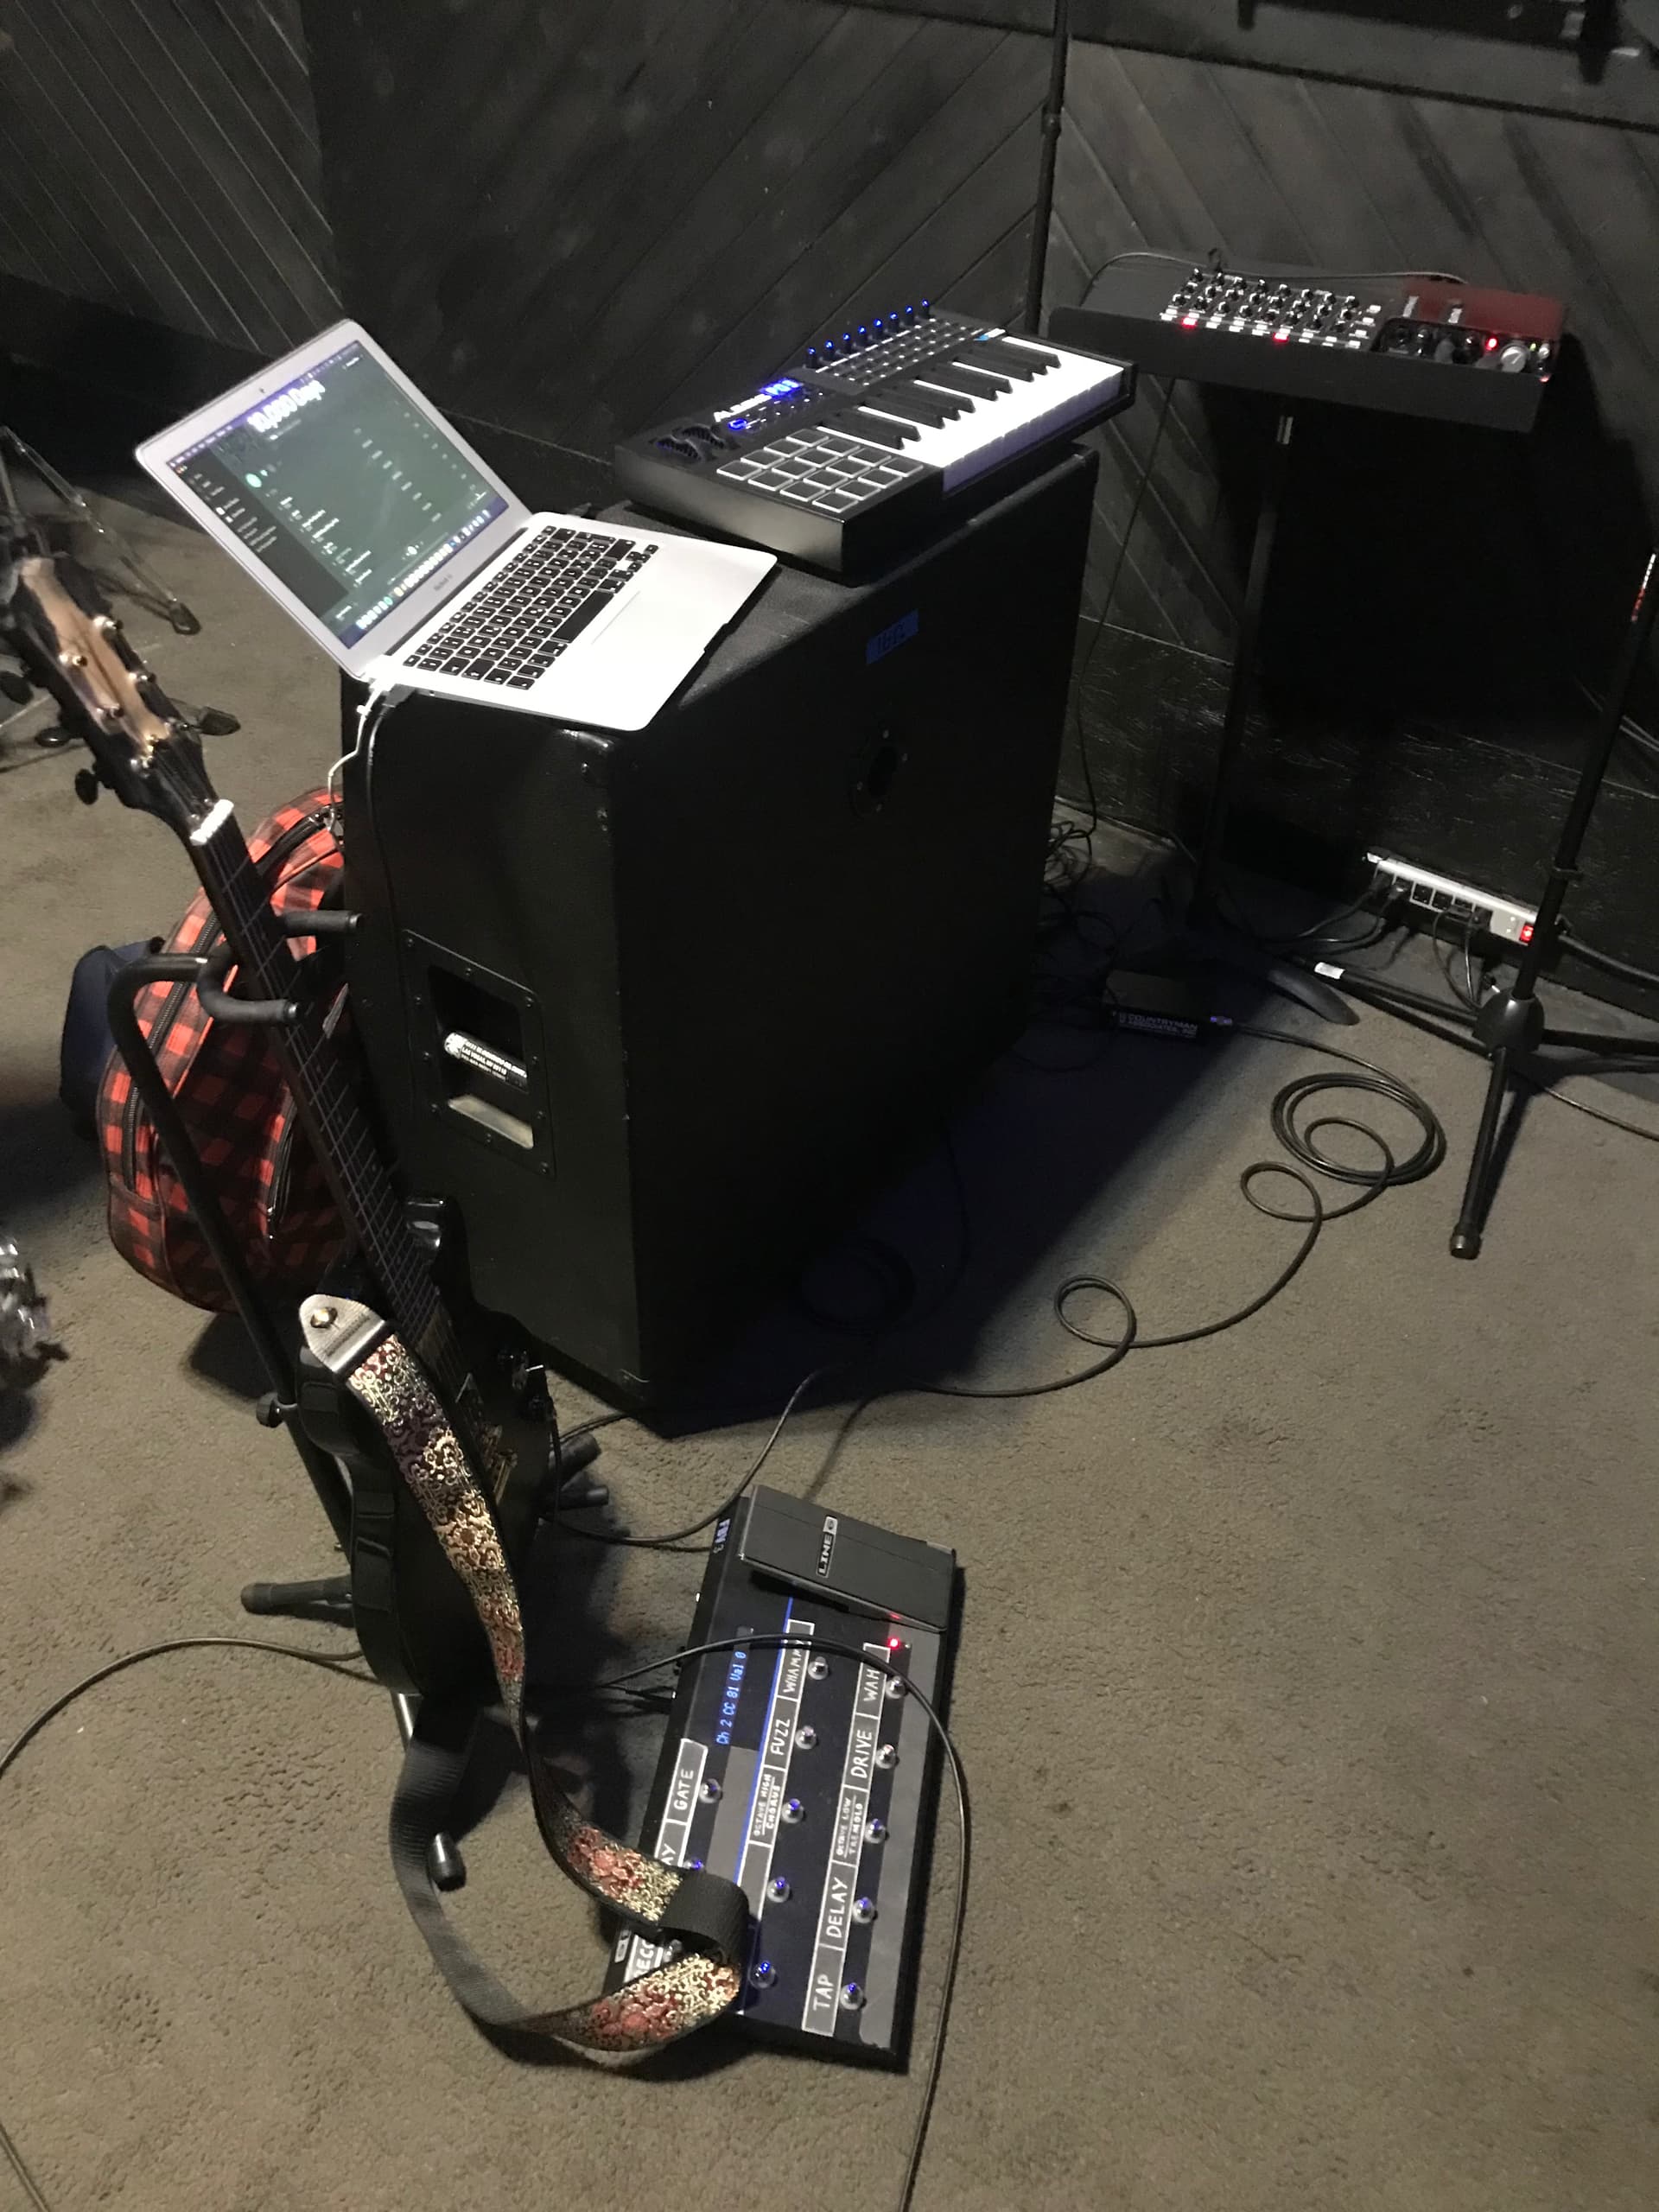
This was my rig at the time. An old MacBook Air, a Line 6 FBV3 foot controller, a Focusrite Scarlett 2i2, an Alesis MIDI keyboard, and an Akai MidiMix controller. The Akai was great for controlling frequently used parameters, without having to click though a bunch of menus/plugins. This is how I recorded Atonian’s first single “The Ravenous”, which you can find here: https://www.youtube.com/watch?v=3xOjXd0AhAc
This was all working great. I was able to really dial in my sound for recording, keep the recordings consistent, and do it all with very minimal CPU. At some point before this, I had moved from using Loopback to Blackhole. Loopback, at the time, had lots of latency, cost money, and sometimes crashed. Blackhole is open source, latency free, and rock solid. You can find them here: https://existential.audio/blackhole/
My rig was sounding great and very functional. However, I started to get obsessed with efficiency. I’m seeing a direct correlation between how difficult it is to record and how much I record. And a few things were still bugging me…
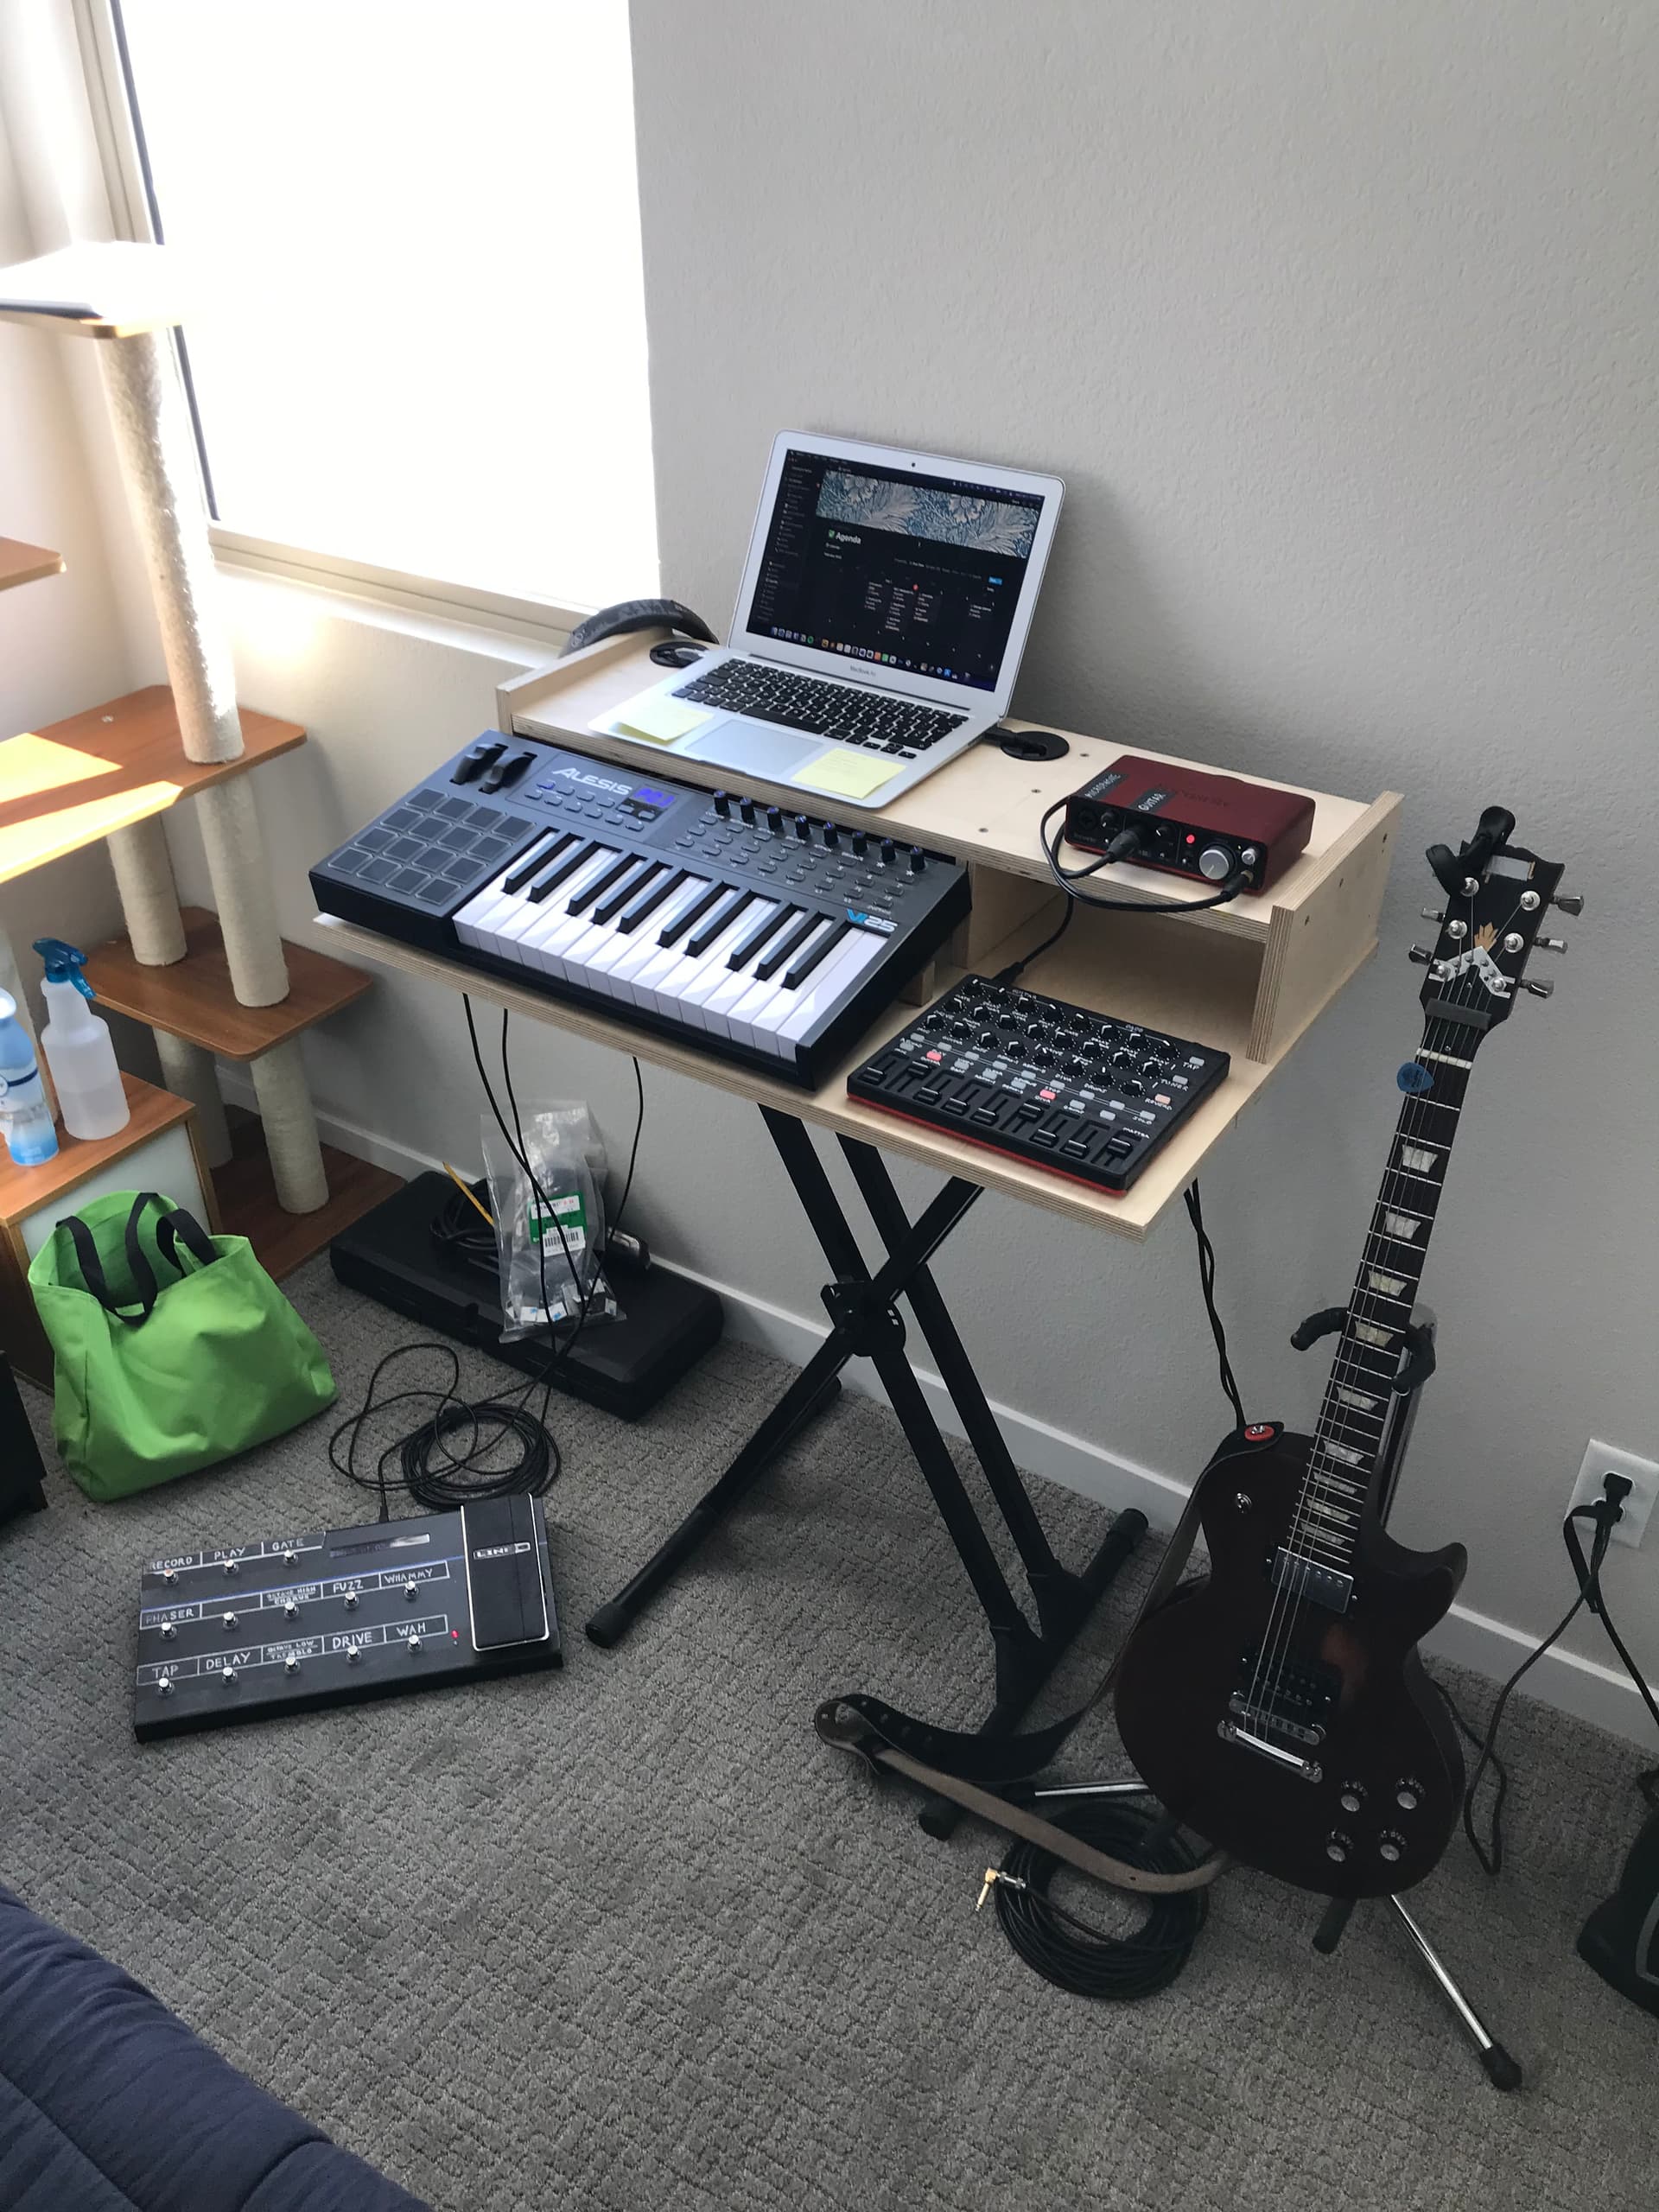
As you can see in the last photo, this was a pretty minimal setup. At the time, I didn’t even have a desk. I would just kinda plop everything down wherever I felt like recording. It’s fun to be that portable, but I needed to contain all of it, especially considering I was starting to play with my new band Vesser’s dummer, Tim O’Nell. Here’s what our first few jams looked like:
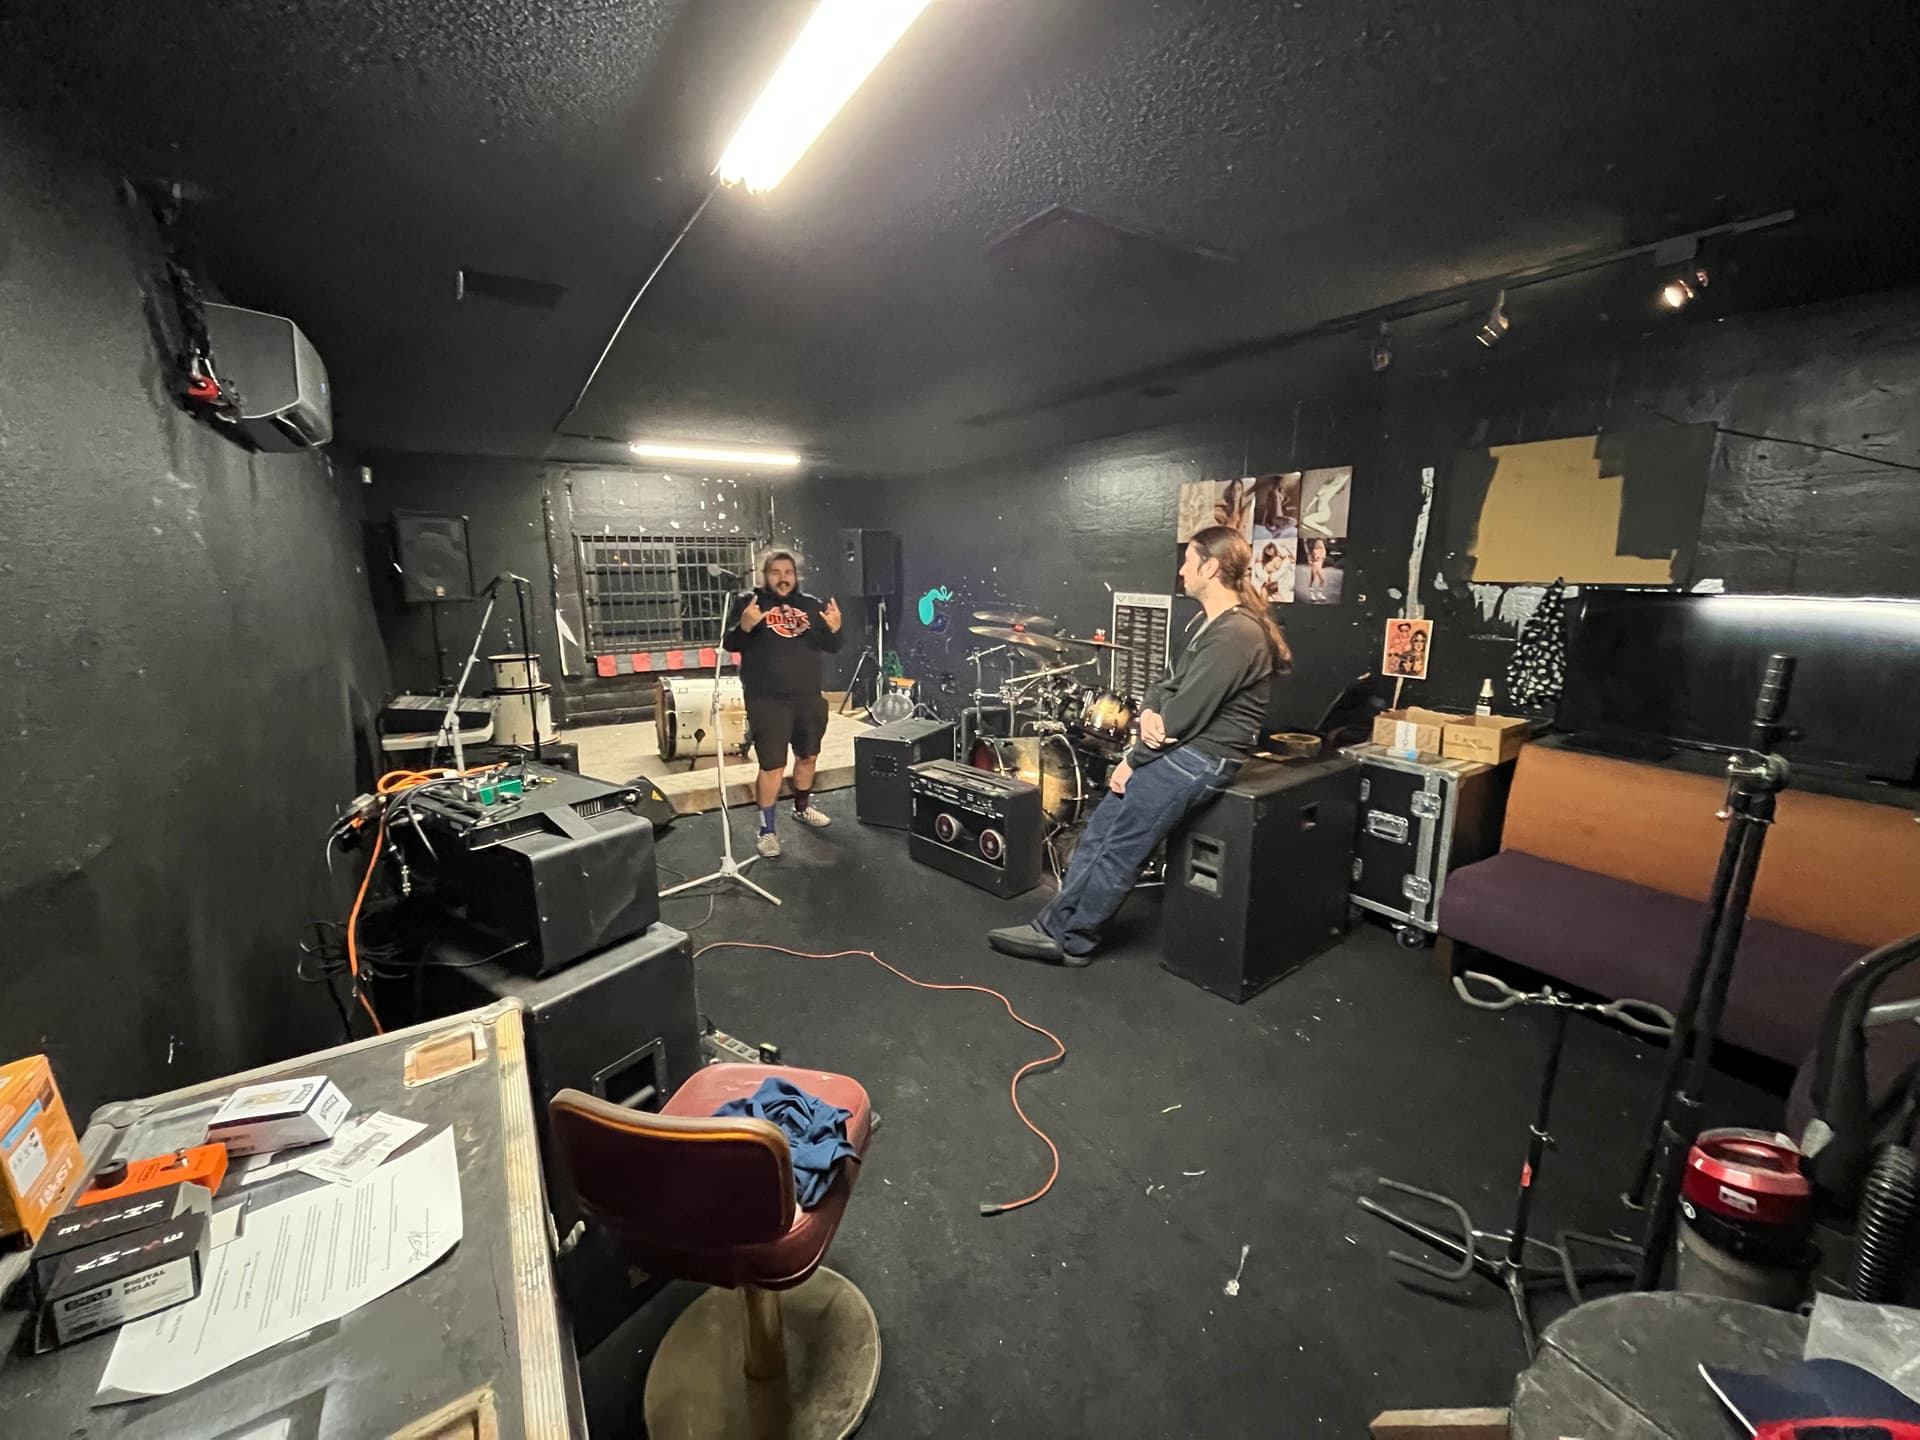
We would rent an hourly studio, and I would kinda just haphazardly throw my stuff onto the house gear. This is where I had to get creative. I knew I needed some sort of stand, I cant just always rely on cabinets and chairs. I also needed to solve the issue of wiring. It took a good 15 minutes to get everything setup and 10 minutes to tear down. When you’re renting hourly, that’s a huge bummer. So my boss’ wife who does some woodworking helped me make this.
A sturdy desk on a keyboard stand, designed for exactly this equipment, that housed all the equipment and cabling needed. Load in was now almost immediate. Just plug into the wall and PA and I was good to go. But then, ironically, load in time no longer mattered, because we found a permanent rehearsal space.
This was a great time for me personally. We got the studio and I got a new job as a roadie that gave me lots of free time and money. A blessing, but also a horribly tempting thing when you are trying to design the ultimate digital guitar rig. I’ve been pinching pennies my whole life getting my rig to this point. Buying USB cables instead of dinner. Meeting shady people on Craigslist to buy a probably stolen MIDI controller. That was no longer the case and there was no reason to compromise anymore. I was going to build my dream rig.
Bi-Directional MIDI was going to have to be the first fix. The Akai MidiMix had physical knobs and faders. It had a cool button that would send the status of all the knobs, which was a nice hack to initialize GP and sync the controller and GP. But if I changed something in GP, it of course would not be reflected because the knobs cant move on their own. And this was a problem because I often would change things via the Panels page, which was sometimes quicker than reaching for the physical knob. I initially looked for something like a motorized MIDI controller. But then I stumbled on TouchOSC. It’s an iOS app which can send MIDI to your computer. More importantly, it could RECEIVE MIDI. Hell yeah.
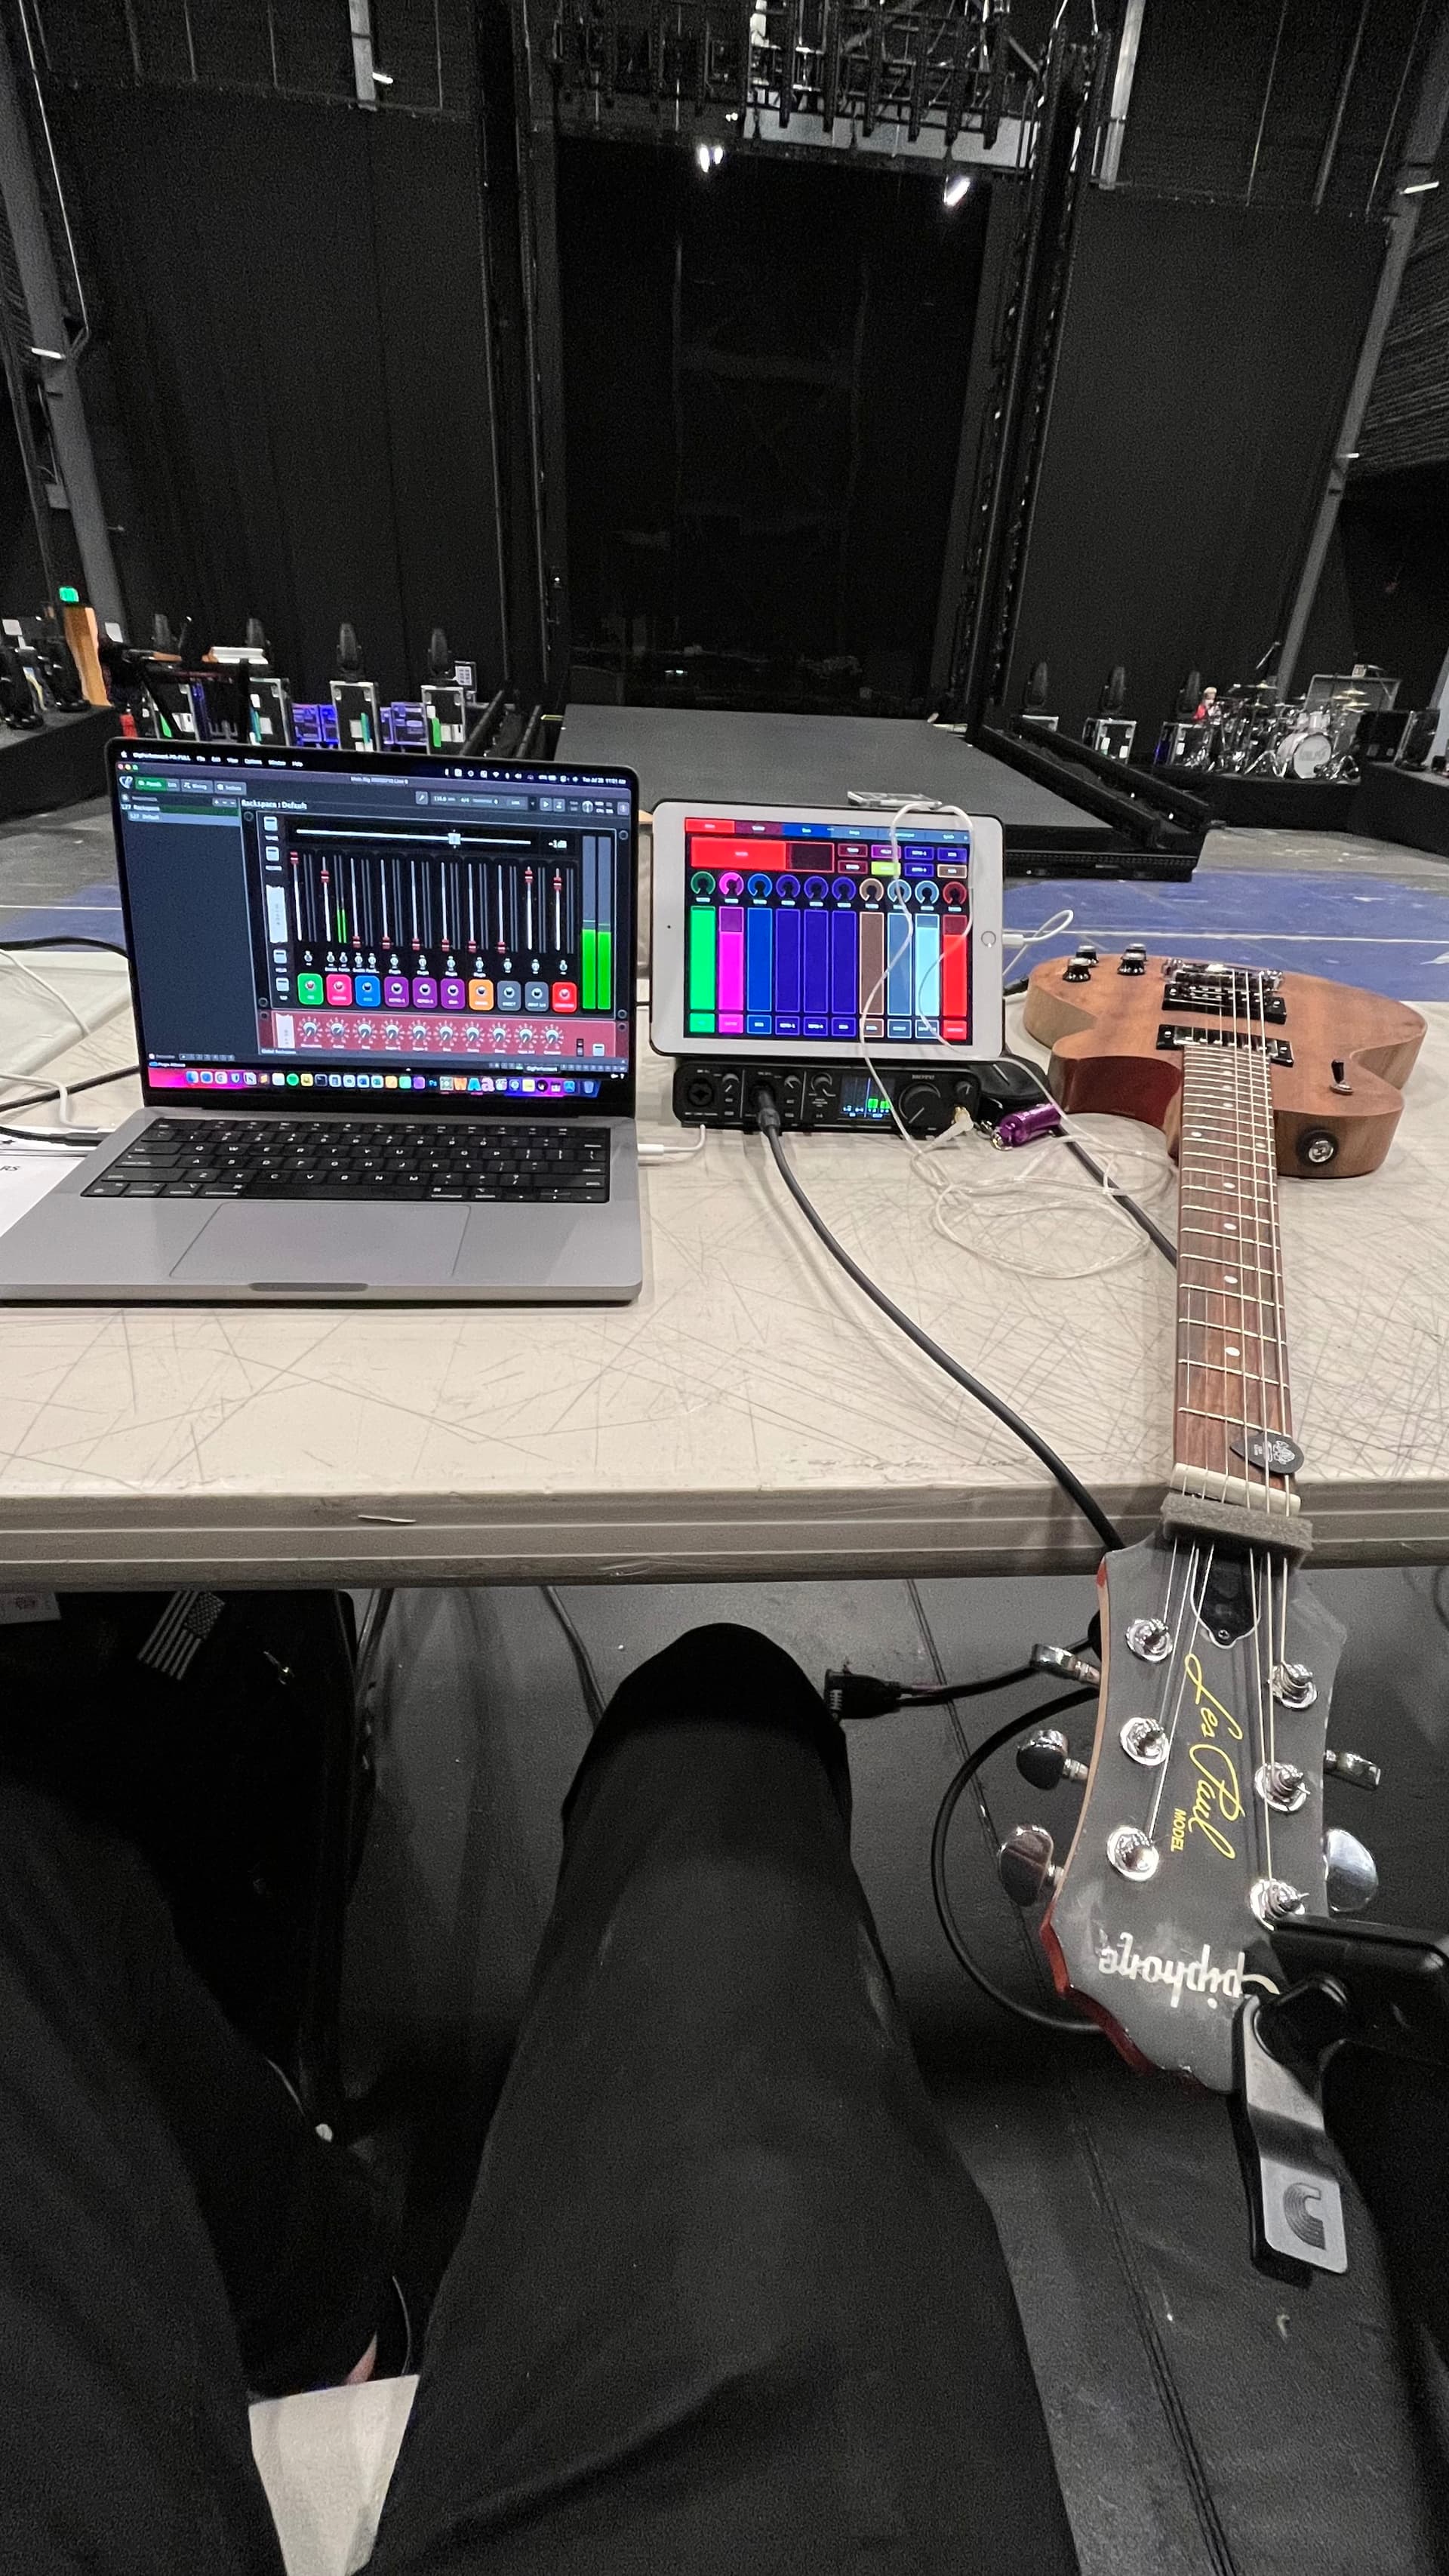
I grabbed a new laptop, interface, iPad and slowly started designing my new rig while I was on the road for my first tour. Being on the road was great for this because it forced me to design everything to be as quick and easy as possible. I also had lots of downtime with nothing to do, so I could sketch out ideas for what the rig will look like. I also got to be inspired by the pros, seeing how the band was traveling with their touring rigs. At this time, I just had an iPad running TouchOSC plugged in via USB to the laptop. I then had GP running through Blackhole into Logic. My goal was to have every single thing controlled on the iPad or floorboard. Over the course of the tour, I created my first TouchOSC template, controlling everything from in-ear mix to guitar pedal parameters. I also sketched many variations of what I wanted to build when I get home.
First thing I built when I got back was the pedalboard. I bought 2 Blackstar LiveLogic MIDI pedals. Nice quiet switches, USB powered (very important), and Bi Directional MIDI (also very important). Attached to the expression ports are 2 Headrush expression pedals. Highly recommend. They are both set to different stiffnesses and since I set them months ago and dragged them hundreds of times between places, they havent changed at all. Also on the board is a Keith McMillen 12-Step. It’s a 1 octave keyboard you can play with your feet. Also USB powered. Everything is plugged into a USB-C hub underneath the shelf, and it is completely bus powered. All I need to do is plug an extension between it and the laptop and I’m controlling things anywhere I need.
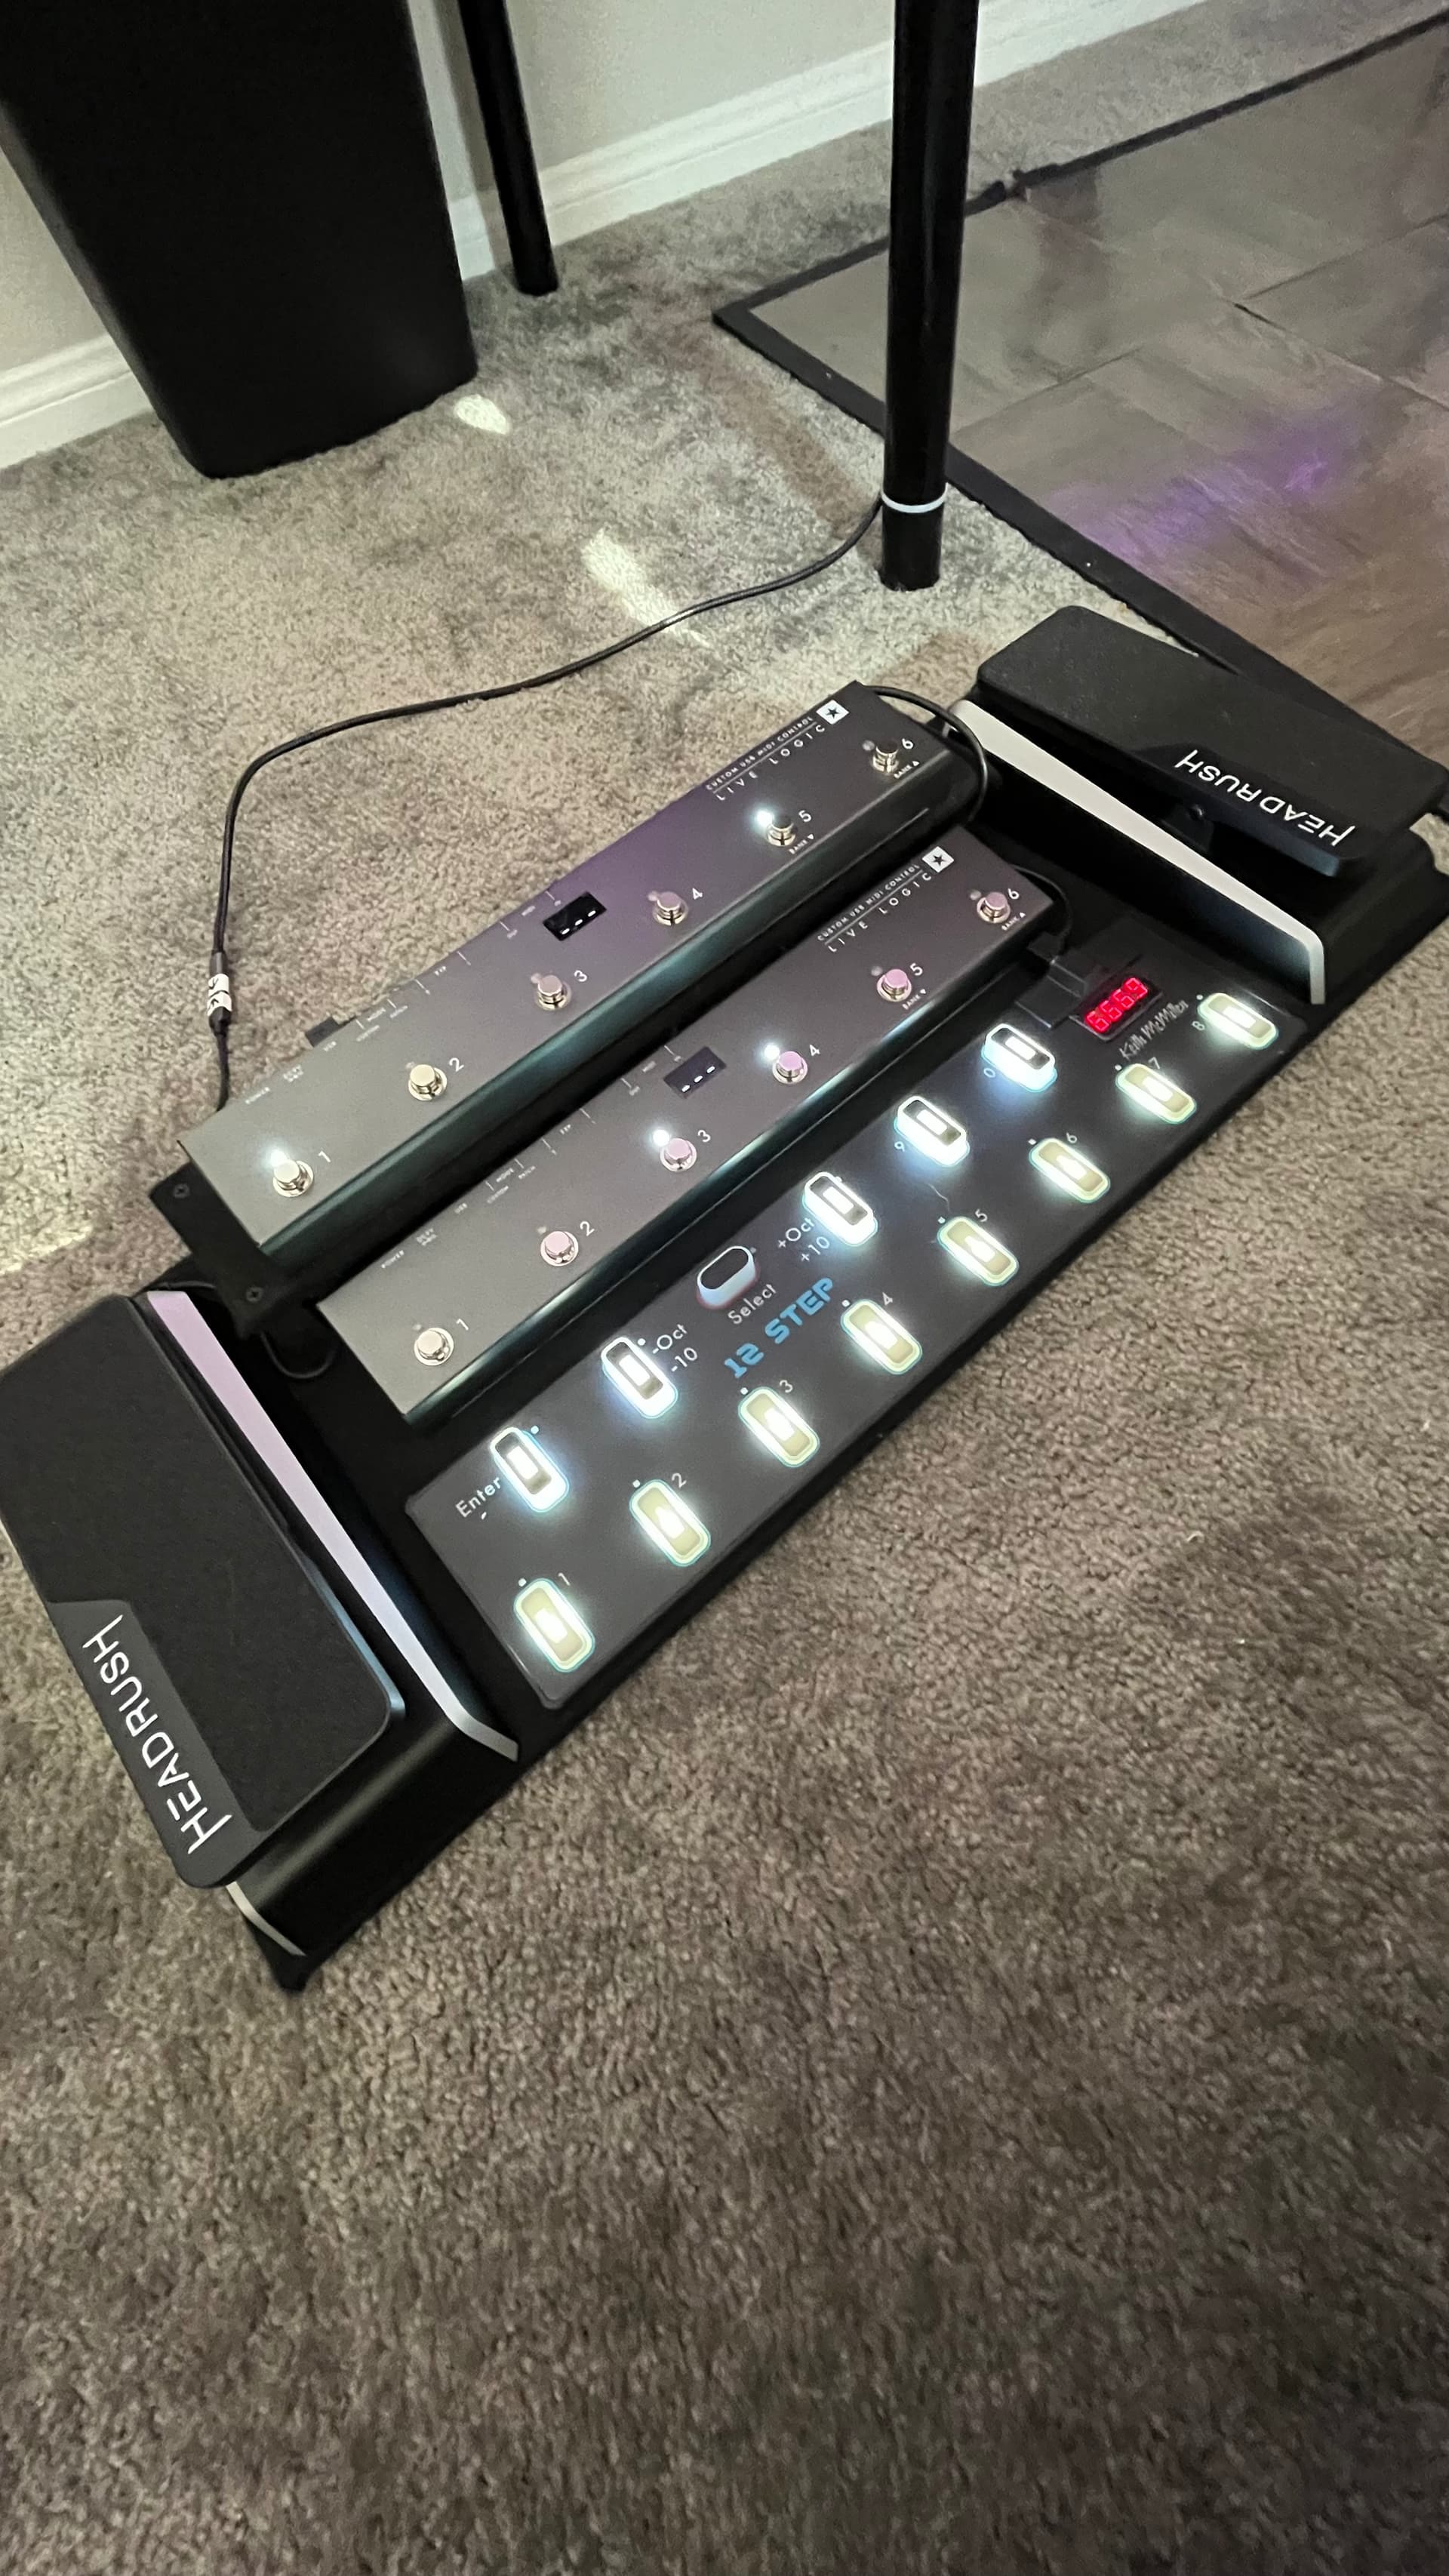
I also ended up using an old Line 6 FBV2 floorboard, exclusively to control my looper (Melda Productions MSuperLooper). That’ll be pictured later. So now I have 2 pedalboards, controlling my guitar pedals, bass pedals, looper, and also a synth. All at my feet. But there was still so much more to control.
A normal guitarist has the luxury of adjusting any parameter at any time. Just bend down and twist a knob on a pedal or on your amp. However, that TouchOSC template I developed had multiple pages. I often found myself jumping between many pages, often getting lost. I really hadnt solved anything. That’s when I made a decision that would eat up dozens of hours of my time, create many Amazon returns, and frustrate me to no end… more iPads.
I thought it was simple. Buy some cheap iPads, put a different page of TouchOSC on each, and done. (sidenote: you can find an iPad today for under $50 that will run TouchOSC, you do NOT need a new iPad for this.) It did not end up being that simple…
On the road, I had just one iPad, plugged in via USB. It worked flawlessly. I thought I’d just grab a USB hub, plug in my extra iPads, and have the same experience. Nope.
First, only 1 iPad was charging. Weird. I tried some new cables. Still nothing. Just the one charging. I did buy these used, maybe I got some bad ones? I experimented. Nope, they were all functioning fine on their own. Only when they were all plugged in were there issues. I learned that an iPad needs much more juice to charge than most USB devices. So I found a USB hub that claimed to output enough power. Still nothing. Returned it. I tried a different one. Nothing. Returned it. I then decided to just buy the bulkiest most industrial thing I could find. The thing had fans in it. It cost hundreds of dollars. It could output 80 watts of power over EACH of its dozen USB C outputs. STILL NOTHING. I was frustrated. Long story short… it’s Apple’s fault. I was so focused on getting these things power that I didnt even realize that my computer was able to see all the iPads. Wait, what? The iPads came in and out of charging, seemingly at random, but they stayed connected to the computer. Turns out… macOS kinda just decides which iPad it wants to charge, and just charges that one. For some reason. And not even consistently. I dont know why to this day. And even though they were connected, TouchOSC Bridge, the companion app to TouchOSC that connects your iPad and computer, was not playing nice with multiple iPads over USB. I had to figure something else out.
Another feature TouchOSC has is the ability to send the data over the network. I would use this sometimes over WiFi, feeling super cool that Im controlling my rig wirelessly. I thought maybe I’ll get a wireless router and just connect to that, while the iPads were plugged into a normal powerstrip. But then I found the solution: LIGHTING TO ETHERNET ADAPTERS. If you’re having similar issues, this is the solution. I use these: https://www.amazon.com/IVSHOWCO-Lightning-Ethernet-Certified-Charging/dp/B09HT77D1D/ref=sr_1_2_sspa
You’ll notice they have a SEPARATE power input. This allows me to connect the iPads via Ethernet to a switch, into my computer. And I can then power each one separately with a normal power supply. So I built a little rack, similar to my previous desk. It has a beefy power supply, a Thunderbolt dock, a network switch, and it housed all the cables I need.
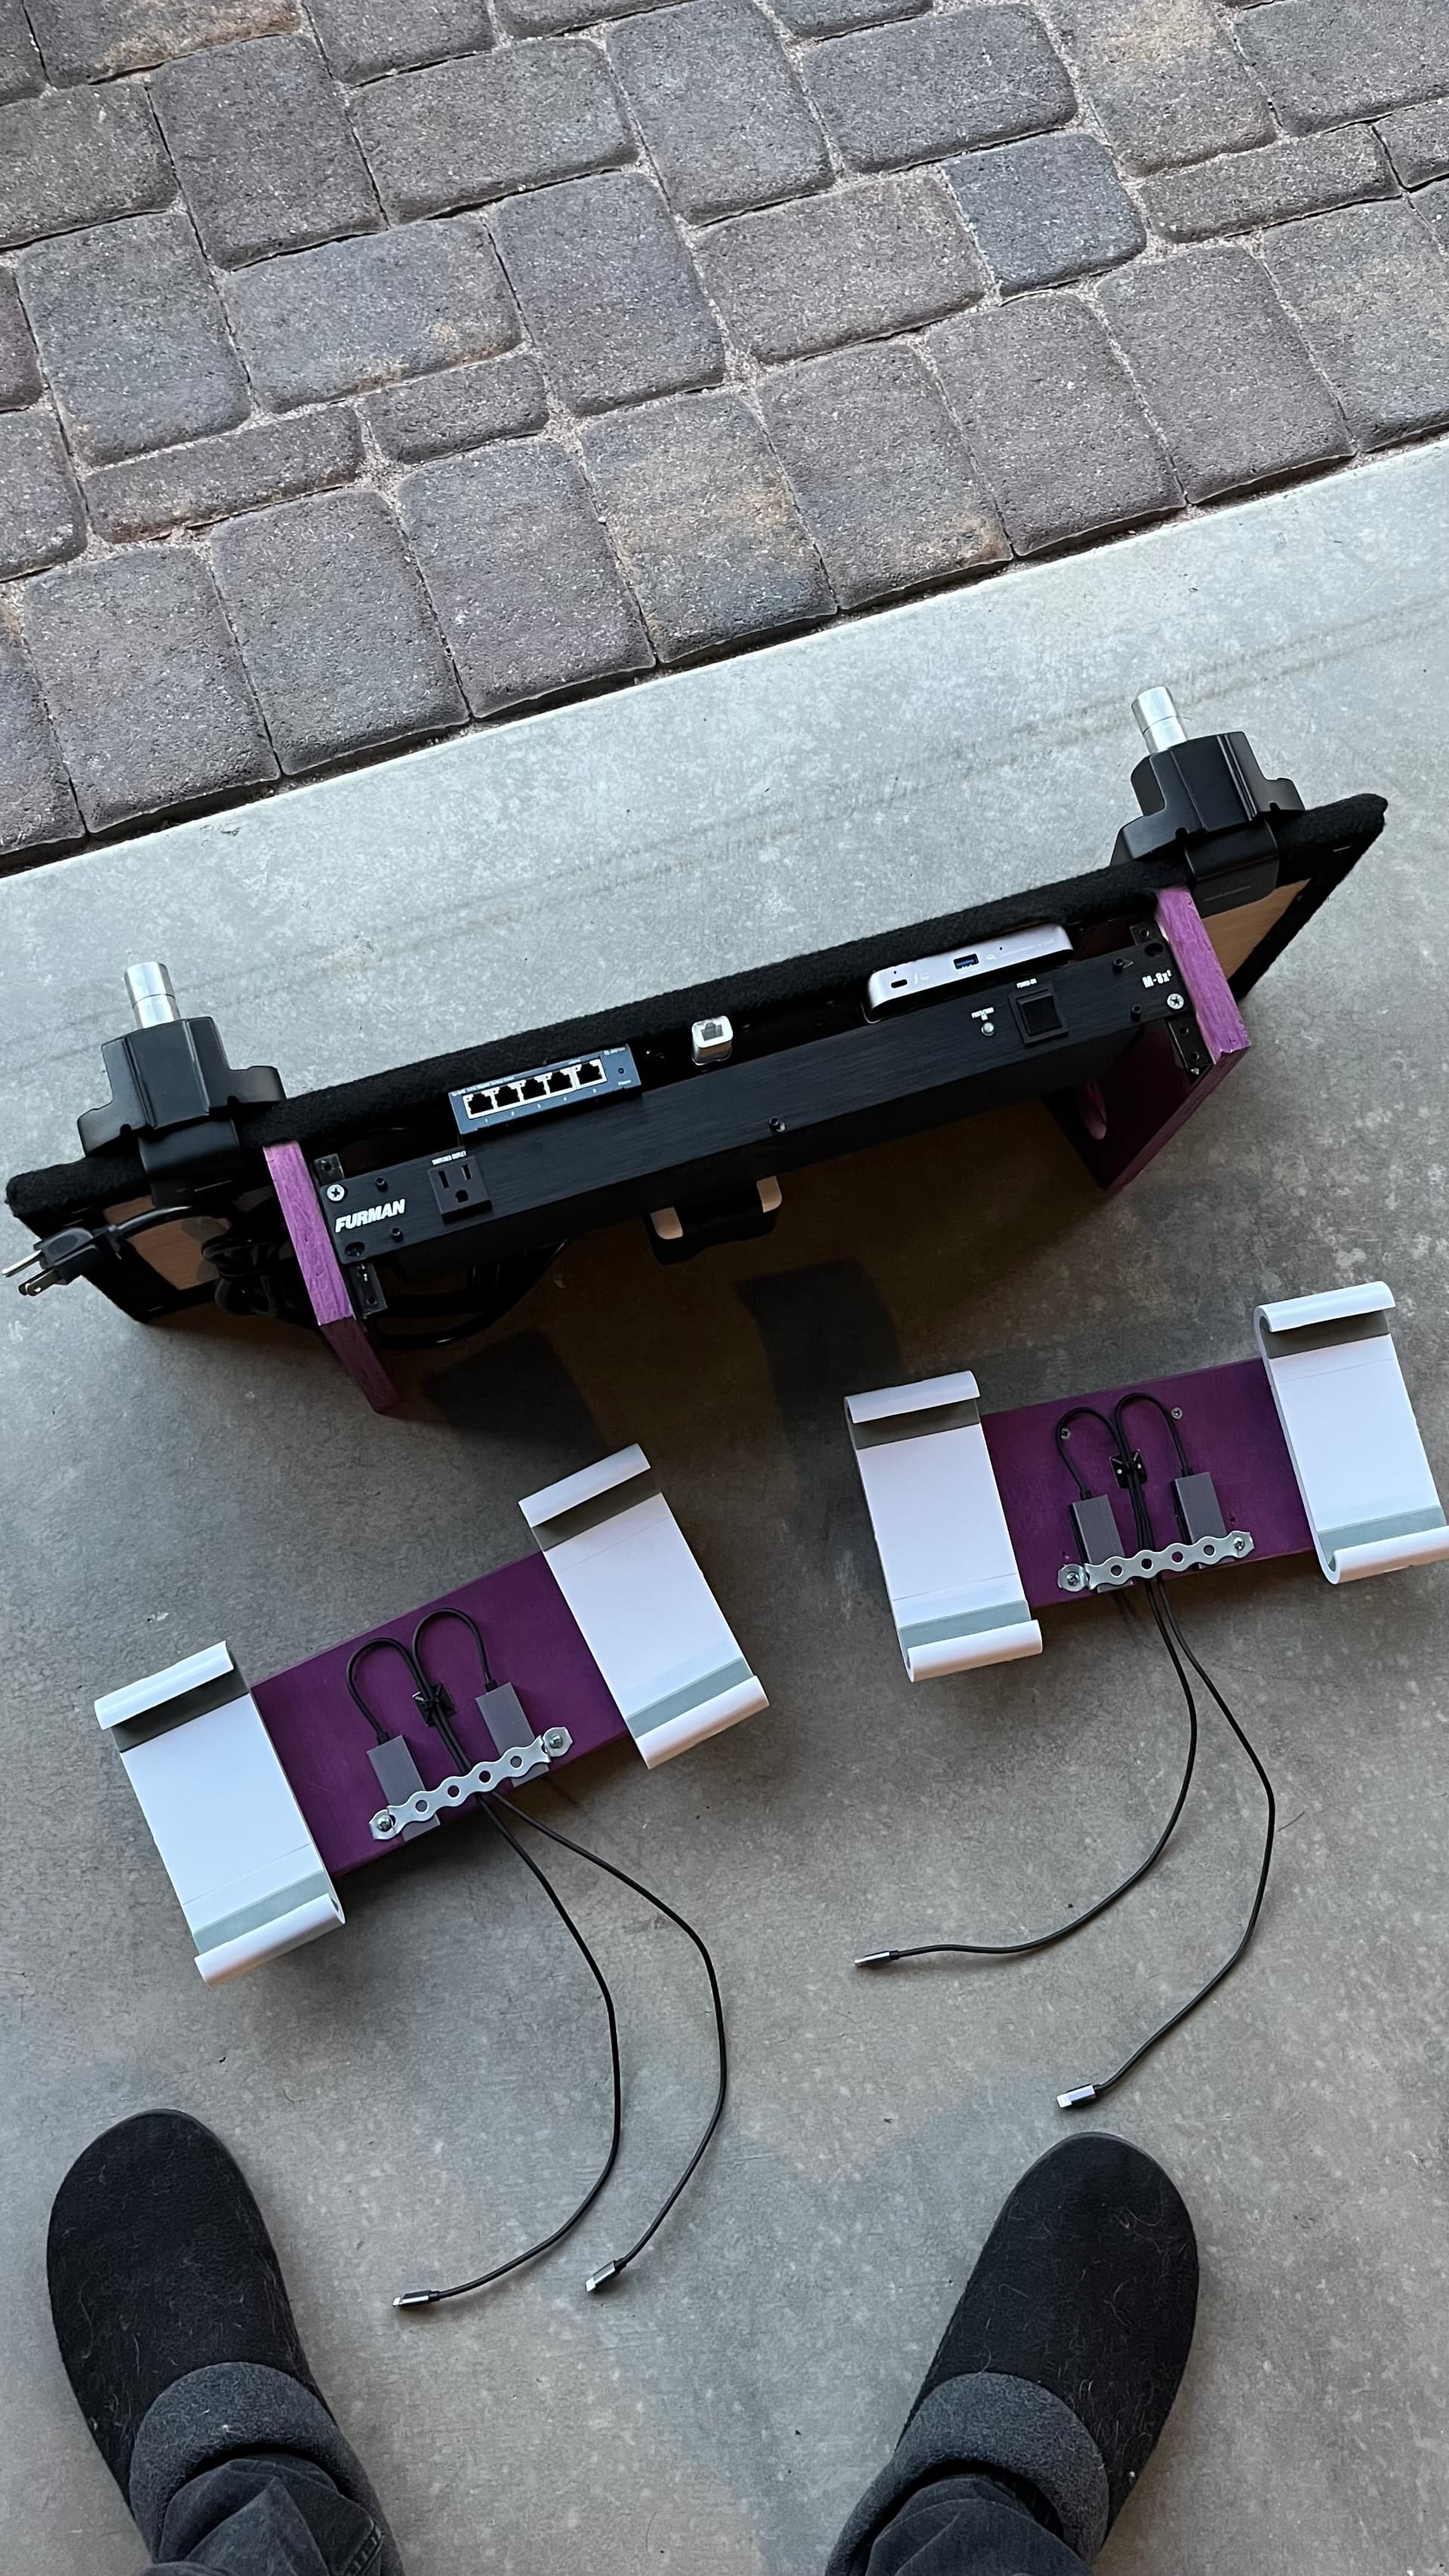
I added several monitor arms to hold my laptop and iPads. I designed these custom mounts that house the adapters as well. The mounts themselves are usually meant to mount a tablet to a wall. These particular monitor arms are tool-less, they can be taken apart in less than 10 seconds.
And this is about where everything is at currently.
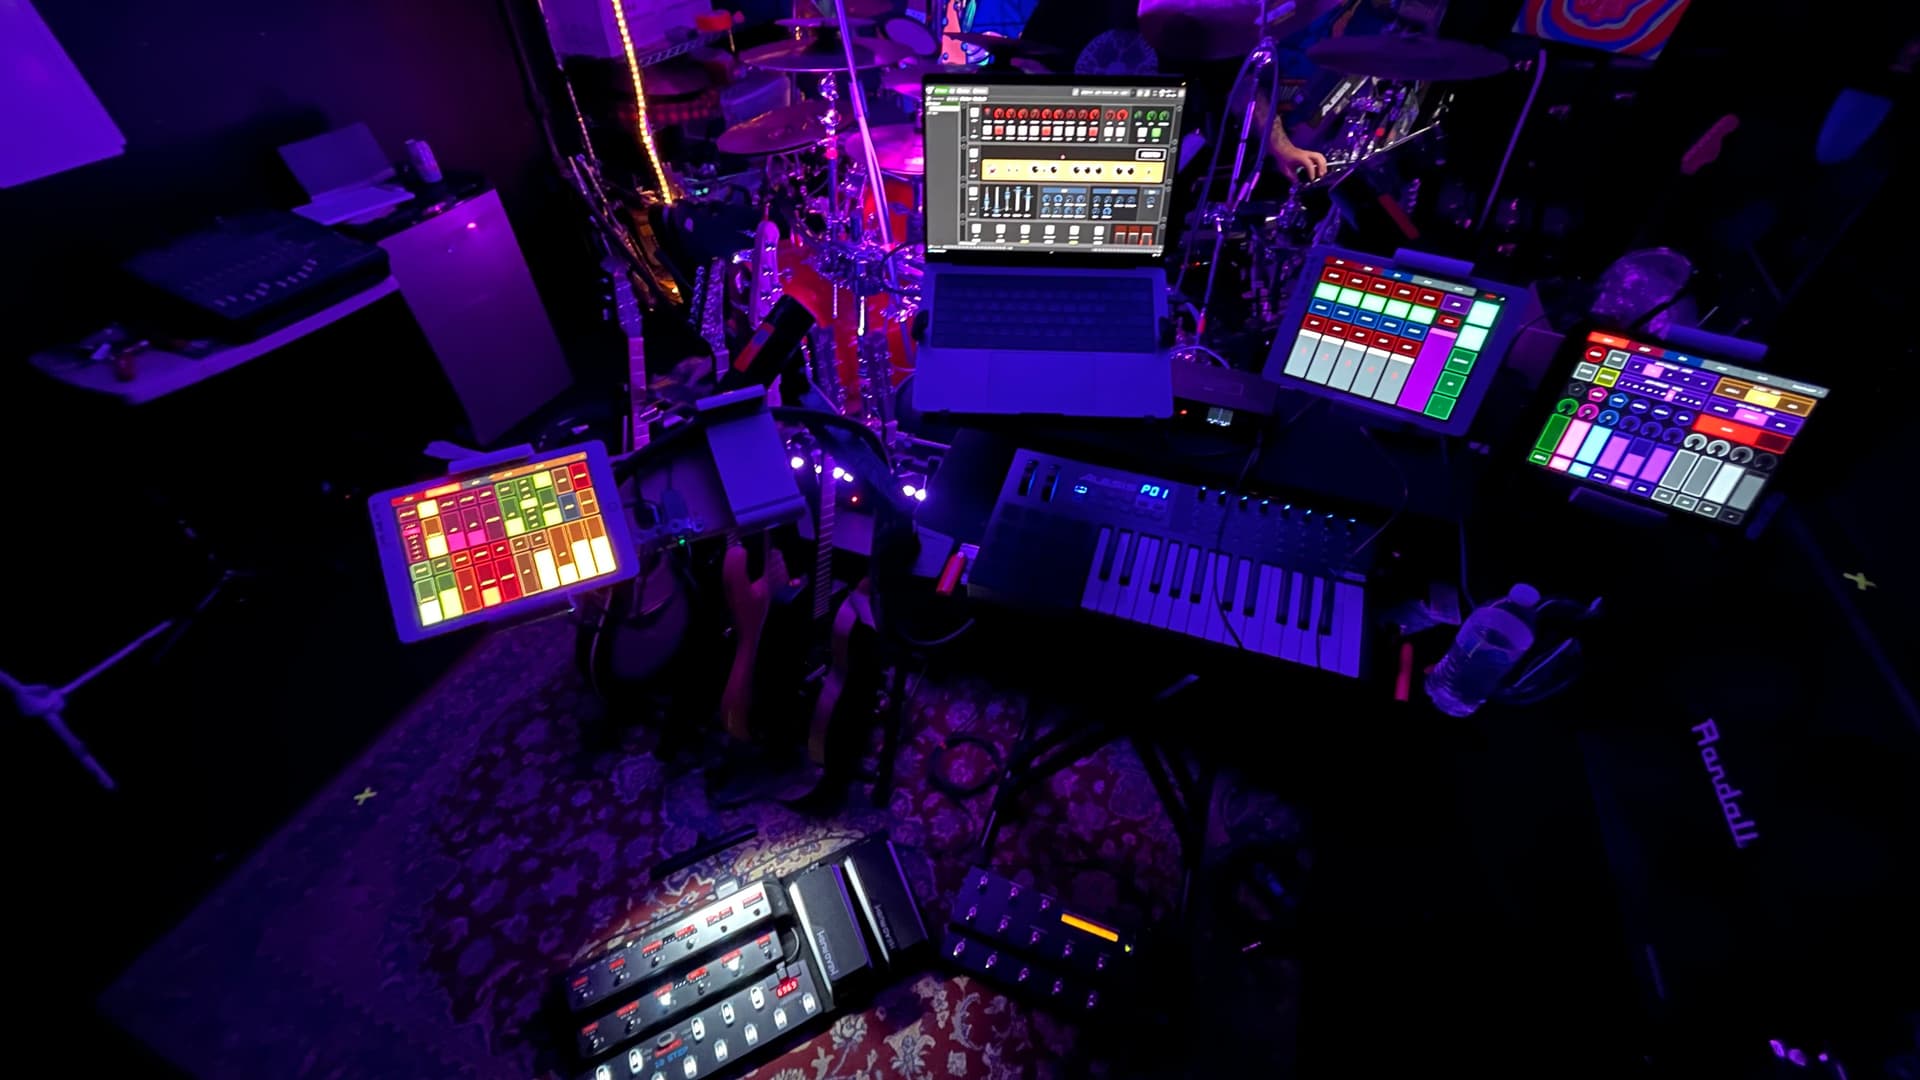

You can see it’s still a work in progress. In the last pic, I just have it on top of our studio mates cabinet. I’m still debating where to go next. The goal is to keep making this as efficient as possible, and as easy as possible to transport. I’m leaning towards building it all into a taller 16-space rack, for expandability in the future.
One thing I didnt mention is that during all of this, my drummer Tim was going through a similar process. We built him his own GP rig, and it is connected to mine over Ethernet via AVB. That’s a whole other discussion though…
THIS CONCLUDES MY EGOTISTICAL RAMBLING
MY CURRENT SETUP
To recap all that nonsense, I’m focused on making everything as quickly as accessible as possible. If I have a sound in my head, I need the least amount of resistance to get there. No clicking through pages, no menus, etc.
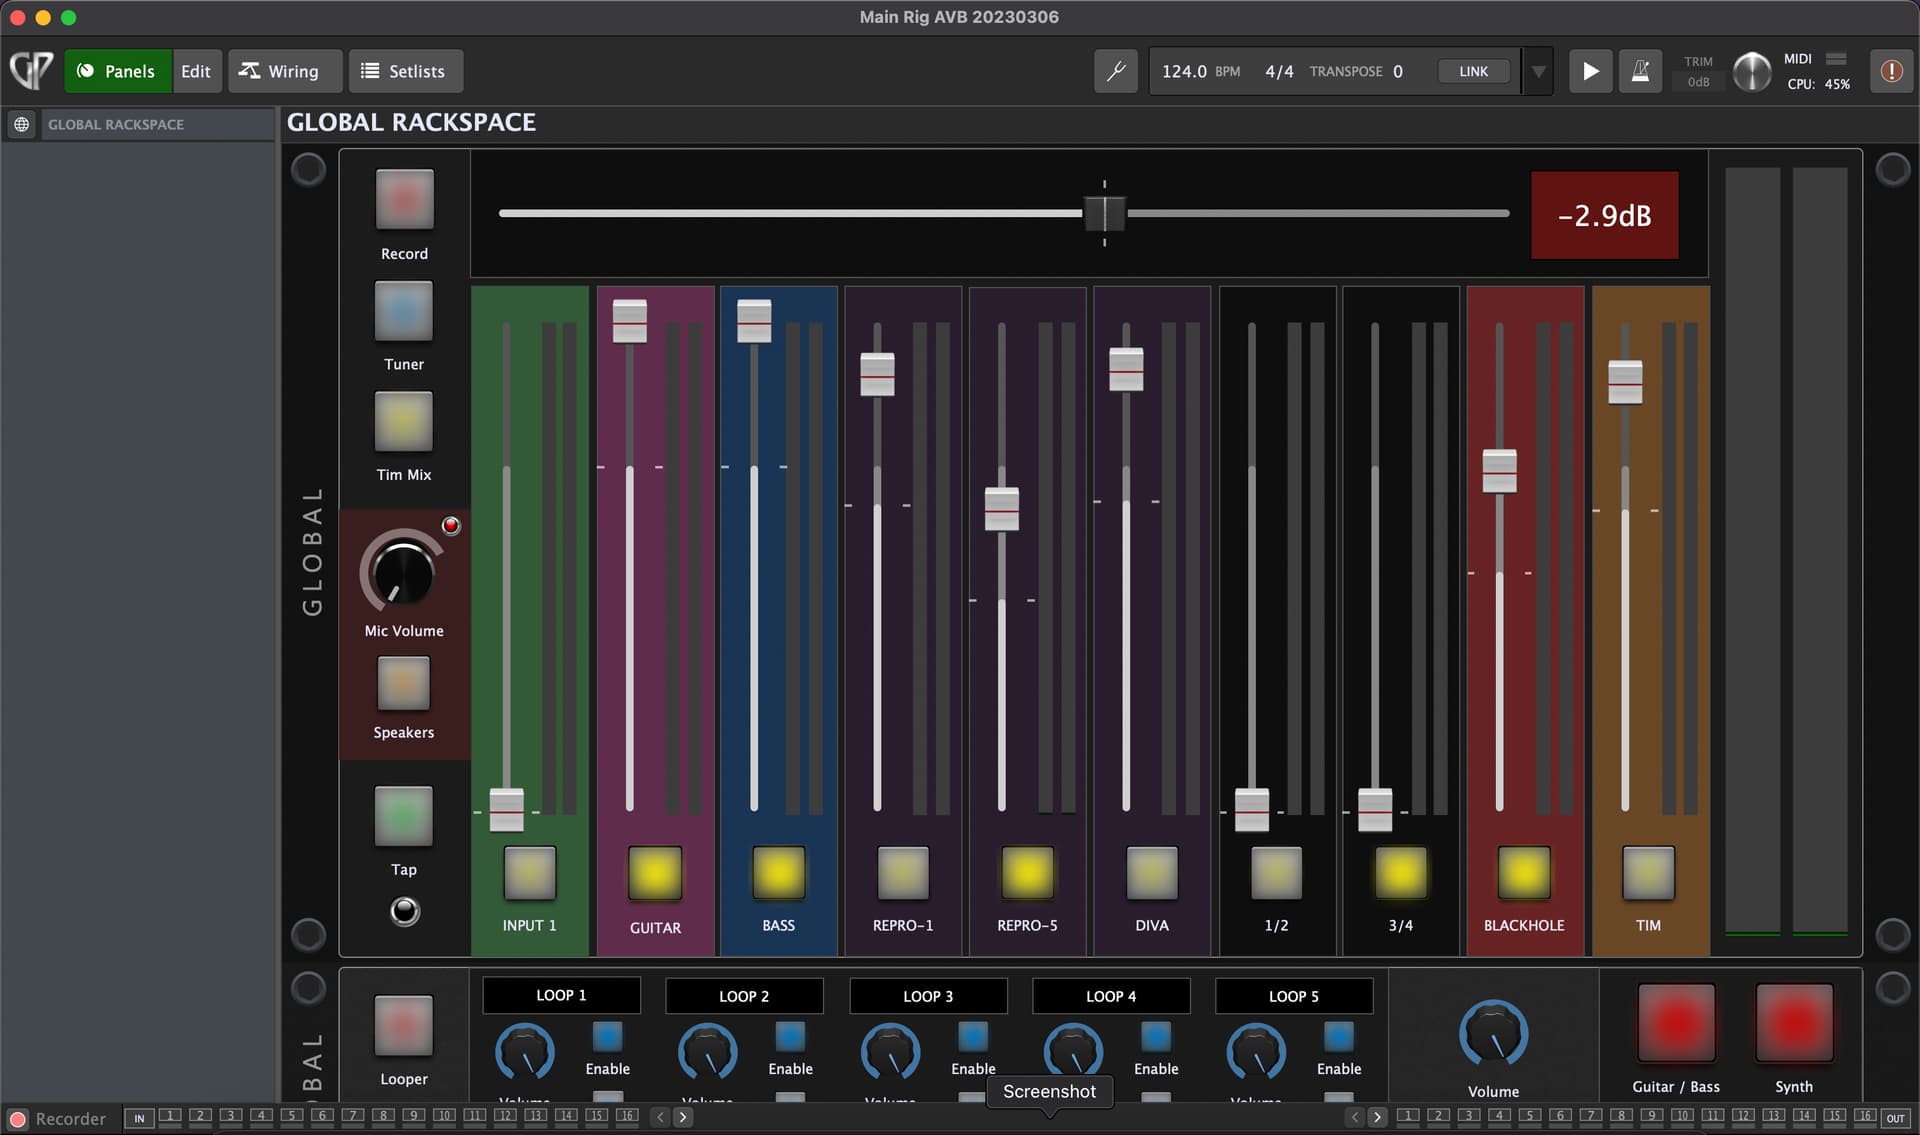
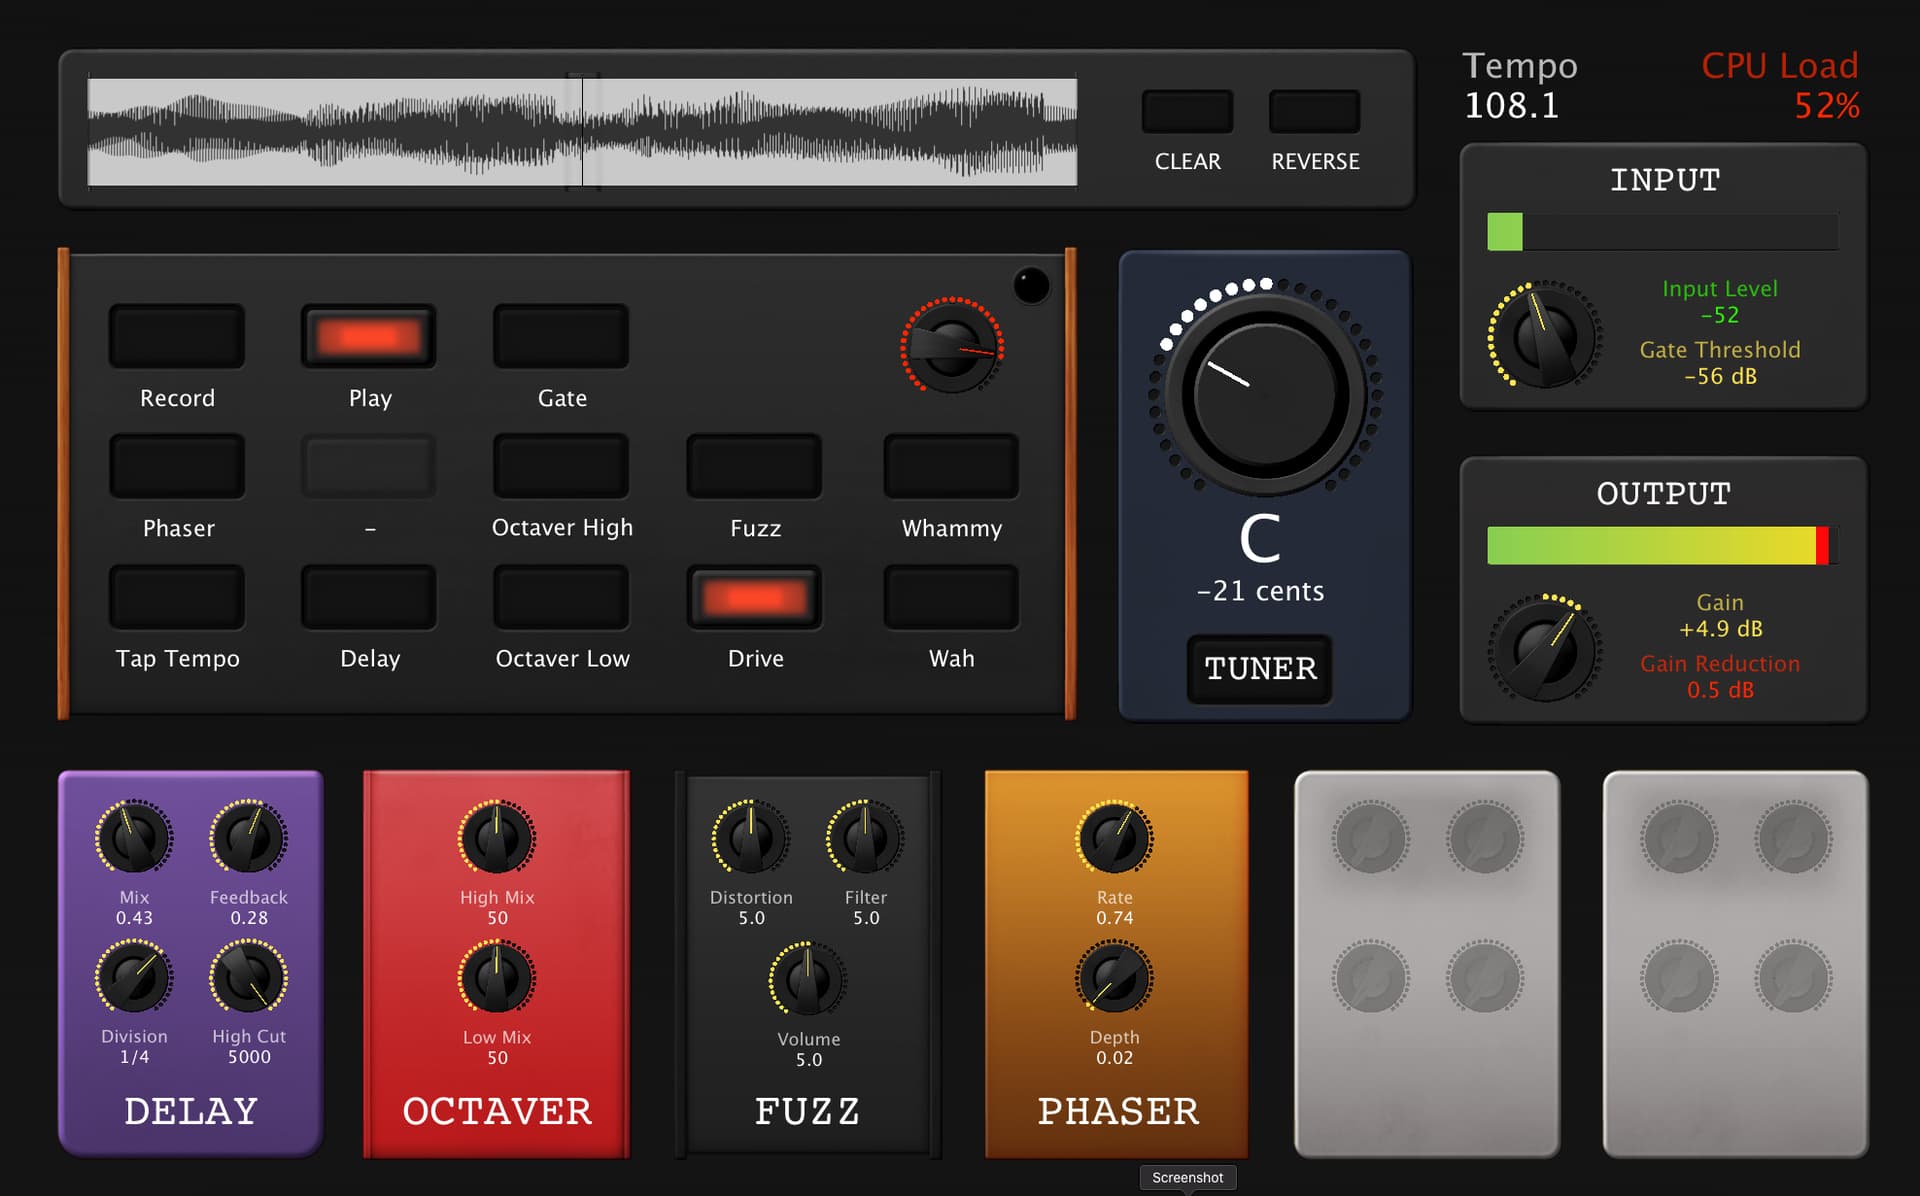
My global panel is where I usually have GP open to. If I’m without my rig and an iPad, these are usually what I need to adjust. (I should note every single thing you see in the panels view is controlled via a controller somewhere else) This page is basically my in-ear monitor mix. The volume of my guitar, synths, and Tim are all controlled from here. I also have Blackhole running INTO GP, allowing my to play along to things on my computer and mix it perfectly. The big fader at the top is a master volume for everything. I have a button to record everything Im hearing. Just press to record, press to stop. I also have a button that turns on and off the laptops speakers. Great for working on things when I dont have my interface.
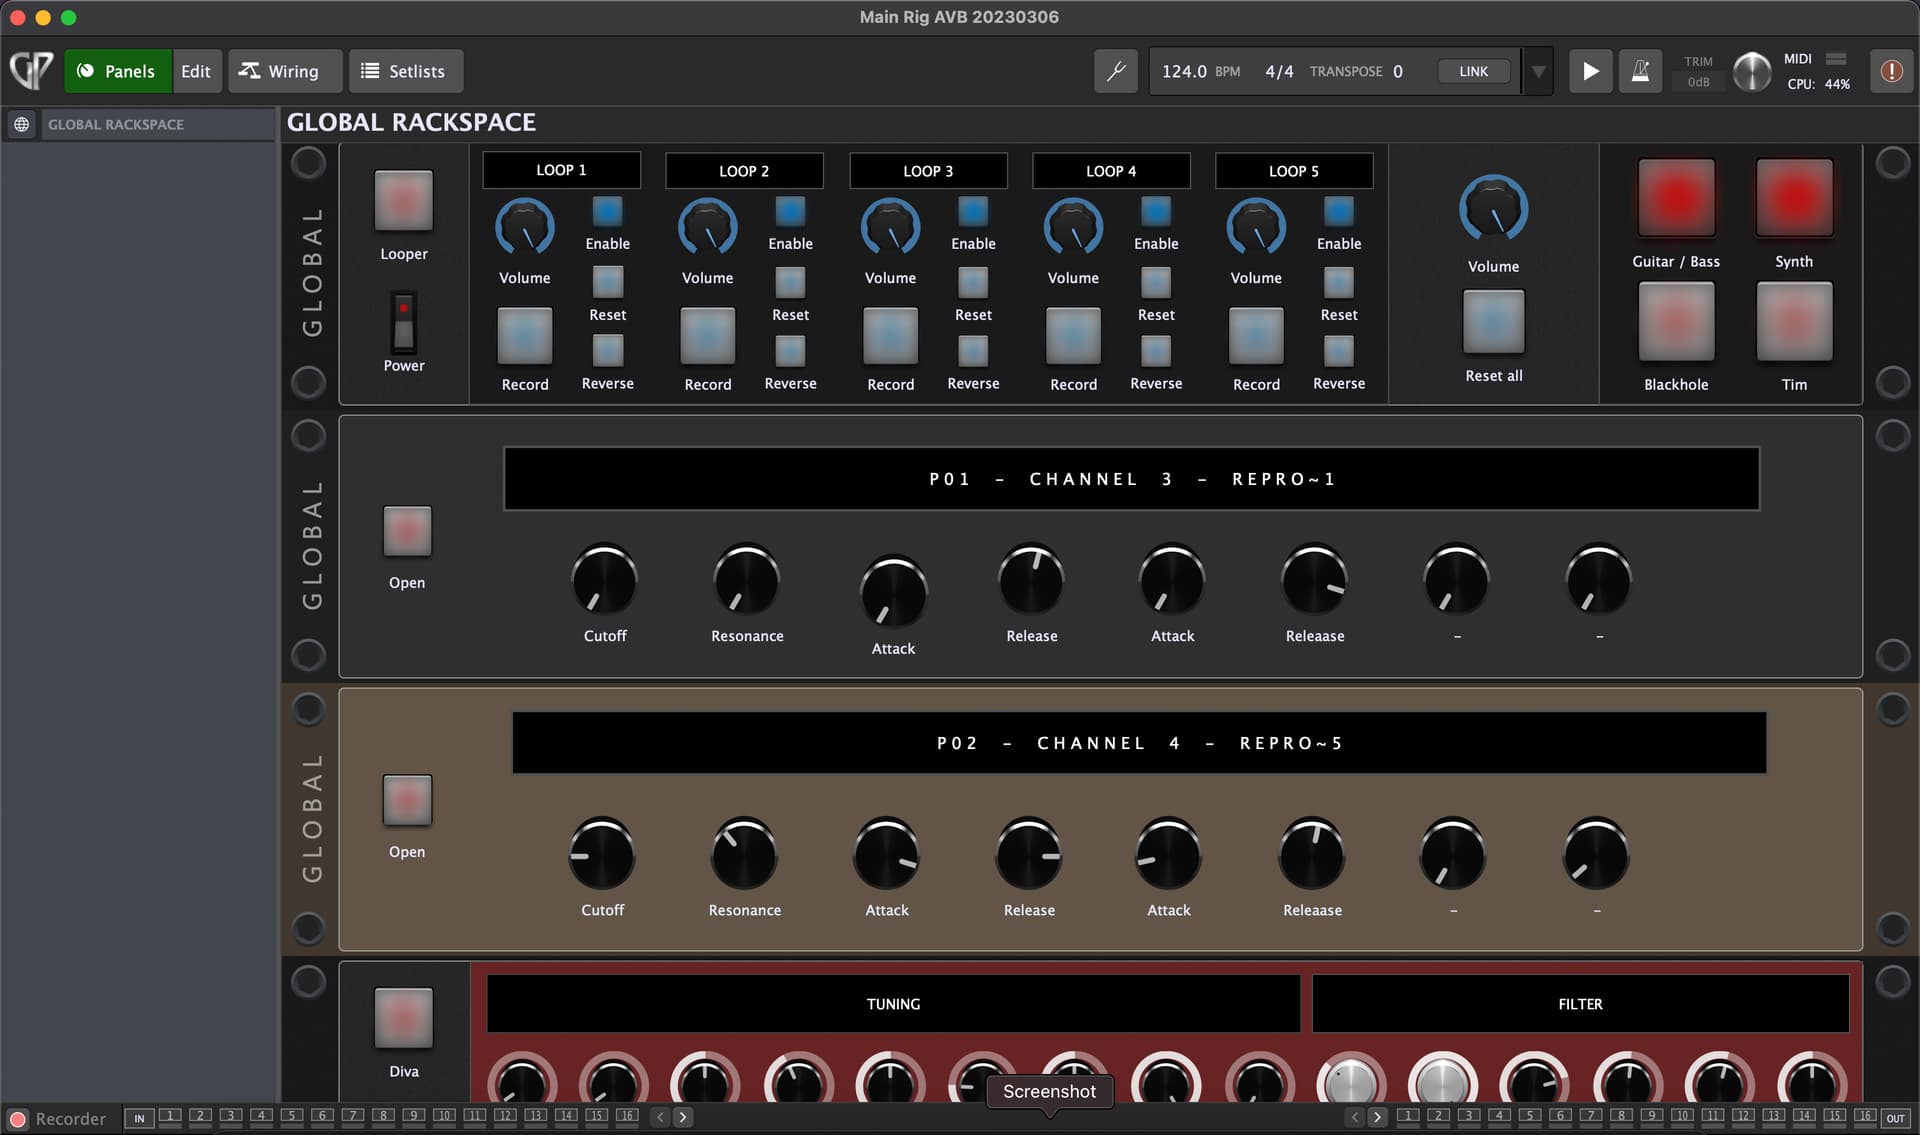
Under that is the looper, and some controls for my synths, currently a work in progress. A fun thing I did with the looper that only GP could provide… I split off the looper from the main output. So it’s getting a duplicate signal. Then, in the looper, I have the dry signal set to mute. So basically, audio is going into it, but not out. Only the “wet” loops will output. Before the looper however, I added a mixer. I made channels for my guitar, synth, blackhole, and Tim. This allows to to selectively mute and unmute WHAT I want to loop. For instance, I dont usually want to loop Tim… so even though I’m hearing it, the looper does not. It’s most frequent use is for me to be able to loop the guitar, but play my foot synth without the synth being looped. Very useful.
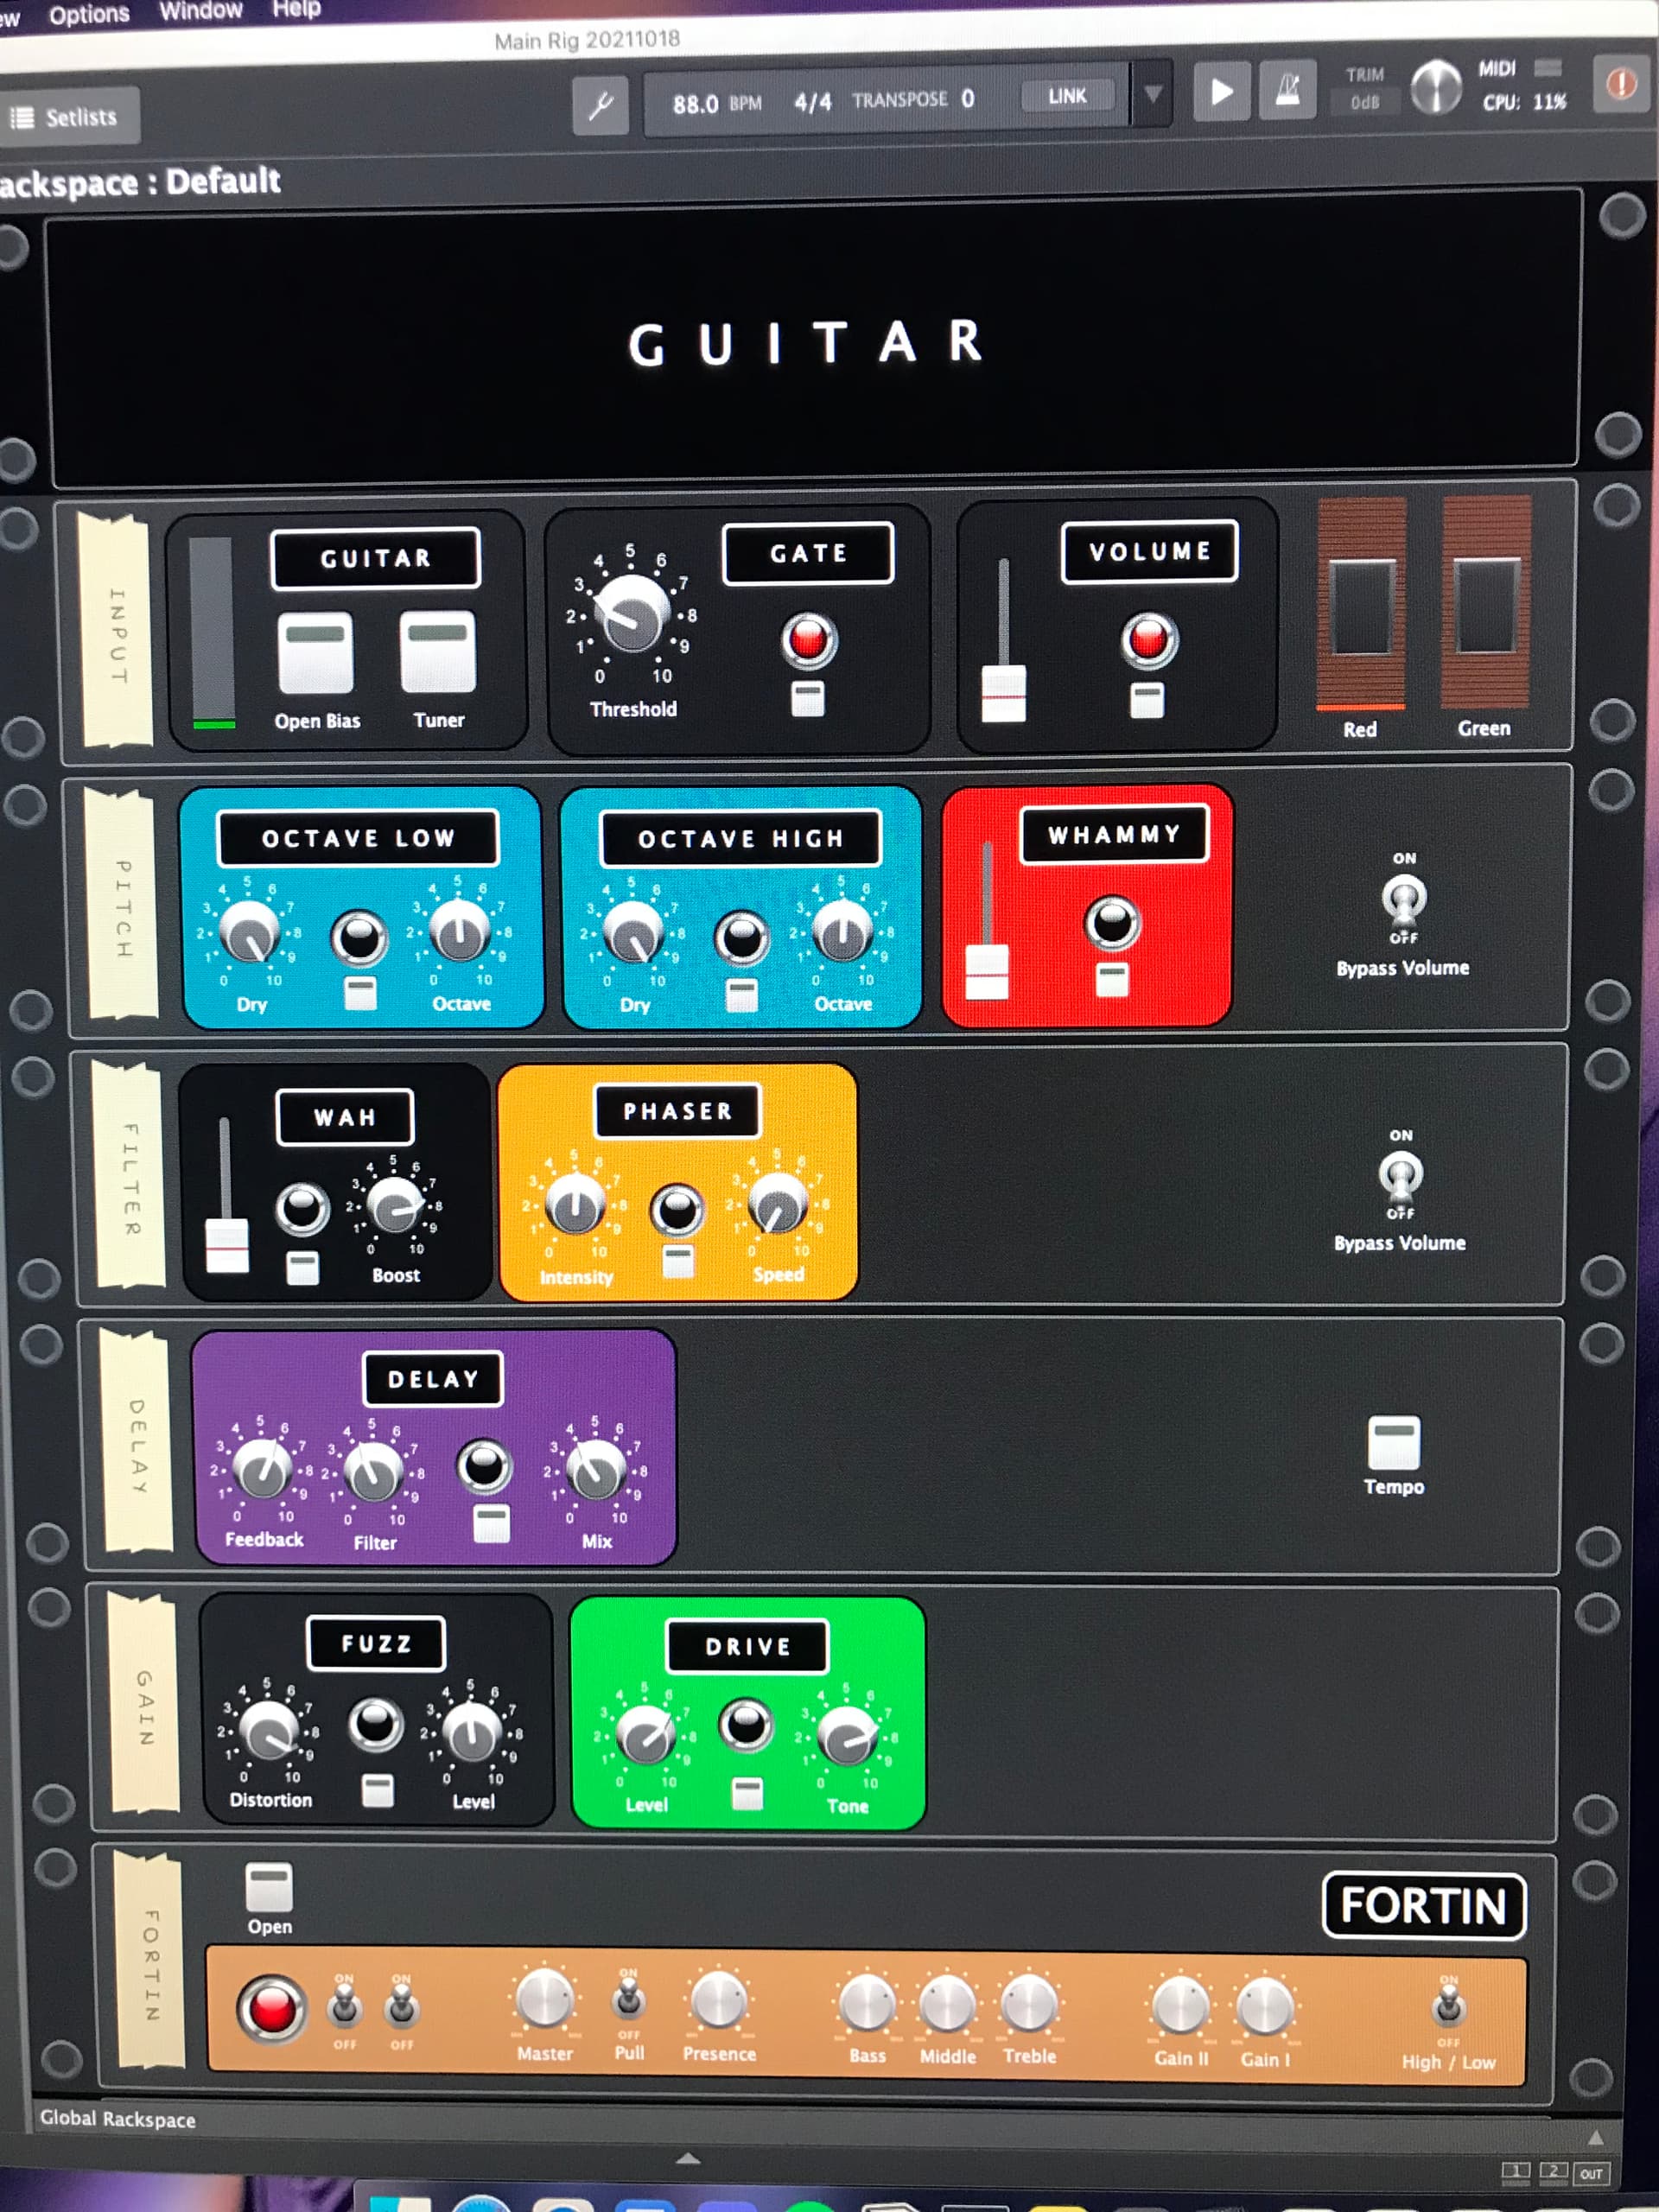
On the rackspace side of things, I have 2. One for guitar and one for bass. No presets.
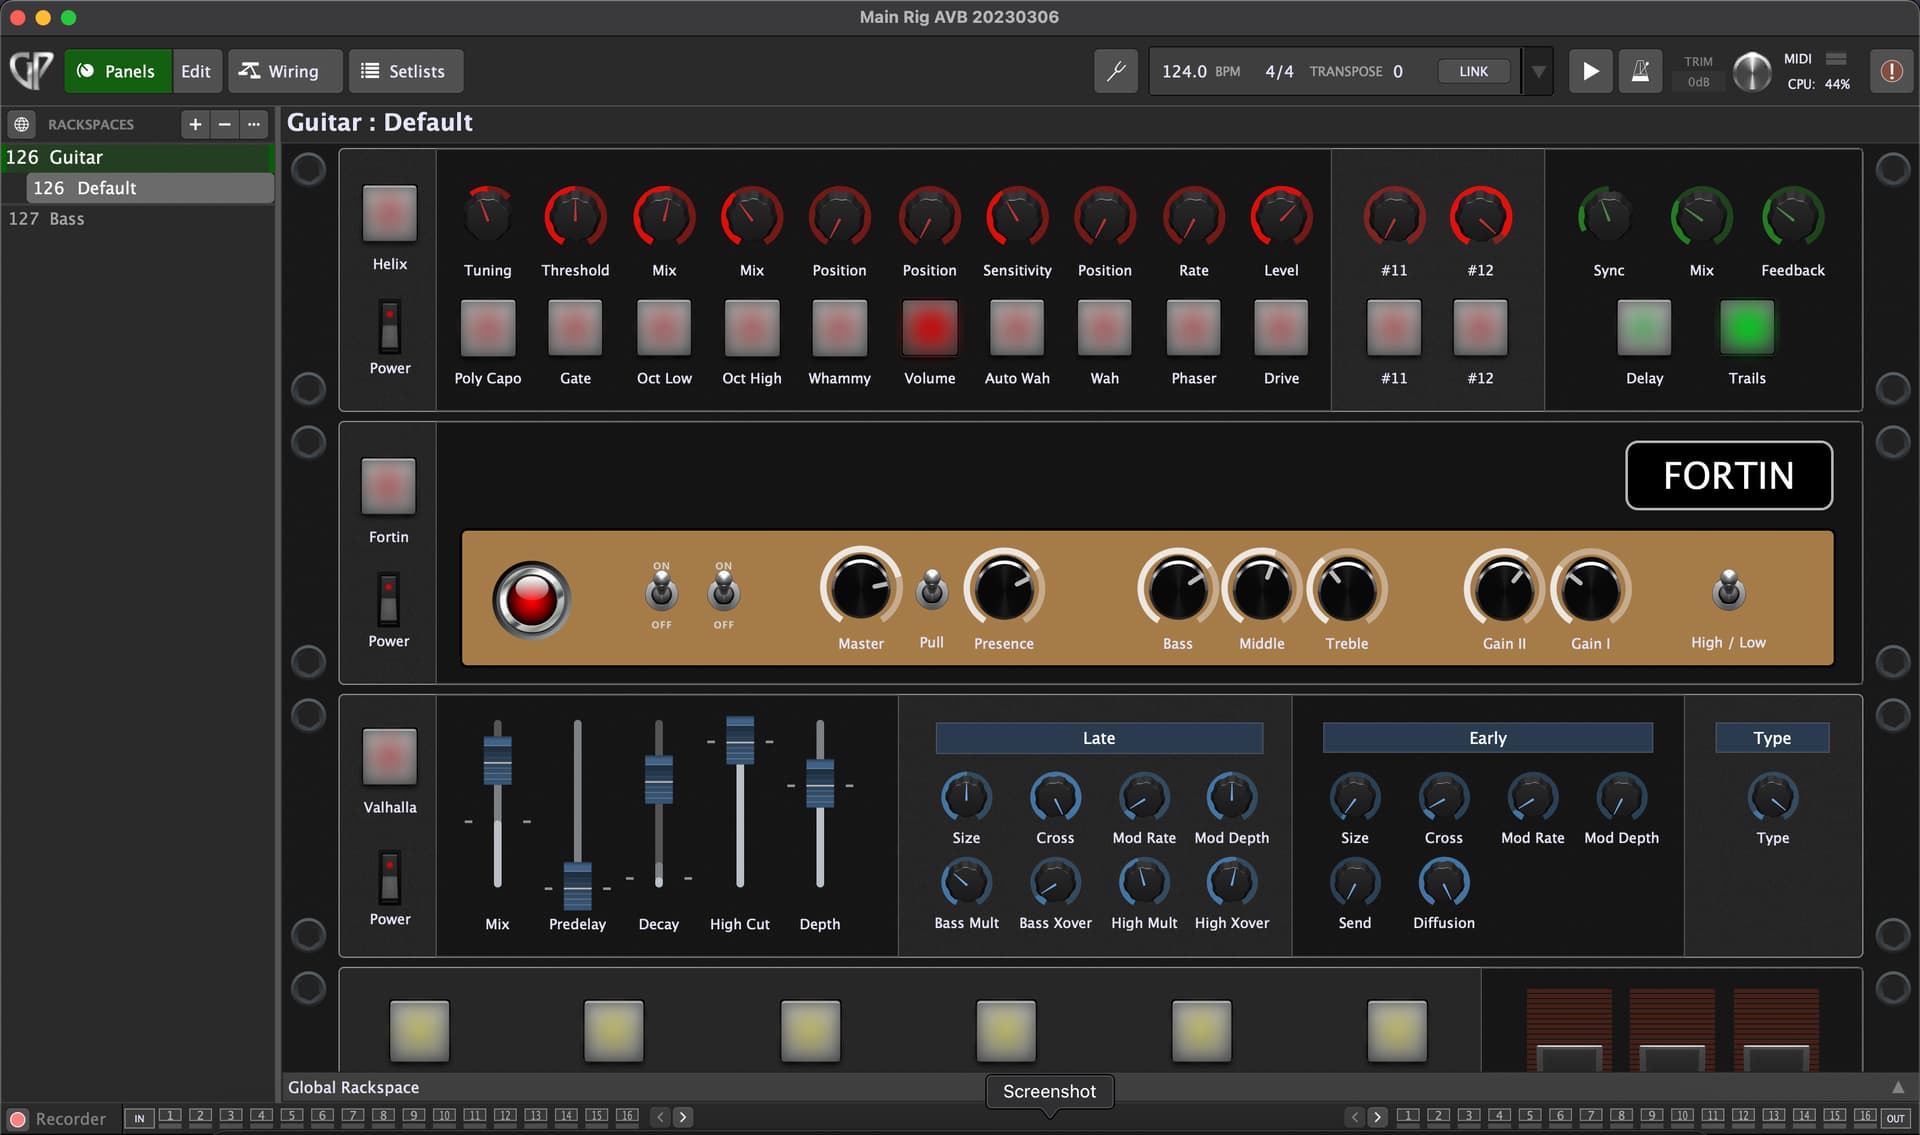
The top rack is the most used controls; my effects. This controls my instance of Line 6 Helix, which I use for all my pedals. Below that you’ll see my amp, reverb, and pedalboard assignments. Again, all controlled via TouchOSC and my pedalboard, but still easily accessible when Im without my rig.
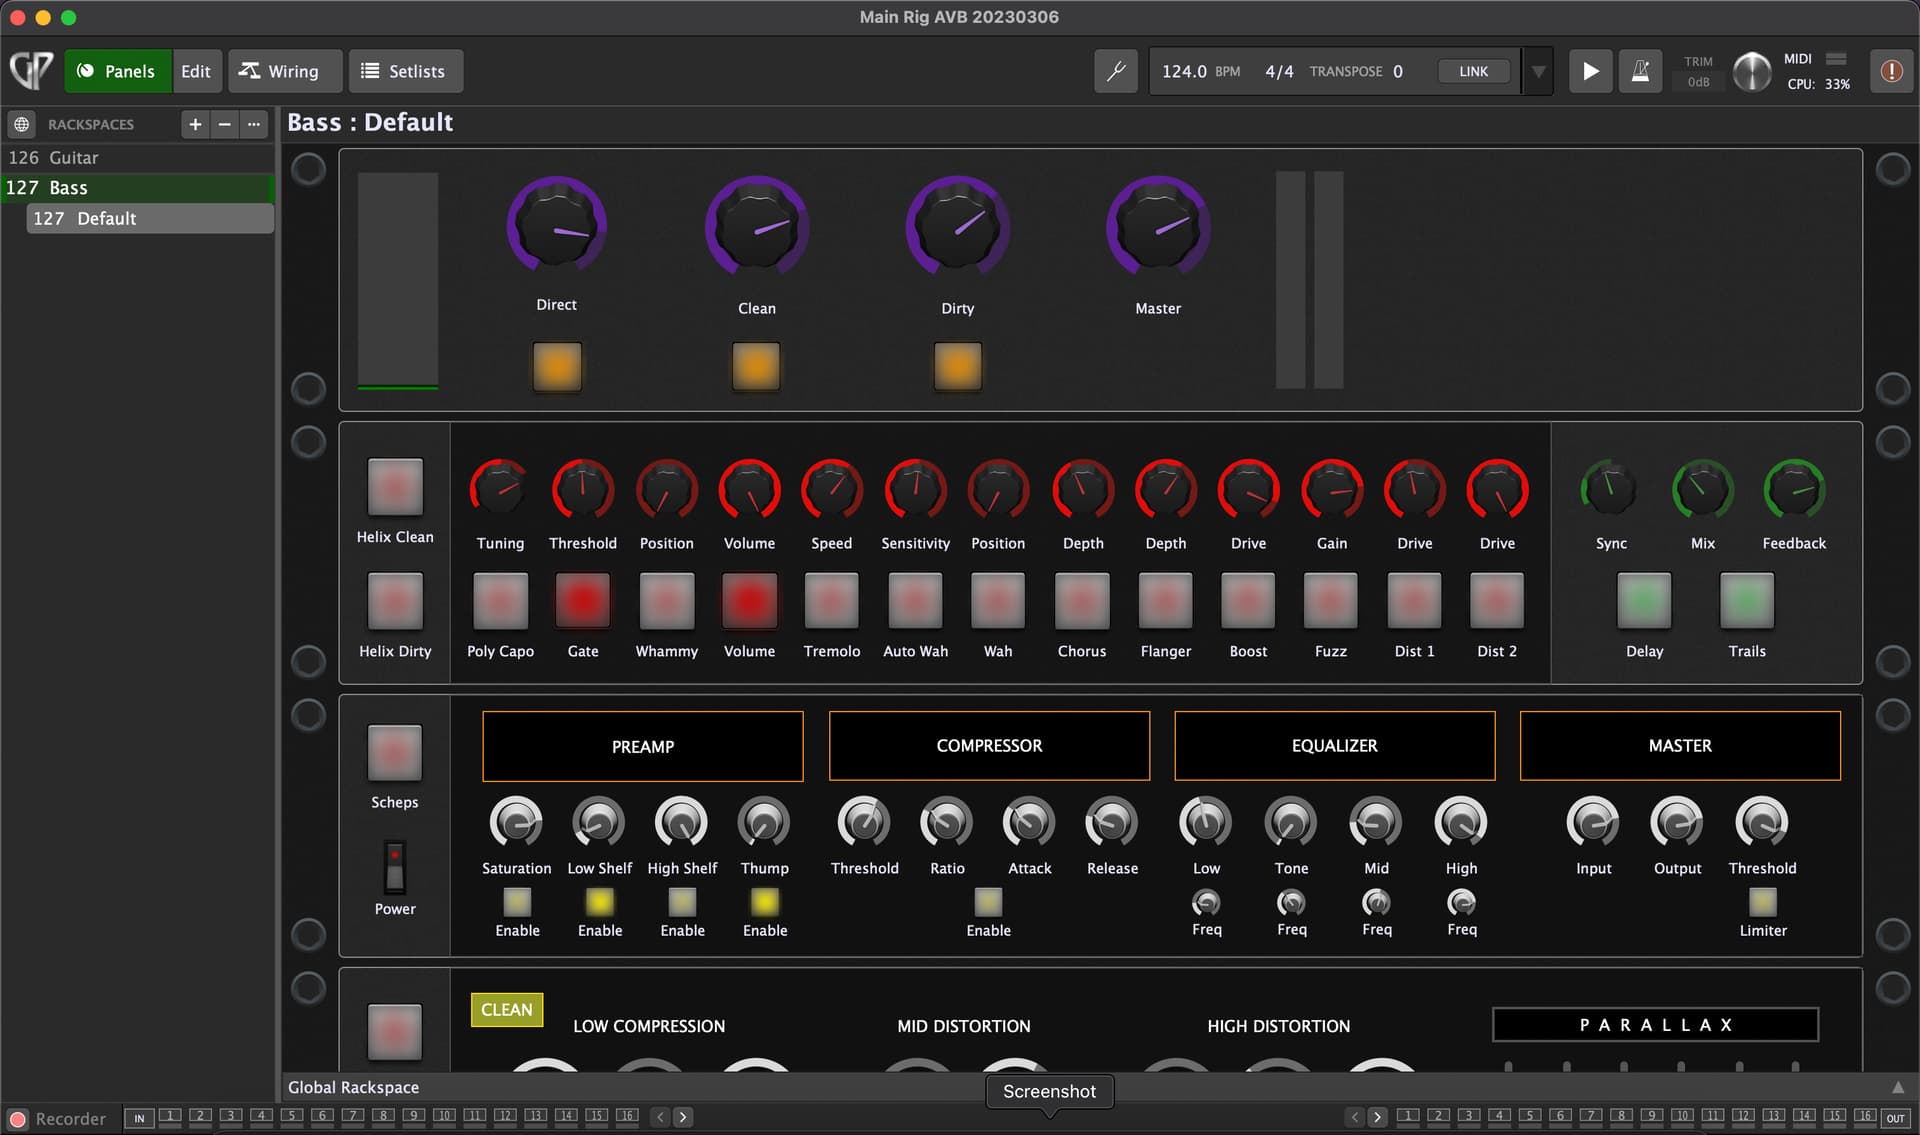
In another rackspace I have my bass rig. Very similar to the guitar rig. Helix for the pedals and NeuralDSP Parallax for the amp. I use rackspaces in this way because it allows me to change what my controllers control. This allows me to use one controller for both my guitar and bass rig. When I switch to the bass rackspace, my pedalboard reflects it immediately. Instead of having to use half of my pedalboard, or build a separate one, I just have my one board. On the board, each button is labeled for both it’s guitar assignment and bass assignment.
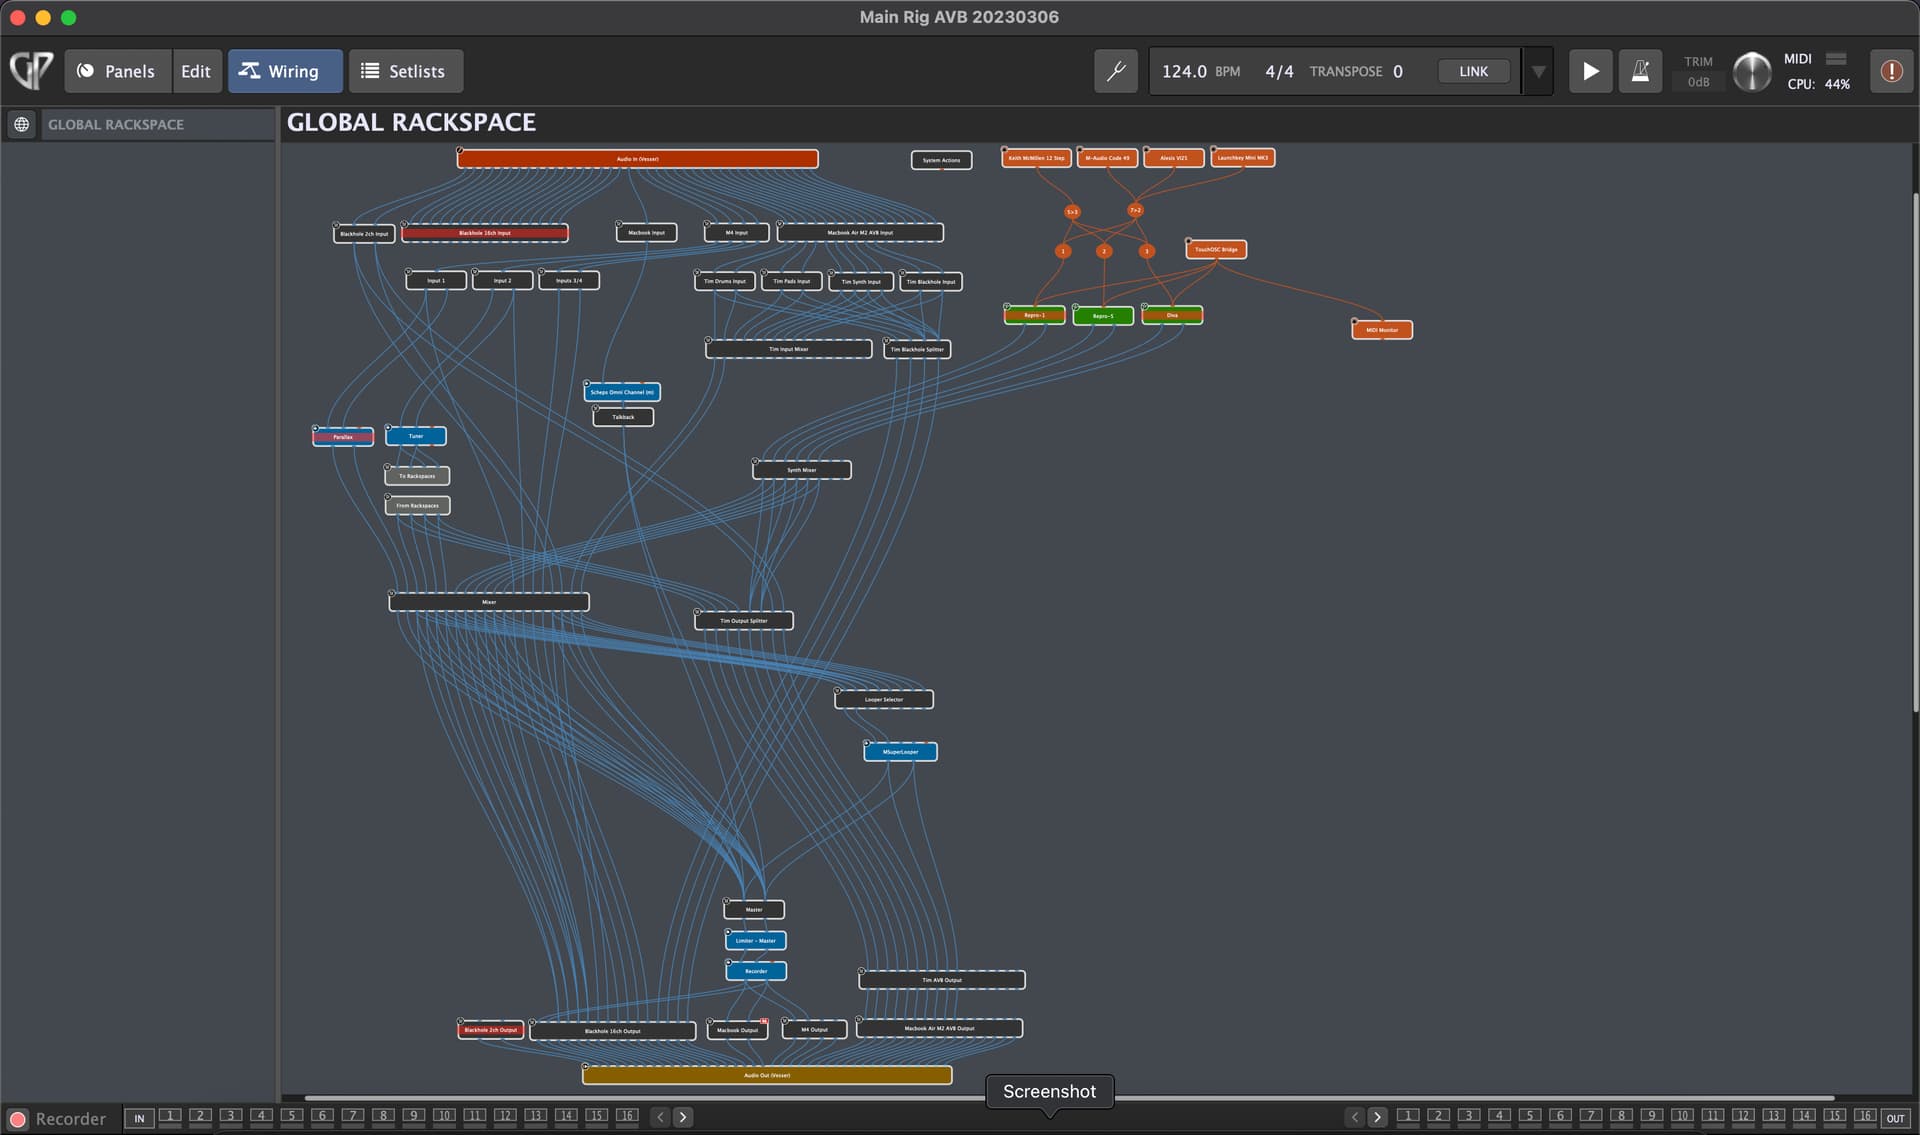
This is a shot of the global wiring, which contains 99% of the rig. The game changing thing about Gig Performer is this wiring view. I mean, I just literally cant do this in other programs, and certainly not as intuitively and easily. There’s so many asterisks with the signal flow. I need one thing going here, but another thing going in a completely different path, and spitting back into another path. For instance, I have my main output, but I also have some isolated channels going to an instance of Blackhole 16, for internal recording. But not everything is going to the Blackhole. So to be able to selectively split the signal like that is so necessary. Again, couldn’t do it any other way.
I think I rambled enough. I told Brett I’d write this a week ago. Below I’ll list all my gear. Here’s a link to all the images, my GP file, and a few other images. I’ll check here occasionally to answer any questions you may have about my rig, or to help you with your rig.
https://cameronwinters.com/cameron_winters_gp_rig.zip
MY PLUGINS AND GEAR
Hardware:
Apple Macbook Pro 14
Apple iPad running TouchOSC (x4)
Motu M4 interface
Countryman DI
Alesis VI25
Blackstar LiveLogic foot controller (x2)
Headrush expression pedal (x2)
Keith McMillen 12-step foot controller
Line 6 FBV2 foot controller
Tech stuff
OWC Thunderbolt dock
Apple Ethernet adapters
Netgear Ethernet swicth
Uni USB hubs
Furman power conditioner
Software:
Gig Performer
Logic Pro X
Existential Audio Blackhole
TouchOSC Bridge
Plugins
NeuralDSP Fortin Nameless
NeuralDSP Parallax
Line 6 Helix
ValhallaDSP ValhallaRoom
Melda Productions bundle plugins (EQ, compressors, etc)
MSuperLooper
Synths
u-He Diva
u-He Repro 1
u-He Repro 5
Guitar
Gibson Explorer and Les Paul guitars
Sterling Stingray bass
Mogami cables
Daddario strings
Seymour Duncan pickups
Graphtech hardware
SKB cases
If you want to see all this in action, you can checkout my band Vesser’s first release, a cover of Puscifer’s Bullet Train to Iowa.
https://www.youtube.com/watch?v=pzOMH4QZDCY
And if you want to know more about me or get in touch, you can go to my website.

