You might have read my little horror story from the trenches in this thread; ![]()
Beware of dads with piano playing daughters ![]() - Stories from the Trenches - Gig Performer Community
- Stories from the Trenches - Gig Performer Community
The good thing that came out of this, was me rediscovering that my Keylab in fact have three banks of controls. Having thought lately that I had a little to few controls for things I wanted to do, even thinking about purchasing some extra control surface, this was a great rediscovery.
One bank consists of 9 encoders(knobs), 9 faders and 9 buttons. So with getting all three banks connected to GP, I would have 27 knobs, 27 faders and 27 buttons. Now we’re talking ![]()
I started out setting it up. I ran into a few hurdles, but nothing serious. Just wanted to make a little walkthrough for others to save some time searching for what may be wrong when they hit those hurdles.
- Started by thinking about the naming of the extra controls I would get. I had already set up the controls I’d learnt in Rig Manager as KM1 to KM9 for my knobs, FM1 to FM9 for my faders and BM1 to BM9 for my buttons. (The M just tells me it’s my Main keyboard rig.)
Should I call my new knobs KM10 to KM27? While I’m perfectly able to subtract 9 or 18 from a number to find out where those new knobs where to find horisontally, it would be a much nicer solution to set it all up as a matrix, the knobs in the first bank being named KMB1-1 to KMB1-9, the knobs in the second bank being named KMB2-1 to KMB2-9 and so on.
But, but; How much work would it be changing those names in the Rig Manager?
Relax! Rig Manager is really your friend. I’m so glad I went for using it some time ago! You just have to click the three dots to the right of the control alias you want to change to find a rename option. And, the best thing of all; After having done all the renaming you want to, hit the Apply and Save in the Rig Manager window. This updates the control associations in all the widgets where the old names have been used. Nothing more to worry about.
-
Next; Found out that the bank 2 button had been down when earlier on learning the controls now named to belong to the first bank, the KMB1-1 and so on. Not really a big problem, but wanted to keep a good sytem in things so decided to relearn those controls.
Again; With the Rig Manager this is done very quickly. Just took me a few minutes to double click my way through the list of aliases and moving the controls to get this done
-
So, onto the task of learning the rest of the controls. I expected this to be straightforward. However, already at the 6th knob in bank 2 I ran into a problem. It would absolutely not accept learning it to CC40. Don’t really know why. However the real problem occured when I should learn the buttons in bank 2. They would not learn at all. Set up a MIDI monitor in GP and found that those contols where not set up with unique values from Arturia’s side. In the default Arturia setup, the faders of bank 2 and 3 share the same CC values and the buttons of all three banks share the same CC values. What to do?
First I started out looking for undefined CCs, But found that with all the contols I needed to learn, I’d be two free CC’s short ![]()
Then I suddenly thought of the obvious solution, that I maybe ought to have thought of in the first place. I could just use different MIDI channels for the different bank. So, I decided to use channel 4 for bank 2 and channel 5 for bank 3. I decided to change the CC values so they where the same for the corresponding controls in bank 2 and 3 as in bank 1.
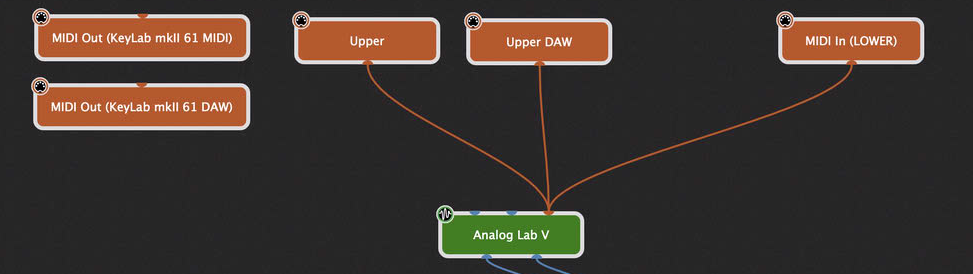
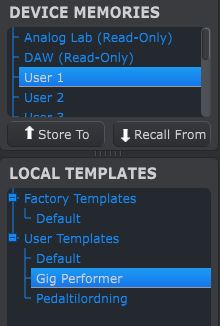
- To get the above done you have to enter the Arturia MIDI Control Center. I advise, as you can see I have done in the below picture, to make your own template for Gig Performer. You do your changes in this template, then store it to a user memory. That user memory will show up with Gig Performer as it’s name in the Keylab display.
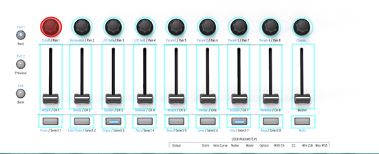
You just click the control you want to set CC value and MIDI channel for, like I have chosen Knob 1 in the picture below.
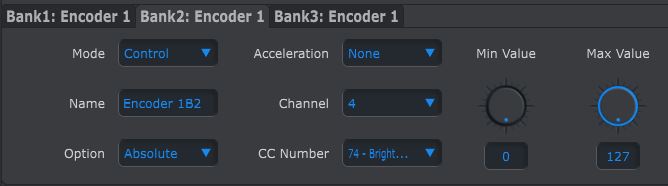
Then do the changes as in the following picture, in the Bank 2 and Bank 3 tabs, in the Channel and CC Number fields. Remember saving your settings ![]()
After this, the learning of the controls went smooth. Just remember pressing the different buttons to the left of the controls in picture number 2 above to choose the right bank before learning.